Monthly Archives: September 2007

Country-Style Christmas Tree

I love a country-style Christmas! Real tree, home-cooking, hand-crafted gifts and decorations. There is something in me that just loves old things. That’s a good thing as I live in a century old farmhouse. It blends right in. Works well for a large family too. I just can’t see trying to raise 5 kids in an ultra-modern design…all that stainless steel, glass and mirrors? I don’t think so! LOL

And so, when Flourishes released this darling O Christmas tree set, I knew I’d love it. Just like their Cake Decorating 101 set, you can decorate it to your hearts content! 🙂

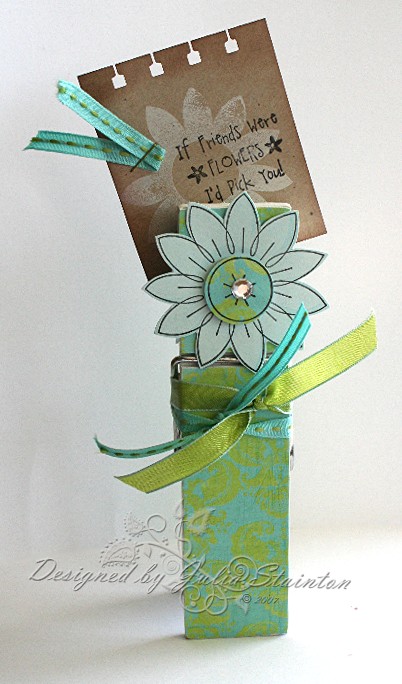
Country-style Christmas Tree

jks-country-copic-tree.jpg

Now if you’ve been reading my blog for a while, you’ll know that I love taking themed patterned paper and using it for a different purpose, just to shake things up a little. I love challenging myself and this is also a good way to use up paper…. but don’t talk to me about that! LOL I can’t help but keep buying it! 🙂

This design uses the new Basic Grey Mellow line of paper. I always love buying the 6×6 paper pads as they are just perfect for designing cards. They are exactly the same as the larger 12×12 papers only scaled down to 25% of the size. The colors of this Mellow line are so warm and homey. They are actually marketed as a Fall line but as you can see, I decided to see if they would work for Christmas.

To create the tree image, I stamped it with Palette Hybrid ink onto green patterned paper from the pad. Using my new Copic markers, I quickly sketched in the branches using two different greens. If you use a short sketchy style stroke, it really gives the effect of branches. To highlight the tree, I shaded around it with a soft yellow Copic marker and then sketched in a rough shadow under the pot.

To add to the country look, I curled up the edges on the central image and then added some copper hardware to the design. A Hodgepodge Hardware clip is at the top of the design and I used my Crop-a-dile to set the eyelets along the sides of the design. To finish it off I added a little scrap of ribbon, knotted and adhered with a glue dot, to the truck of the tree. It was a very simple way to add texture and dimension to the design.

Supply List:

Cardstock: Very Vanilla, Chocolate Chip, Old Olive – Stampin Up

Patterned Paper: Mellow 6×6 paper pad – Basic Grey

Stamps: O Christmas Tree – Flourishes

Ink: Black Palette Hybrid ink – Stewart Superior

Other: ribbon – Offrey, Hodgepodge Hardware – SU, eyelets – Making Memories, Crop-a-dile – WE R Memory Keepers, markers – Copic

OK…I’ll play!

I saw this on another blog …forgive me if I don’t remember which one! I copy and pasted this last week and finally got a chance to fill it out. The entry said to consider yourself tagged if you wished and I thought it sounded like fun. LOL I didn’t notice the stripper on until later or I may not have done it!


1. YOUR ROCK STAR NAME: (first pet & current car) – Buffy Astro

2.YOUR GANGSTA NAME: (fav ice cream flavor, favorite cookie) – Chocolate Chocolate Chip

3. YOUR “FLY Guy/Girl” NAME: (first initial of first name, first three letters of your last name) JSTA

4. YOUR DETECTIVE NAME: (favorite color, favorite animal) – Celery Dog

5. YOUR SOAP OPERA NAME: (middle name, city where you were born)- Kathleen London

6. YOUR STAR WARS NAME: (the first 3 letters of your last name, first 2 letters of your first) – STAJI

7. SUPERHERO NAME: (2nd favorite color, favorite drink put “The”) – Sky the French Vanilla

8. NASCAR NAME: (the first names of your grandfathers) – Wellington James

9. STRIPPER NAME: (the name of your favorite perfume/cologne, favorite candy) – Obsession Caramel …yikes!!!

10.WITNESS PROTECTION NAME: (mother’s & father’s middle names) – Kathleen James

Daisy Noteclip…

It is such a dreary rainy day here, I just had to post this jumbo clothes peg note holder that I made recently. I had so much fun making it…so cute and sunny. I was going to give it away as a gift but my teenage daughter claimed it and so I’ll just have to make another. It was fun, quick and easy so I’m not too worried about it. 🙂 I’m glad she at least takes an interest in a few of the things I make.

I have to tell you about something that touched my heart this morning… I drove my teenagers to school early this morning. It was See you at the Pole day. Just after 7:30 in the pouring rain. We were a couple minutes late and there standing on the front lawn of the school…that early in the morning in the cold pouring rain…there were already about 50 teenagers standing there praying for their school, teachers and fellow students. I was so touched at their dedication. It really made my morning. See you at the Pole started at a high school in Texas in the 90’s and now takes place across the US, Canada and Australia. It is totally student initiated and student led.

And now…back to the design… 🙂

Daisy Jumbo Clothespeg Note Holder

jks-daisy-paper-clip-note-holder.jpg

I bought this large white Clothes peg at Michael’s a while ago. I’d seen them altered before and wanted to jump in on the fun myself. To start I covered my paperclip with some beautiful Rhonna Farrer Autumn Leaves paper and sanded the edges. My new May Arts ribbon was a perfect match (I love this ribbon! I’ve gone through huge amounts in the past weeks!) and was easy to tie on the peg.

Edited to add… I used my favorite glue … Scotch Quick Dry Adhesive …. to adhere the patterned paper to the clothes peg clip. 🙂

For my daisy embellishment, I pulled out my Daisy Dots stamp set from Lizzie Anne Designs. The daisy was first stamped using my Canvas Palette Hybrid ink onto Soft Sky cardstock. I stamped it again with the black Palette pad and then cut out my daisy. For the daisy center, I stamped one of the dots onto the patterned paper and then punched it out with my circle punch. For the center, to add a little fun, I added one of my Doodlebug Designs gemstone stickers. They come in varying sizes and colors and are fabulous.

Quick Tip; My 7/8″ circle punch works perfectly with the Daisy Dots stamp set. The one inch circle punch works wonderfully to mat it if desired.

I decided when giving this as a gift, a little gift not tucked into the clip would be a perfect addition. I used a scrap of Kraft Cardstock and punched one edge with my Spiral punch from Stampin Up. The edges were then sponged with Close to Cocoa ink. I stamped the solid daisy again in my Canvas ink and pulled out my Simply Sentiments set…I just love this one! AFter stamping the friend sentiment in black, I quickly stapled on a little scrap of the May Arts stitched ribbon and voila… I was done! 🙂

Wishing you a bright happy day!

I must be in a Christmas Mood… & a sketch design for you…

This is my second holiday themed post of the day! I’ll tell you what got me started on this one. Some more new Lizzie Anne Designs stamps arrived in the mail this morning! Yay! When I saw the Bashful Blue, Old Olive and More Mustard color combo, I just had to try and work it into a card design with these darling little snowmen.

Snowmen … A Color Challenge

jks-snowmen-melt-your-heart-2.jpg

It has been busy and I’m trying to catch up here so I just had time for a simple card…well, really, I didn’t but I took the time anyway! 😉 So….. for a quick design it is always great to start with a challenge…takes some of the thinking out. I knew to make this design work I needed to focus on the bashful blue, completment with the Olive and add just a tad of the Mustard for accent. Designs always work best this way…that old gallon, quart, pint rule.

My snowmen were stamped onto a scrap of whisper white cardstock and then colored in with my Copic Markers. So quick and easy. After matting the image with all three colors, I punched a 1 3/8″ circle from Old Olive and inserted a Karen Foster snowflake brad. A little scrap of blue striped ribbon was tied to the stem of the brad and knotted for a little flair.

For my background I quickly stamped it with the snow flurry stamp in Bashful Blue. The design still needed a little somethign to make it stand out. I trimmed a scrap of whisper white cardstock and ran it through my Cuttlebug with the snowflake embossing folder. I think this is my favorite embossing folder…just love it on white! Then I did something I rarely do…I turned my layer on an angle. I usually line things up very vertical and horizontal but I thought with this design, it would be fun to give it a little twist! Now you all know how much I love to add stitching to almost every design so I tried stitching the embossed panel…worked great! And yay! I’m ahead of the game this year with another Christmas card done! 🙂

jks-snowmen-sketch-design.png

Sketch Challenge: Want to try out this sketch? You can enlarge it by clicking on it and are welcome to print it off. If you decide to try it out…add a comment below so I can check it out! 🙂

Holiday Cards and More –

Don’t you just love getting ready for the Christmas Holidays? It is always such a special time of year. I love making things for Christmas…personal gifts, cards, home decor. It is always such a busy time of year though and it is a great idea to get started early. Paper Crafts Magazine has a fabulous new special publication to be released in two weeks. It is called Holiday Cards and More and is now available for pre-order here. I’m allowed to share one of my designs with you here. 🙂 For the other ones…you’ll just have to take a look in the magazine.

Beaded Christmas Candle Centerpiece

jks-beaded-christmas-candle-centerpiece.jpg

This design uses a 5″ diameter glass vase from Michael’s as a candle holder. I thought the light from the flame would look lovely dancing through the Christmas words along the top. I love candles, especially at Christmas. They are such a timeless decoration and I love giving them a new twist. 🙂

A Ghostly Greeting…a sanding technique

I had so much fun making this Halloween card. I don’t actually usually make them but thought this was a fun idea came to me…so ghostly ghosts. 😉

Halloween is coming up soon. Don’t you just wonder where the weeks go?! Craft Critique is having a great Halloween Craft Carnival on their site very soon! It will be a lot of fun with lots of great ideas. Do you have a cool Halloween project to share? If so, you may want to check it out at Craft Critique. 🙂

Ghostly Greetings

jks_ghostly_greetings.jpg

For this design, I thought hmmm….what if I sanded the paper with a ghost shape behind it. One of the great things about sanding is that it will pick up a texture behind and this produces my faded ghosts. So fun! I was so excited about my idea! LOL Sometimes those ultra-simple smack your head ideas are the best. 😉 I free hand cut out a little ghost shape and then punched out a pair of eyes with my hole punch. After simply laying it under my patterned paper, I lightly sanded until the shape became faintly visible and then repeated for his buddy. 🙂

I had to use some ghostly letters on the design as well to spell out BOO. Heidi Swapp ghost shapes alphabet was the perfect trick and I roughly painted the backs of them to get a worn out look, just enough to be able to read them well. A row of orange brads on the right side and a little scrap of tied on ribbon finishes up the design. Have a fun night!

Edited to Add… I simply use a fine grit sandpaper…the same kind I use to sand paper off the edges of  chipboard

Supply List:

Cardstock: Black – SU

Patterned Paper: Making Memories

Other: sandpaper, ribbon, Ghost Shape Alphabet – Heidi Swapp, white paint & Orange brads- Making Memories,

What Scrapbooking Item are you?!

I saw this fun quiz on Alison’s blog and just had to take it! Pretty boring, am I not?! LOL I guess I pretty much knew that. Adhesive…hmmm But hey…you just can’t live without adhesive, right?! 🙂 Have some fun and take it yourself…just follow them link! LOL I’ll be honest. I took it twice, and changed a couple of my answers…still the same. But I have to admit…most of it is pretty accurate! And hey…if you do this…leave me a link…I’d love to see some of the results! 🙂
What scrapbooking item are you?


You are GLUE!You are the adhesive that keeps things together. You go through life helping others. You stick to people and try to keep people together. You like it best when you are surrounded by people and able to help them. But Glue Beware – in your efforts to keep everyone together and with you, you sometimes overlook yourself and find it hard to keep yourself together. Don’t neglect personal time in your overwhelming need to socialize and help others.
Take this quiz!


Quizilla |
Join

| Make A Quiz | More Quizzes | Grab Code