
It is such a dreary rainy day here, I just had to post this jumbo clothes peg note holder that I made recently. I had so much fun making it…so cute and sunny. I was going to give it away as a gift but my teenage daughter claimed it and so I’ll just have to make another. It was fun, quick and easy so I’m not too worried about it. 🙂 I’m glad she at least takes an interest in a few of the things I make.
I have to tell you about something that touched my heart this morning… I drove my teenagers to school early this morning. It was See you at the Pole day. Just after 7:30 in the pouring rain. We were a couple minutes late and there standing on the front lawn of the school…that early in the morning in the cold pouring rain…there were already about 50 teenagers standing there praying for their school, teachers and fellow students. I was so touched at their dedication. It really made my morning. See you at the Pole started at a high school in Texas in the 90’s and now takes place across the US, Canada and Australia. It is totally student initiated and student led.
And now…back to the design… 🙂
Daisy Jumbo Clothespeg Note Holder
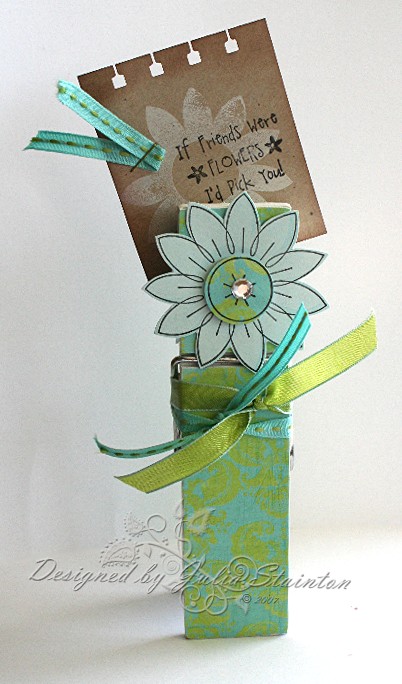
I bought this large white Clothes peg at Michael’s a while ago. I’d seen them altered before and wanted to jump in on the fun myself. To start I covered my paperclip with some beautiful Rhonna Farrer Autumn Leaves paper and sanded the edges. My new May Arts ribbon was a perfect match (I love this ribbon! I’ve gone through huge amounts in the past weeks!) and was easy to tie on the peg.
Edited to add… I used my favorite glue … Scotch Quick Dry Adhesive …. to adhere the patterned paper to the clothes peg clip. 🙂
For my daisy embellishment, I pulled out my Daisy Dots stamp set from Lizzie Anne Designs. The daisy was first stamped using my Canvas Palette Hybrid ink onto Soft Sky cardstock. I stamped it again with the black Palette pad and then cut out my daisy. For the daisy center, I stamped one of the dots onto the patterned paper and then punched it out with my circle punch. For the center, to add a little fun, I added one of my Doodlebug Designs gemstone stickers. They come in varying sizes and colors and are fabulous.
Quick Tip; My 7/8″ circle punch works perfectly with the Daisy Dots stamp set. The one inch circle punch works wonderfully to mat it if desired.
I decided when giving this as a gift, a little gift not tucked into the clip would be a perfect addition. I used a scrap of Kraft Cardstock and punched one edge with my Spiral punch from Stampin Up. The edges were then sponged with Close to Cocoa ink. I stamped the solid daisy again in my Canvas ink and pulled out my Simply Sentiments set…I just love this one! AFter stamping the friend sentiment in black, I quickly stapled on a little scrap of the May Arts stitched ribbon and voila… I was done! 🙂
Wishing you a bright happy day!
13 responses to “Daisy Noteclip…”