Monthly Archives: February 2008

Curvy Cutter Circle Template {C’est Bon}

jks-curvy-cutter.jpg

I just love my new circle cutter. I’ve been wanting to post this review & tutorial since I first bought it but time has been in short supply. It didn’t take me long to fall in love with it…from the first perfect cut with it…I’ve been so enthralled. The EK Success Curvy Cutter Circle Template is so slick and easy to use and I’m so impressed with its abilities. I’ve always loved circles and they are so hot and trendy right now in design. Usually I’d tend to stay away from circles as I just wasn’t happy using the shape cutter I had. It would leave spots where I had to trim. I do love the Nestabilites circles but I found I was limited in size of what would run through my die cut machine. With my new Curvy Cutter Circle Template, I’m just loving adding circles of all sizes as they are so quick and easy to incorporate. I just had to have this circle cutter template after falling in love with all the cool ways Nancy uses circles on her blog, Scrap This. Take time to check it out…her layouts are so fun and fabulous!

What I like about the Curvy Cutter

  • easy to use
  • easy to position
  • very quick to set up
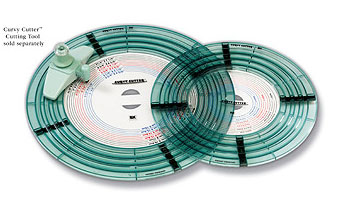
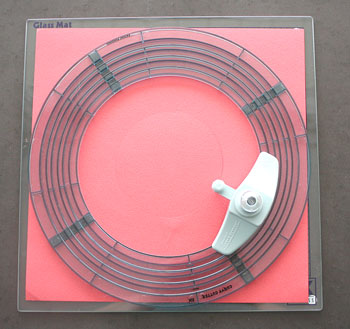
  • huge size variety of circles from 2.25″ to 7.5 inches …you can also cut outside the circles for greater flexibility and a full 12″ cut
  • 1/8″ increments mean you can cut and mat with great flexibility
  • two circle positioning templates make it easy to position your photo or paper in just the right place
  • ergonomic handle swivels easily for cutting in a single motion
  • no torn or ragged edges….a crisp perfect circle
  • gripper feet keep the template easily in place
  • works well on cardstock, photos, vellum etc.
  • double sided blade means you can cut in both directions
  • expandable….you can use the Curvy Cutter part with other templates such as the Oval Template and the rounded squares
  • you can use the glass cutting mat for other applications such as free hand cutting etc.

Things to note:

  • this cutter does not work well with small scraps of paper
  • The cutter is sold in two pieces…the circle template and the Curvy Cutter blade mechanism itself…you will need both
  • this cutter works best with a glass cutting mat. Self healing mats are not recommended
  • When cutting multiple circles…start at the smallest size and work out.
  • This cutter is not inexpensive but I find it is well worth the money. Well made and flexible I know it will give me great cuts for years to come.

How to Use:

To cut thin circles…

jks-circle-1a.jpg

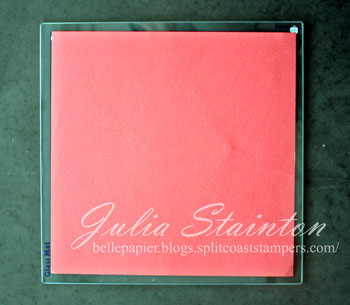
1. Lay cardstock on glass mat.

jks-circle-2a.jpg

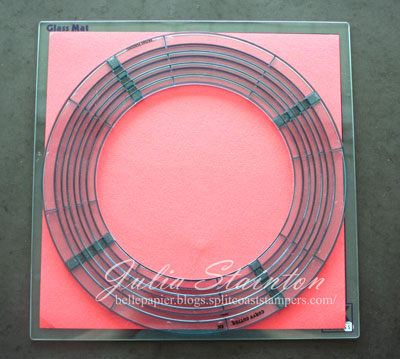
2. Position circle template on top. Remove guide and place cutter in desired track.

jks-circle-3a.jpg

3. Swivel blade around track.

jks-circle-4a.jpg

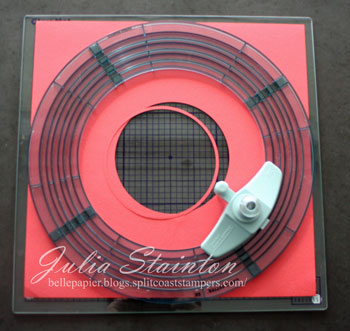
4. Push blade in until it clicks at the next increment. Cut circle.

jks-circles-5a.jpg

5. Repeat.

To position on photo and cut out…

jks-circles-1b.jpg

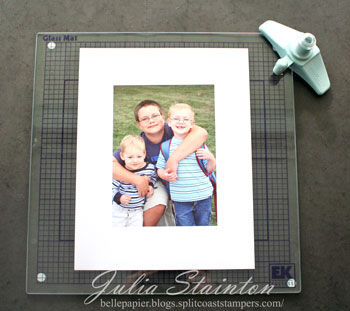
1. Place photo on glass cutting mat.

jks-circles-2b.jpg

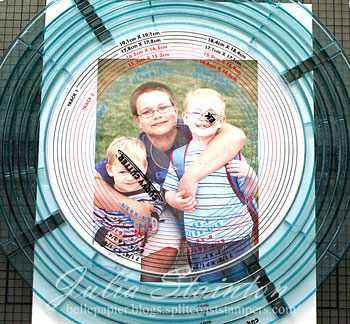
2. Position circle template with positioning insert where desired on photo.

jks-circles-3b.jpg

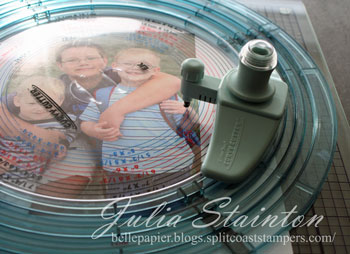
3. Adjust blade to correct size. Remove insert and place blade in track.

jks-circles-4b.jpg

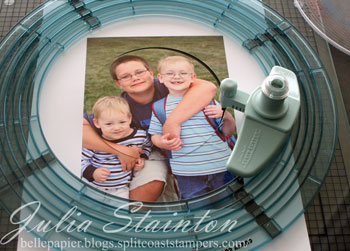
4. Press down on template to hold steady and swivel blade with other hand.

jks-circles-5b.jpg

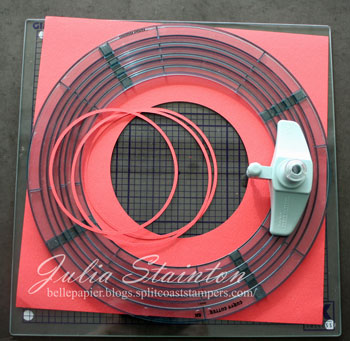
Quick Tip: When cutting rings of circles…I often cut out a full sheet of circles at once. This allows me to have some precut circles on hand and play around with which size best suits my design.

Where to find it…

  • I purchased my cutter from my local scrapbook store.
  • You can also find it at Michael’s and other craft stores
  • On-line stores

Things to do with it…

  • make a circle card
  • make thin 1/8″ circles
  • cut circle spotlights
  • make circle windows
  • cut out off-set circles
  • line up the side of your card to create a semi-circle edge

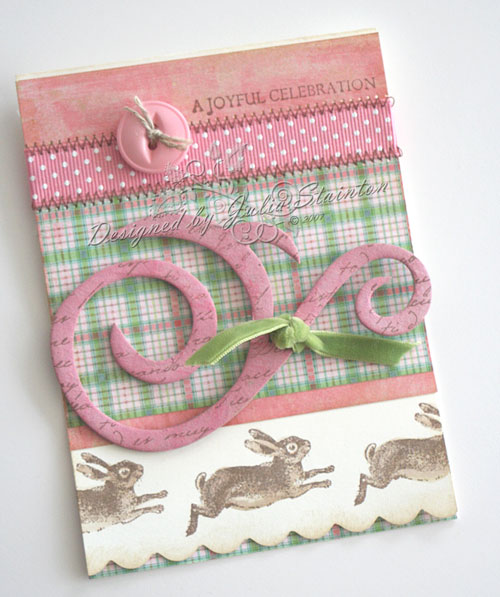
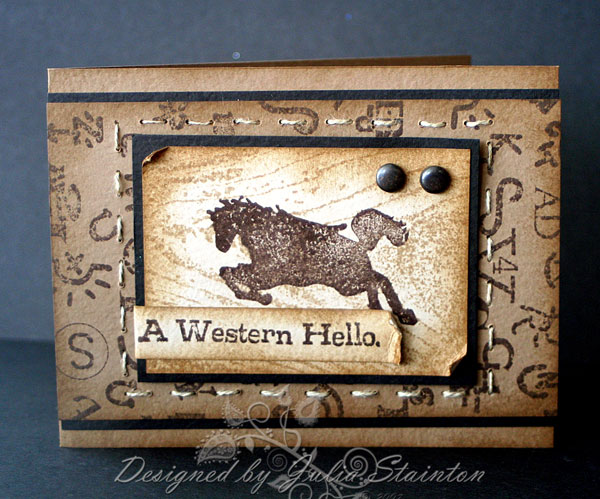
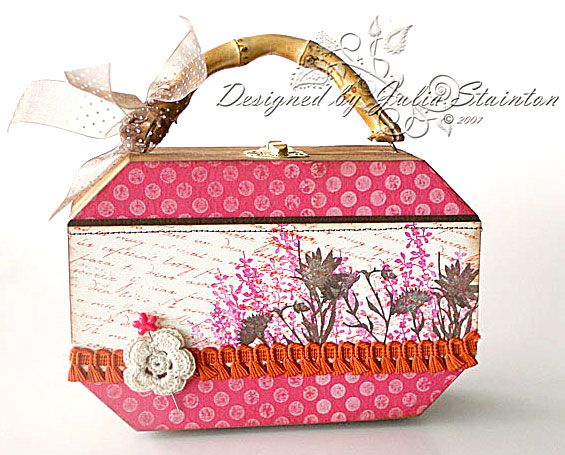
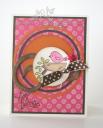
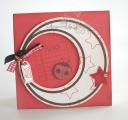
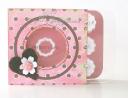
Samples…(just click on image to go to design and instructions in original post)

jks-hey-tweetie.jpgjks-ladybird-hello.jpgjks-oh-happy-day-edited.jpgjks-unique-layout.jpg

If you have questions about this product…please feel free to ask. I’ll do my best to answer by editing in the answers into this post. All {C’est Bon} entries feature products that I love to use and are my personal honest opinion. 🙂 If you’d like to check out other {C’est Bon} entries that I’ve written…just click on {C’est Bon} in the Category section of my sidebar.

Edited to Add….

From Rachel….

I’ve had the circle cutter for about a year and never use it because the directions were very confusion. Your tutorial helped a lot! I do have a question for you. What kind of adhesive to do for the thin 1/8 circles?

I’m so glad it helped you out Rachel! I’ve found that using a Mono type adhesive leaves a gummy mess all over so I usually use one of two liquid glues… the Scotch Quick Dry Adhesive or the Sakura glue pen. Both of these adhesives are easy to apply in a thin line and hold well. Hope this helps!


  • Many of you have also mentioned to me that the Curvy Cutter was originally packaged with the cutter and oval templates together. They are now marketed separately and I purchased the Curvy Cutter, the Circle Templates and the glass cutting board as separate items. I can’t say for sure what the original packaging said about the cutting surface but the Circle Template instructions now read that a glass cutting surface is definitely recommended for a clean cut. Hope this helps!

Joyful Easter…

I decided to share this Easter card design with you today. I know I usually have a {C’est Bon} entry for you today but some server problems mixed up with a busy weekend have me deciding to switch up my posts. Make sure you stop by tomorrow for the {C’est Bon} review and tutorial. For those of you who have recently started reading this blog… my {C’est Bon} entries are products that I just love to use. I usually provide a tutorial or list of reasons I love it and sometimes, a project to go along with it. {C’est Bon} means It’s Good in French. I know…my grasp of the language is quite poor, especially my grammar but I do have a little fun using it from time to time.

Joyful Easter

jks-joyful-easter.jpg

I had a lot of fun putting this card design together. I just love this darling little Running Rabbit stamp from Cornish Heritage Farms. I saw it on-line and had never seen anyone use it and so…just had to order it. So sweet! I used it no too long ago on a little baby design and it also works perfectly for Easter. This design uses a top fold card that is layered with patterned paper. The bottom front edge is scalloped with my EK Success corner rounder and then stamped. The bunny was so simple to color with some ink and my waterbrush.

To add interest and depth to my design, I painted my Maya Road chipboard flourish with white paint and then sponged it with pink before stamping with the Spanish Script Backgrounder. A little scrap of velvet May Arts ribbon is tied to the chipboard before adhering to the design.

The sentiment…a really great flexible one from the new Classic Essential Expressions set is stamped at the top of the design just above some stitched Making Memories ribbon.

Stamps:
-Running Rabbit stamp by Cornish Heritage Farms
-Spanish Script Backgrounder by Cornish Heritage Farms
-Classic Essential Expressions (Mona Lisa Moments) by Cornish Heritage Farms

Ink:
-Burnt Umber Palette Ink by STewart Superior
-Antique Linen Distress Ink by Ranger

Cardstock:
-Natural Smooth cardstock by Prism Papers
– Two Scoops 6×6 paper pack by Basic Grey

Accessories:
-chipboard by Maya Road
-white paint by Making Memories
-mossVelvet ribbon – Flair Designs
dotted ribbon – Michael’s
-small corner rounder – EK Success

Tools:
Sewing machine

Simply Saturday…many thanks

Wow I’m thankful that it is Saturday. Not much relaxing going on here but it is a NEW long weekend here in Canada. Monday is FAMILY DAY. Sounds a little dorky but hey! I’m up for another holiday no matter what its called! And yay…more time to get working on the renovation. And yes…it IS really good to spend time with your famile. We needed a holiday BTW…with none from New Year’s until Easter…we are due one! Actually…we’re hoping to take a little time off on Monday for some toboganning. With all this snow, might as well enjoy it…anyways…I hope!

Thanks, Thanks So Much

jks-thanks-thanks-so-much.jpg

Enough rambling…you and I both have things to do! This design is a simple one using a sketch from one of the Paper Crafts magazine recipes. I love how the blocks are all collaged up the left side. A very simple card, this design just uses rub-ons and patterned paper for a quick fun thank you. This design was also part of a review on My Mind’s Eye paper that I wrote for Craft Critique.

Wishing you a super fun weekend! Spend some time with your family and Thanks, thanks so much for stopping by. 🙂

Supply List:

Patterned Paper: My Mind’s Eye, Ink: Chocolate Chip by Stampin Up Other: eyelet by Making Memories, rhinestone sticker, flower by Prima Marketing, rub-ons by Deja Views

And yet another…

And yet another challenge card, that is. Wow. It’s hard to keep up with so many great challenges happening. Today’s challenge for the CHF designers was a Limited Supply one. The challenge…use one or two backgrounders, one sentiment and one image stamp. Any embellishments. Due to a rather hectic day with two little boys who got up on the wrong side of the bed…don’t they know it’s Valentine’s Day?!!! ….my hopes of getting another design made were slipping away. And then it struck me…I had a card I made on the weekend and hadn’t uploaded that perfectly fit the bill. Now what are the odds of that?

Be sure to check out the other designs created for this challenge… Dawn, Kristine, Anne & Mary

And feel free to play along yourself. Just link you post in the comments section of this entry. I’d love to stop by and see. 🙂

A Western Hello

jks-a-western-hello.jpg

This card uses the two backgrounders mixed up with some distressing and some hand stitched linen thread for a masculine style design.

Supply List:

Stamps: For the Men (The Rummage Bin line), Woodgrain Backgrounder, Cattle Brands Backgrounder – Cornish Heritage Farms

Ink: Espresso Adirondack ink, Brushed Corduroy Distress Ink – Ranger

Cardstock: Black, Tawny Medium, Tawny Light – Prism Papers

Other: brads – Creative Impressions, Linen Thread

The Height of Fashion…

lol well……. this may not be the height of fashion but it made a fun title. I designed this purse for the Cornish Heritage Farms CHA display. CHA Winter finished yesterday and this year the theme was fashion. While designing and brainstorming for it, there were so many fun ideas came to mind. I thought it would make a really great Ways to Use it Challenge. So there you are. Today’s WT challenge is to use fashion in your design ideas. If you need a jumping off place of ideas… alter a purse or shoes, use fashion themed stamp images, be inspired by an article of clothing, make a baby dress card, create some altered jewelry. I’m sure there is a myriad of other ideas out there too! This challenge is a really wide open one so that everyone can play along. Have fun with it and get stylin’ 🙂 The Height of Fashion challenge

Silhouette Blooms Altered Purse

jks-cha-purse-design-final.jpg

I had so much fun creating this design. This purse was an inexpensive wooden purse box picked up at Michael’s. I started off by rubbing Brushed Corduroy Distress ink into the sides of the wood to stain it darker and add a richer look. It actually looks a little darker than this in person…the light reflecting off it makes it look a little lighter. The ink dried really quickly and I was soon off to my next step. I covered the front and back with Prism Intense Pink cardstock that had been stamped with the Large Polka Dots backgrounder in white craft ink. The Prism Prismatics line of cardstock is really neat as it has one smooth side and the other is textured. I love this textured side and stamped on it to add to the design.

To create my stamped panel, I used Raspberry Adirondack ink to stamp the large branch flowers from Silhouette Blooms 1. Over top I stamped other images from the same set in Black. To fill in the back of the design, the Spanish Script Backgrounder was stamped in Sunset Orange. After cutting the panel to size and matting with some cardstock, I stitched a line of brown straight stitch on my machine before adhering to the purse front. A few simple embellishments finished it off… a crochet flower from Imaginesce, a Fashion Pin from Fancy Pants and some luscious trim from Making Memories.

Have a great day! Hope you can join in the challenge! 🙂

Feeling Funky…

This is totally not my usual style but I’m not sure why…I just had an urge to have a little funky scrappy styling fun. Some of the CHF designers and myself decided to have a little fun this week and do some daily challenges. Today’s is a sketch challenge by Tami Mayberry. I love sketches cfhsketchchallenge.jpgand Tami designs the fabulous ones for the CPS blog each week. There is sure to be a variety of styles for this challenge so make sure you check out the other designs. Dawn, Mary, Kristine & Anne all participated today. 🙂 If you’d like to play along…feel free. Just leave a link to your design on one of our blogs and we’ll come check it out. 🙂 I know this is a sketch I’m going to have fun playing with again!

Funky Rock Star

jks-rock-star.jpg

This design is inspired by the fun patterned paper by Scenic Paper Route and Kim Hughes’ fabulous fun style. I paired up the Pretty Birds stamp set with Supah Star and the Lined Paper backgrounder using some simple stamping. I just love the acid color combo. A few staples and brads and a little Making Memories ribbon add to the fun. DD didn’t quite get why the owl was perched on the guitar. But I think he looks cute there and why not? 😉 It just adds to the funk factor.

Quick Tip: When using heavy patterned paper…you can make the card right from the paper itself. I almost made a top hinged card until I thought about those birds. They would have been upside down on the back. Using a side hinged fold was the best way to cut this paper and still have the birds heads up on the back. 🙂

Check back in tomorrow morning for another Ways to Use it challenge. It is sure to be just your style. 😉

Supply List:

Stamps: Supah Star & Pretty Birds (Kim Hughes collection) & Lined paper Backgrounder all from Cornish Heritage Farms

Cardstock: Spring Willow Medium, Frosted Teal, Razzleberry Medium – Prism Papers

Patterned Paper: Scenice Route Paper co.

Other: circle punch – EK Success, stapler, flower – Prima Marketing, ribbon & Brads – Making Memories, clear journaling block – Maya Road

A color challenge…

In between awaiting for glimpses of the CHA displays…a few of the Cornish Heritage Farms designers and myself decided to have a little challenge. We’re the extremely jealous ones at home the ones blessed to stay home with our loved ones, and decided to have a little fun too. Well…I’m not having too much fun here with the renovations but hey! I needed an outlet today! This seems to be the never ending renovation/addition. DH is very talented and doing 95% of it himself. Of course… it will be extremely well done and the only way to afford it but the drawback is…it started in September and consumes every waking moment he is home from work. Thanks so much ladies for all the kitchen color combos. We’ve decided on a color…I think. It is Benjamin Moore Bed of Ferns and is something of a cross between SU’s True Thyme and Prism’s Birchtone Medium. DD is not happy with the choice but hey! when she has her own kitchen, she can choose. With the amount of time I spend in there daily cooking for seven people I need SOOTHING, baby!

Today’s challenge was to use Birchtone Dark, Intense Pink, Papaya Puree Dark & Spring Willow Green medium as a color combo. I picked this color combo for the Cornish Heritage Farm’s CHA display for Kim Hughes’ line. I love pink and orange together! You can check out some pics of the booth display here. Make sure you check out the other CHF designers’ blogs for their designs as well.

Dawn, Anne, Mary, Tami, Kristine (yes, Kristine DID go to CHA but she is home again and raring to play:) )

Hey Tweetie

jks-hey-tweetie.jpg

I was trying to decide what stamp set to play with today when I realized that even though I’ve made quite a few designs with Kim’s Pretty Birds set…I’ve not made any for my blog. That clinched it…I just adore these little birdies and masked the nest, branch and bird together for a fun image. The only piece of Intense Pink I had left was already inked and stamped with the Large Polka Dots backgrounder stamp in white craft ink so I pulled the design together from there using some of my favorite accessories.

We have another fun challenge planned for tomorrow so stay tuned! And if you want to play along…feel free. Just link your designs in the comments section of one of the blogs and we’ll come take a peek. 🙂

Supply List:

stamps: Pretty Birds (Kim Hughes’ line) & Large Polka Dots backgrounder  – Cornish Heritage Farms

cardstock: Natural Smooth, Intense Pink, Papaya Puree Dark, Birchtone Dark – Prism

Ink: White Craft ink, Burnt Umber Palette ink – Stewart Superior, Latte, Raspberry, Espresso, Lettuce Adirondack inks – Ranger

Other: Fashion pin – Fancy Pants Designs, ribbon – Creative Impressions, circle cutter – EK Success, flourish chipboard – Maya Road