Monthly Archives: February 2008

Hello Foursquare…

This morning I thought I’d share a fun card design that I created last week. This week has been so crazy I haven’t been able to sit down for more than a couple minutes at the computer and havne’t made it NEAR the stamping desk! Today my kitchen cupboards are getting pulled out and let me tell you…I just cannot wait until this is all over. We’ve been up at six and working till almost midnight each night and it seems despite my best efforts, the dust and dirt get worse each day. ๐Ÿ™ In the end, it is all going to be worth it though and I’m just keeping the end in sight. Anyone have some ideas for a kitchen paint color? This one has scratching my head. I usually know what I want! Tile is tan, kind of a natural finish, cupboards will be dark brown stained cherry and the counted a speckled black and tan granite look.

Ladybird Hello

jks-ladybird-hello.jpg

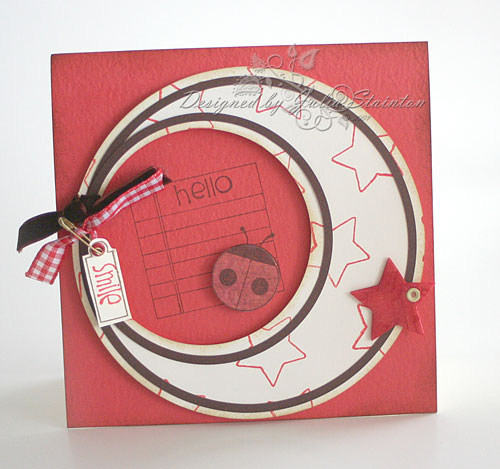
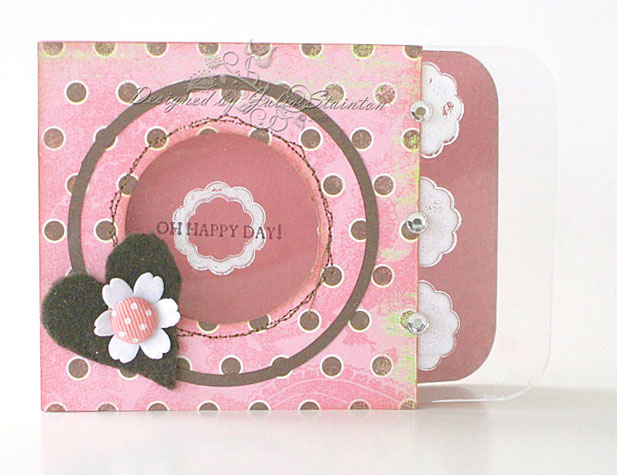
This card just kind of came together. I’d been wanting to play somemore with my EK Success Curvy Cutter Circle template. This kind of a circle cut out of a circle layout has been in my head for a while. I actually had a few of these brown circles cut out and laid them on top to see how it would look. I was shocked to find they were the exact right size to layer on top. Now how often do things like that happend?! ๐Ÿ™‚

For this design I used my new Kim Hughes’ Foursquare stamp set from Cornish Heritage Farms. The star stamped natural layer, as well as the ladybug is elevated on foam adhesive. The little star is foam from an American Crafts baby embellishment set and I just colored it in with my Copic marker to make it the shade I wanted. ๐Ÿ™‚

{Have a great day!}

Stamps:
-Foursquare(Kim Hughes Collection) by Cornish Heritage Farms
-Tag You’re It (the Kim Hughes Collection) by Cornish Heritage Farms

Ink:
-Red Adirondack Ink by Ranger
-Antique Linen Distress Ink by Ranger
-Burnt Umber Palette Ink by Stewart Superior

Cardstock:
-Natural Smooth cardstock by Prism Papers
-Medium Blush Red, Suede Brown DArk Prismatic cardsotck by Prism Papers

Accessories:
-safety pin by Creative Impressions
-Brown Velvet ribbon – May Arts
-foam star by American Crafts
-eyelet by Making Memories
-red gingham ribbon
-dimensional foam tape

Tools:
Crop-a-dile by We R Memory Keepers
circle cutter – EK Success

A is for….

A is for Adore….a valentine’s design using Basic Grey’s Blush paper line.

While I’m home in the middle of a huge messy renovation…I’m having fun checking out all the cool new product lines and glimpses from CHA. Wohoo for the Craft Critique girls who are busy checking out the new product! ๐Ÿ™‚ Make sure you check out the Craft Critique site for updates throughout the day. Kristine also has posted a couple pics of the Cornish Heritage Farms booth and some of the designers. It is cool to see how all that planning came together and see them having fun. Not that I’m jealous or anything. ๐Ÿ˜‰

{Adore}

jks-a-is-for-adore.jpg

This design actually uses a patterned paper covered coaster as its main layer. I love how it adds dimension and stability to the card design. After sanding the edges, I adhered it to my main card base and stitched around the design. My stamping on this is very simple…the letter A monogram stamp is from a Hero Arts clear monogram stamp set is stamped in Chocolate Chip craft ink and then embossed with clear embossing powder. I then cut out the letterwith my tiny craft scissors and the center of the A, with a craft knife. After matting with Ruby Red cardstock, I repeated the trimming again.

The word adore from the same Hero Arts set is stamped along the side of the coaster layer and to work in another “A” word… I set an “always” embossed designer eyelet through the coaster layer with my Crop-a-dile.

Quick Tip: Coasters are great for layers, die cutting, making accordian home decorations from, even hinged card designs.

Have a great week!

I Spy….

I spy with my little eye….

Crafts n Things April 2008 issue

Anyone like that little birdie card on the cover? ๐Ÿ˜‰ I must say…I just couldn’t believe my eyes the other day when Lauren sent me some congratulations. ๐Ÿ™‚ I really had NO idea! I also have three other designs in there and just can’t wait to get my hands on that magazine.

As for my {C’est Bon} entry for today. With the renovations still going strong and my kitchen pretty much torn apart….I’m thinking {c’est bon} to take a day off. ๐Ÿ™‚ I can’t wait to show you what I have in mind for my entry next week. I think you’ll love it as much as I.

Have a great day!

Simply Saturday ….a birthday design

It’s simply Saturday again today. I think these are always some of my favorite posts of the week. I love simple designs. For a long while I shied away from them but now {embrace} simplicity as a beautiful alternative and a breath of fresh air.

This design was created for a review on My Mind’s Eye for Craft Critique. I love their paper line and accessories! This design uses a 4×9″ card format to make the most of those gorgeous tall blossoms on the paper.

Birthday Blessings

jks-my-minds-eye-floral-de.jpg

This is a super simple design to create. I love the long three image acrylic strips that My Mind’s Eye released with this line. I used my paper trimmer to cut it down to just one image…the flower. Might as well get three projects out of it. ๐Ÿ˜‰ On the reverse side, I swiped my Canvas Palette Hybrid in across it and heat set to get a semi opaque look. The little dragonfly is a MME rub-on that I quickly added. I then stamped the Birthday Blessings sentiment from the Classic Essential Expressions from Cornish Heritage Farms in Timber Brown Stazon ink. Brushed Corduroy Distress ink was sponged around the card to frame it. To fix my panel to the card, I stapled the one side. On the other, I used a Making Memories’ clip to hold a crocheted flower and hide glue dots underneath holding it all together. While simple, I really love this card. ๐Ÿ™‚

Also…a little something to check out… Jacksonbelle Embellishments is having a super huge moving sale until Tuesday. Stop by and take a look when you have the time. I know I can never resist a sale and some gorgeous goodies. ๐Ÿ™‚

Blessings to you today. Hope your Saturday is simply wonderful.

Sets for Sale…

It’s been a while since I updated my stamp sets for sale page. I spent quite a while yesterday…getting it all updated. ๐Ÿ™‚ If you’ve never noticed it before, the Stamps for Sale tab is right at the top of my blog header. Just click and it will take you to my sale page. Some sets are brand new and others, lovingly used. I’ve found I have to pair down my stash if I’m ever going to get everything into my new (but small) stamp room. Also stay tuned… if you’re in the market for ink, I’m currently in the process of switching my ink pads over to Ranger Adirondack Ink. I’ll be listing those sometime in the next week. ๐Ÿ™‚

Have a great weekend!

Julia

Bible Verse Challenge

One challenge I really wanted to take up this year is Lori Craig‘s Bible Verse challenge. The challenge was to create a project that would span the year and memorize the Bible verse each month. I’m kind of late to the challenge…it actually started last month but somehow in the business of the new year…I had totally not even heard about the challenge. Jami was so sweet to PM me and ask if I would like to join in. :)I’m jumping in now and I’ll either do two in one month to catch up or just make my challenge project go one month longer. I’m so excited about doing this. I always have good intentions but somehow the days slip away. I think part of getting things done is making a plan and sticking to it. This challenge is now on my calendar, the 8th of each month, and at the end of the year, I’ll have a beautiful book of my favorite verses. Better yet…I’ll have them hidden in my heart, {embracing} God’s Word. If you’d like to join in with the challenge…you can just start now too if you’d like. You can check it out here.

Psalm 139:7-10ย ย ย ย  (click on pic for closeup)

jks-psalm-139.jpg

This whole chapter is one of my favorites. I know it very well to start with as I couldn’t begin to guess how many times I’ve read it. It has brought me so much comfort to know that I am held in the hand of the Almighty. Part of this chapter also talks about God knowing all about me and how he formed me in my mother’s womb. During pregnancies and illness and just through the trials of life, this chapter has been a blessing to me.

As for the design of this project…I decided I’d create a little book of all the verses, something to jks-divine-design-book.jpgkeep and treasure. I recently purchased this darling little 6×6 Maya Road chipboard album. The pages are so sturdy. A wonderful size and so easy to embellish. The binder clip binding works really well and I’ll be covering the outside in the coming months so stay tuned. I noticed the other day that I had a lot of Basic Grey Stella Ruby paper left and as I love the warm shades and floral look…thought it would be perfect for this project. To keep this project cohesive, I’ll be storing away the rest of my paper in a ziploc bag with other goodies that I might want to incorporate.

Quick Tip: When planning pages on a chipboard album…you’ll want to take into consideration that you’ll be decorating the back as well. If you add things like brads, add them on a layer and insert before adhering the paper to the chipboard.

{Wishing you a day of joy and peace.}

jks-psalm-139-closeup.jpg

Supply List:

Cardstock: Natural Smooth – Prism

Patterned Paper: 6×6 paper pad Stella Ruby – Basic Grey

Stamps: Beautiful (flourishes) from The Rummage Bin line- Cornish Heritage Farms, Carte Postale (bird) – Stampin Up

Ink: Brushed Corduroy & Tea Dye Distress Inks, Shell Pink Adirondack ink – Ranger

Other: moss velvet ribbon – Flair Designs, ruffled ribbon – Making Memories, flower – Prima Marketing, Loopy Brad – Karen Foster Designs, Designer Brad – We R Memory Keepers

Going dotty…

Polka dots…gotta love them! So much fun! Today’s Ways to Use it challenge is to get a little dotty and have some fun incorporating them in your design. Need some ideas? How about patterned paper, dotted backgrounders, embossed dots, dotted accessories, you can even punch out little circles and make your own dotted background. This should be a fun challenge that everyone can join in and play! Here’s the link…WT152. ๐Ÿ™‚
Oh Happy Day

jks-oh-happy-day-edited.jpg

For this card design, I paired up some dotty patterned paper by My Mind’s Eye and a couple new stamp sets from Cornish Heritage Farms…Classic Essential Expressions and Cardmakers Shapes. I’m always looking for new ways to incorporate transparencies into my designs and this card uses a window and shorter front panel to show off the stamped acetate layer beneath. Flowers and sentiment are stamped in white opaque and black Stazon ink. A little stitching and cardstock circle play up on the circle theme. The little chocolate felt heart is just a piece of felt I picked up at Michael’s and freehand cut out. I love the warm texture it adds.

Quick Tip: When stamping with Stazon ink on transparencies…be sure to stamp in a clean up and down motion. The acetate can be slippery and smear if you press to the side. Practice on a scrap first for good results.

Wishing you a happy day! Please join us with the challenge…don’t by shy! ๐Ÿ˜‰

Supply List

Stamps:
-solid and ring flower from Cardmakers Shapes (Mona Lisa Moments) by Cornish Heritage Farms
-sentiment from Classic Essential Sentiments set (Mona Lisa Moments) by Cornish Heritage Farms

Ink:
-Antique Linen Distress ink by Ranger
-White Opaque and Black Stazon by Tsukineko

Cardstock:
-Prismatic Pink cardstock by Prism Papers
Patterned Paper:
-Tres Jolie by My Mind’s Eye

Tools:
-circle cutter & Corner Rounder – EK Success
-sewing machine

Accessories:
-pink dotted brad by Making Memories
-white velvet flower by Maya Road
-brown felt – Michaels