Monthly Archives: February 2008

Precious Baby…

I love making baby cards. I guess I just love babies and everything to do with them! I didn’t design this card for anyone in particular…just because I had this patterned paper and “darling” title card. I just looked baby girl to me and so I added in the “precious baby” part of the sentiment with a Crate Paper rub-on transfer.

Darling Precious Baby

jks-darling-precious-baby.jpg

This was a super simple card design to create. A simple white card base covered with patterned paper and a scalloped edge on the right hand side. I used the EK Success large corner rounder punch to create these large scallops. EK Success carries at least three different sizes of corner rounders in their punch line. I love making different sized scallops with them.

To add a little embellishment to this simple design, I folded a Prima Martini flower over the top of the title block and adhered a jumbo copper eyelet from We R Memory Keepers with my Crop-a-dile. Also with my Crop-a-dile, I added little white eyelets in each of the scallops. The last two additions just make me think “girl”. Soft pink velvet ribbon and a little pink rhinestone sticker to dot the i in darling. 🙂 This design was created for a review for Craft Critique on My Mind’s Eye paper line.

Thanks for stopping by today! Wishing you a fabulous week!

Terrifically Tacky Tape{C’est Bon}

jks-tape-roll-large.jpgjks-tape-sheets.jpg

Just a quick {C’est Bon} entry from me today. This renovation is certainly taking its toll this week! Today I’d like to give a huge thumbs up to one of my favorite adhesives, Terrifically Tacky Tape by Provocraft. This adhesive is not for your usual adhesion of paper layers etc. but is fabulous for adding some special effects. Super, and I DO mean SUPER adhesive allows you to adhere almost anything to your project. If you have something hard to adhere…this is the perfect adhesive. The Terrifically Tacky Tape comes in sheets 6.75″ x 9″in size and has two sheets per package. Also, this super adhesive comes in a roll of narrow tape that is perfect for adhering difficult altered projects as well as creating borders of embellishments. The tape rolls come in a variety of sizes to meet your particular needs… 1/8″, 1/4″, 1/2″, 1 1/16″

What to do with it…

  • adhere over layer, cover with clear microbeads
  • adhere heavy metal embellishments
  • die cut shapes and apply small loose embellishments over top
  • punch it
  • apply beads
  • apply flocking
  • adhere cardstock to altered project
  • adhere glitter
  • the strip adhesive is perfect for holding together journals and wrapped candles as well as other projects

How to apply…

  1. Cut, punch or die-cut to desired size or shape.
  2. Remove one side of protective backing. Apply to surface.
  3. Remove other side of protective backing. Apply item to be adhered.

Things to Note:

  • Make sure you are totally committed to where you want this adhesive…when it is adhered, there is no going back
  • If you are nervous about applying your adhesive staight…just turn down a tiny corner of the backing to adhere one corner, then slowly peel off the backing applying the adhesive in a smooth manner.
  • I love using my Guillotine paper cutter with this adhesive sheet. It always gives a great clean cut

This product is available at your local craft store, local stamp or scrapbooking store as well as some on-line stores. This product doesn’t look very glamorous on the shelves but if you try it…you’ll be amazed at the fun techniques and looks you can get with it.

Beaded Birthday (click to enlarge photos)

jks-beaded-birthday-2.jpg

I created this birthday design for a good friend of mine whose birthday is this week. I tried to use products and a style that I hope she likes. 🙂 This patterned paper made me think of her when I saw it.

jks-beaded-birhtday-closeup.jpgTo create this design I started off by stamping my image panel using the Silhouette Blooms 2 stamp set and the Time to Stamp set from Cornish Heritage Farms. After stamping and sponging the edges, I cut a piece of Terrifically Tacky Tape sheet the same size as my image panel and adhered it over top. I then sprinkled the entire surface with my clear Microbeads and pressed them in firmly to get a nice smooth even coverage.

To add to my distressed look of this card, I added some brown zigzag stitching and lots of sponging. I decided to try out another new idea I had by added a brushed on “frame” of Ranger Distress Crackle paint. I love how it slowly cracked as it dried adding to the shabby vintage look.

Supply List:

Stamps:Silhouette Blooms 2 (flower), Time to Stamp (ornamental circle), The Art of Framing (birthday sentiment) – Cornish Heritage Farms

Cardstock: Natural Smooth, Tawny Medium – Prism

Patterned Paper:

Ink: Antique Linen & Brushed Corduroy Distress Ink – Ranger, Burnt Umber Palette Ink – Stewart Superior, markers

Other: sewing machine, ribbon & Brads – Creative Impressions, glitter chipboard and pin – Making Memories, Terrifically Tacky Tape sheet, Clear Microbeads – Provocraft, Antique Linen Distress Crackle Paint – Ranger

Hope you enjoyed this product review and tutorial. 🙂 For other {C’est Bon} products just click on the C’est Bon tab in my category section of the sidebar. All {C’est Bon} products are ones I love to use and are my own opinion based on my experience with that product. I love hearing from you. If you have any questions or comments on this product I’ll do my best to answer by editing this post.

Simply Saturday…simply thinking of you

Well I don’t think stamping gets more simple than this! I created this card weeks ago but totally forgot about posting it until now. When I saw this fuzzy flocked metallic paper by Heidi Grace at my local scrapbook store, I couldn’t resist it. Soooo beautiful and I knew right away that I would pair it up with this stamp I already had at home. A little different in style but definitely the same type of flower.

Simply Thinking of You

jks-dreamy-thi-nking-of-you.jpg

To create this design, I simply inked my Penny Black stamp with Tempting Turquoise & Always Artichoke markers and then stamped a first and second impression of the image. The sentiment is from the Lizzie Anne Designs Simply Sentiments set. The image panel edge was simply sponged with Close to Cocoa ink and then adhered and stitched to my card base. To finish it off, I tied a scrap of ribbon around the base of my K & Company embroidered brad and adhered it to the design.

I hope your weekend it simply wonderful! Thanks for stopping by!

St. Paddy’s Day…

Being half Irish…I just couldn’t resist designing a little card for St Paddy’s Day using some of my Lizzie Anne Designs stamps. This design uses a few sets paired up with some Basic Grey patterned paper. I’m totally drawing a blank this morning on which line it is. I know it is from one of their 6×6 paper pads but since I actually created this design a few weeks ago… I’ll try and figure it out and edit it in. I love how the circles are interconnected in the pattern. It reminds me of Celtic art. This renovation sure is taking its toll! As of last night, my kitchen is now stripped of sink, dishwasher, insulation (brrrr….), cupboards, drywall…in short, everything! My littlest guy wasn’t quite sure what to make of it. You’d think after six months of constant construction he’d be used to it but I guess not. Poor little guy. Last night he said…”Daddy, why you bweaking mine house?”

St. Paddy’s Day Party

jks-st-paddys-day.jpg

Edited to add…thanks Regina for letting me know the paper is Kisa from the Perhaps collections! 🙂

For this design, I used a simple layout paired up with some darling stamp sets…. It’s a Party, Celebrations & Celebration Sayings from Lizzie Anne Designs. The images were stamped onto Very Vanilla cardstock in Old Olive ink. Once again, I’m loving my Circle Template…just can’t seem to put that thing down! Some Making Memories brads accent the curve and a little scrap of May Arts ribbon is tied and adhered to highlight the Party celebration. All edges were sponged with some Close to Cocoa ink to add a warm distressed look.

Wishing you a wonderful weekend!

Windows….

One of the simplest ways to add interest to a card design is by adding a window. Why I always seem to forget this, I’m not quite sure! I’m going to challenge myself to include more window designs. Today I’m challenging you too to open a window and have a little fun. Today’s Ways to Use it Challenge is to find ways to use windows. Whether you simply use a stamp image of a window, or create a window with flaps, shape cutters or punches…I can’t wait to see all the fabulous ideas! This week the challenge is a rerun. We originally did this challenge way back for WT85. I’m not quite sure where the time goes. I’ve been challenging you every Thursday (well, almost!) for the past three years and today is no exception. HAve a little fun and open a window. Challenge instructions can be found HERE.

Edited to add...just in case anyone is trying to get a hold of me…my e-mail server is done…again! Sorry! If you’ve e-mailed…I’ll get back to you as soon as I can!

Hey Chickie!

out-for-pub-sign-oct-07.jpg

To create this design, I started with simple 5.25 x 10.5 piece of patterned paper. More Crate paper…I found a stash of it and I’m in the mood to use some more! The paper is from the Twirl Collection. I folded the paper in half to create my card…keeping the striped side to the inside. Now you know…I just can’t resist stamping on patterned paper so I pulled out my Pretty Pattern Backgrounder stamp from Cornish Heritage Farms and stamped the front of my design. One of my favorite things about Crate paper is its white core and textured surface. It is so much fun to sand and so I lightly sanded some of the surface area as well as the edges.

To create my window, I pulled out my new EK Success Curvy Cutter Circle Template and cut out the window. I then cut out larger circular rings with the cutter from some coordinating paper to frame my window. I wanted to pair up this window with a darling little chick image from CHF. This Three Chicks stamp is from the new Easter release by Aslea and is so darling and easy to color with my Copic Markers. After cutting it out with my circle template, I adhered it to a piece of transparency that was attached behind the window on the inside. I love how this makes the image “float”. The stripes on the inside peek through and I can also tuck in a little circle behind image with my sentiment…”Hey Chickie!” 🙂

To finish the outside of my design, I added some Prima Hydrangea flowers. The aged copper brads are by Creative Impressions as is the darling brown dotted ribbon that is tied through my button. To balance the other side of my design, I pulled out my Dew Drops again and adhered them with Ranger Liquid Accents along my other circle.

Wishing you a fabulous day! Hope you enjoy the window challenge. I’ll also leave you with one of my favorite quotes…

When God shuts a door, He opens a window. 🙂

Supply List:

Stamps:
-Hey Chickie!(Asela Collection) by Cornish Heritage Farms
-Three Chicks (Asela Collection) by Cornish Heritage Farms

-Pretty Pattern Backgrounder by Cornish Heritage Farms

Ink:
-Black Adirondack Ink by Ranger
-Antique Linen Distress Ink by Ranger

Cardstock:
-white by Staples
-patterned paper – Twirl Line by Crate Paper

Accessories:
-flowers by Prima Marketing

-brads & dotted ribbon by Creative Impressions

-Dew Drops by The Robin’s Nest

-acetate transparency

Tools:

Markers by Copic
Curvy Cutter Circle Template

sewing machine

Eggs and Chicks

I’m having so much fun with these darling little chickie stamps that are being released today from Cornish Heritage Farms. Asela has outdone herself with these sweet little images…chicks and sentiments and bunnies too! This image is one of my favorites. It looks like this little chick has a super big treat to carry along. My little guys are having a blast too with these images. They are coloring and cutting up a storm along side of me. It’s getting pretty messy here but creativity isn’t always nice and tidy is it?! I guess its just some good clean fun and they are happy to be spending some time with their mom. 🙂

This design was also designed with today’s SCS sketch challenge layout. The proportions aren’t quite exact but for the most part…it works. 🙂 If you’d like to play along, you can check out the sketch HERE.

Eggs and Chicks Easter Card

jks-happy-easter-chick.jpg

To create this design, I pulled the color combo from one of my favorite patterned papers from the Confetti collection by My Mind’s Eye. After stamping my image, I colored it with my Copic markers for a fun spring look. The image was then matted with some Crate Paper left on my desk and I sanded the edges to define them a little.

For the bottom panel of the layout, I stamped the tiny lined paper image (from the Kim Hughes’ Foursquare set) onto the reverse side of the My Mind’s paper. The Happy Easter sentiment was stamped onto a scrap of white cardstock and stapled to the design. I finally got around to playing with my new Robin’s Nest Dew Drops. I can tell I’ll be using them again soon. I received this bottle of them with my latest Paper Crafts magazines and goodies but I also have a couple others I’m going to have to pull out that I purchased from Ellen. So fun and easy to use!

Quick Tip: The reverse sides of double-sided patterned paper is perfect for matting and stamping on and coordinates perfectly.

Wishing you an eggstra-special day…. 😉 I know, that was sooo lame…. but seriously, have a good one.
Supply List:

Stamps:
-An Egg for You Chick(Asela Line) by Cornish Heritage Farms
-lined paper from Foursquare (Kim Hughes Collection) by Cornish Heritage Farms
-Happy Easter (Asela Line) by Cornish Heritage Farms

Ink:
-Antique Distress Ink by Ranger
-Black Palette Ink by Stewart Superior

Cardstock:

white cardstock – Staples
-patterned paper – Confetti line from My Mind’s Eye, Birdie Line from Crate Paper

Accessories:
-Dew Drops – The Robin’s Nest

-ribbon – Making Memories

-markers – Copic

Tools:

-stapler

-sewing machine

The February Challenge…

Since November, each month the Splitcoaststampers Dirty girls…past and present… get together for a challenge. It’s so much fun to reconnect and to design something just for fun. Last month just seemed to get away from me and I wasn’t able to take part so I was determined to work something in this time. This month the challenge had three parts…

Challenge Focus: Stamps Designed by Fellow Dirty Girls. –OR– alternate option – use any fellow Dirty Girl’s gallery creation as an inspiration to semi-CASE something of your own (be sure to link it in your post).

Required Element: Spring Color Combo – whatever feels like Spring to you!

Restricted Element: NO CuttleBug/Big Shot/Wizard or similar diecut/embossing machines.

Keyword: DCS208 (for Dirty Challenge Shout February 08 )

You may know, my good friend Lisa Strahl designs a line of stamps for Cornish Heritage Farms called Mona Lisa Moments. Lisa and I were also on the Dirty Dozen Design team together for a 3 month overlap at the end of 2006 to Feb 2007 and I’m excited to use a few of her stamps here. Two backgrounder designs, and one of my very favorite sets… Classic Essential Expressions.

Forever Friends

jks-forever-friends-pocket.jpg

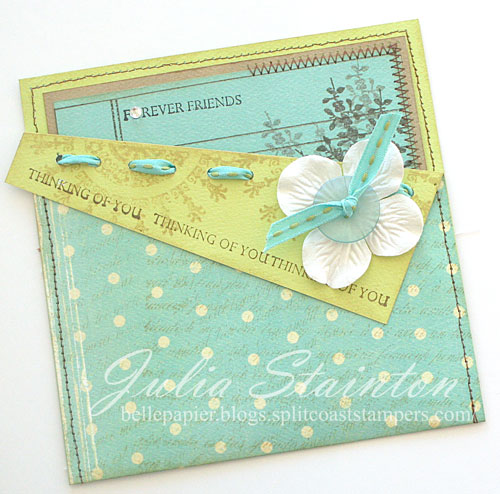
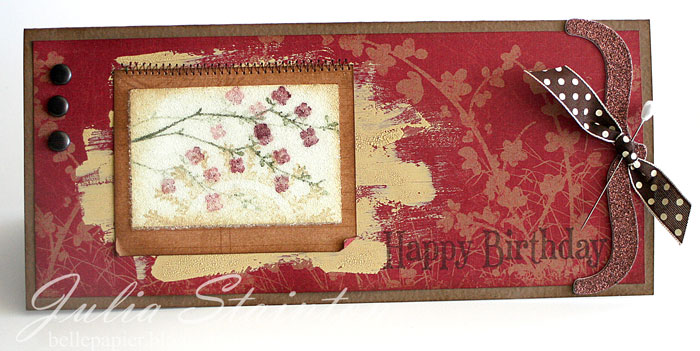
For this design I decided to pair up two of my favorite backgrounders Lined Paper and French Script with some patterned paper stamping and a pocket card design. It’s been a long time since I did a pocket card and I thought it would be fun. Going through my paper stash, I found this Birdie Crate Paper line. I just love Crate Paper, the colors and texture are gorgeous and perfect for stamping on. This Birdie line just screams Spring to me and so I had my color combo. Speaking of Spring… I CANNOT wait for it to arrive. It has been a long strange winter!

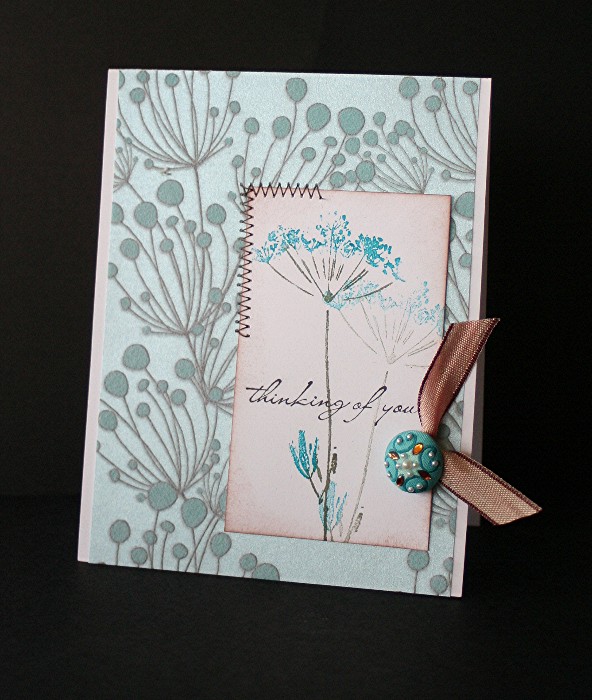
The pocket for this design is just a 5.25″ square card with the top corner folded down on an angle. To create the pocket, I just stitched up the side seams and created a little card insert to fit inside. It may be a little faint but over the front polka dot paper, I stamped the French Script Backgrounder a couple times and then used my Lined Paper Backgrounder for the inner panel. I also added a few other stamps from CHF to the design. Along the folded flap, the ornamental image from Time to Stamp from the new Rummage Bin line. Inside, the flowers stamped onto the lined paper are from the Silhouette Blooms 1 stamp set. The rules didn’t say you couldn’t add extra stamps so I went for it. 😉

jks-forever-friends-open-po.jpg
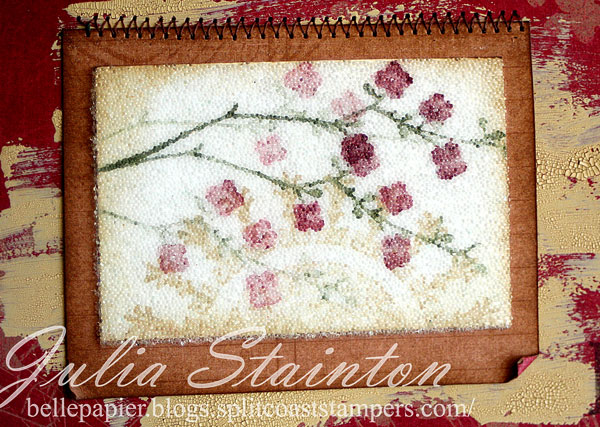
To add in another stamp set by Lisa…I used her new Classic Essential Expressions to add in a couple sentiments. At the top of the pocket insert, I stamped Forever Friends and added a fun little rhinestone accent in the center of the o. I always love adding a little bling. 🙂 Along the edge of the front folded flap I stamped Thinking of You three times to make a little border and emphasize the edge. Also to add interest to the front flap, I punched holes along the fold with my Crop-a-dile and then stitched my ribbon through to hold it down. I love how perfectly this ribbon works with the paper.

The funny thing is…once I finished this design, I realized…I didn’t use even one scrap of cardstock on this design. Just patterned paper. Now how often does that happen?!

Have a great day and don’t forget to stop by Splitcoaststampers and check out all the other designs for this challenge. I’ve gotten a peek at a few of them already and they are fabulous!

Stamps: Lined Paper Backgrounder, French Script Backgrounder, Classic Essential Expressions, Time to Stamp, Silhouette Blooms 1 – Cornish Heritage Farms

Ink: Black and Burnt Umber Palette Ink – Stewart Superior, Antique Linen Distress Ink – Ranger

Paper: Birdie Collection – Crate Paper

Other: hole punch, ribbon – May Arts, button – Autumn Leaves, flower – Prima Marketing, rhinestone – Me and My Big Ideas, sewing machine