Monthly Archives: January 2008

Embossing…a challenge…

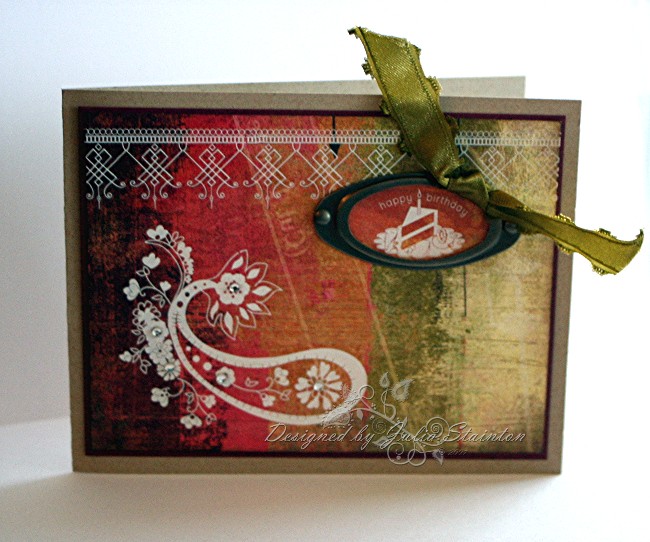
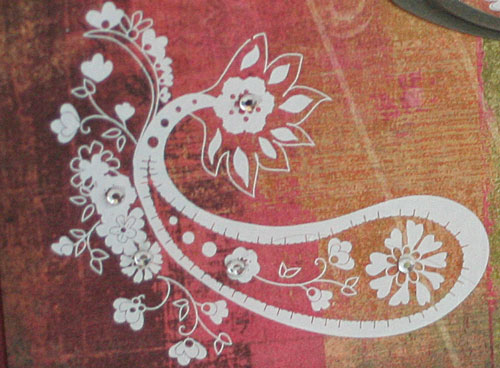
Thursday again! Almost time for another weekend and it IS time for another Ways to Use it Challenge! This is a rerun week and I had to check my list twice…even three times for this challenge. This was one of our very first Ways to Use it Challenges ..embossing powder…and I thought for sure I had done is again. But no and so we are going to have another one today. Any kind of embossing powder is great for this challenge. I’m also challenging you…instead of just embossing a sentiment (probably the most common use) make sure you do something a little different. Cracked glass, resist techniques, embossing something out of the usual…are all great ideas but you are also welcome to think up your own! 🙂 Just one requirement from me…

Make sure you have fun! 🙂 Check it out at WT

Silver Bonjour

jks-silver-bonjour.jpg


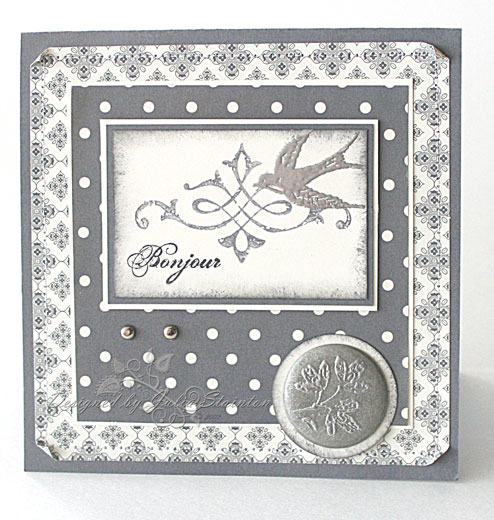
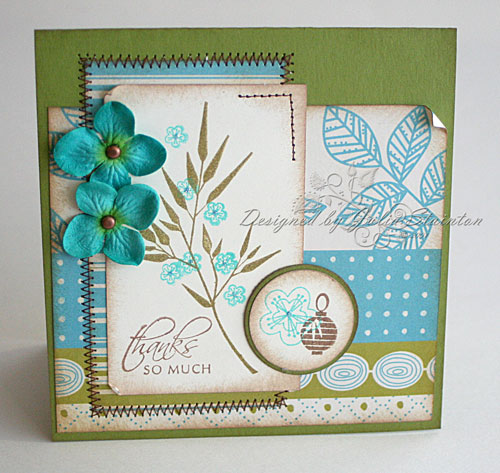
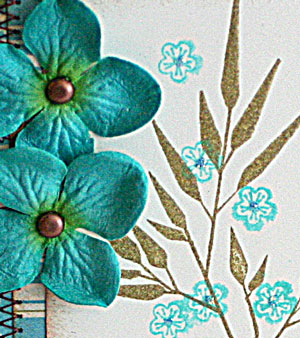
This design uses one of my favorite patterned papers by Stampin Up. This paper is actually a Basic Gray (charcoal) and Very Vanilla color combo. I think the photo makes it look a little washed out…it is so rich looking in person. I was creating this card specifically for today’s embossing challenge but really…I’m not a huge fan of lots of embossing. I used to be when I first started stamping. It was always like magic watching that powder melt. Perhaps I did too much or perhaps its just not my style now, but over the past while…I mostly use it in small touches. This is the concept I went with for this card…less is more and the embossing is just a highlight.

jks-silver-brad-closeup.jpg
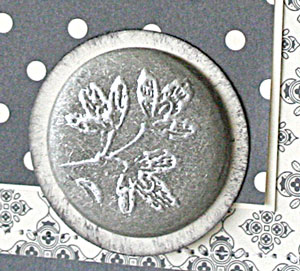
This stamp set I used is the Carte Postale set by Stampin Up that I’ve loved since I first saw it last year in a mini catalogue. It is such a flexible set and I love the elegance of it. Because of the intricate design of the papers, I kept the stamping itself very simple. A sentiment, scroll and embossed bird all on one little panel. After adding some stitching around the design…I still needed something. An embellishment and there just was not enough embossing on it to use as a sample for the WT challenge. And then an idea popped into my head that I had thought of before but never gotten around to. Would it work if I embossed on the Jumbo Karen Foster Designs brads?! I love these brads and have done lots with them but never embossing. The little flower stamp from the set seemed to fit perfectly and after stamping it onto the brad with Versamark…it was simple to emboss.

Quick Tip: Use a pair of crafting tweezers to hold the brad so that you don’t burn your fingers with the heat gun. I use a Making Memories pair that I bought as part of a scrapbooking tool set but they are also available separately.

Wishing you a very happy Thursday and some embossing fun!

Supply List:

cardstock: Very Vanilla, Basic Gray – Stampin Up, patterned paper: Charbon – Stampin Up, stamps: Carte Postale – SU, ink: Versamark – Tsukineko, Basic Gray – SU, Other: silver brads – Making Memories, Jumbo Brad – Karen Foster Designs, Silver Embossing Powder – SU

The Sketch Challenge…

It’s been quite a few weeks since I’ve had time to play around with the Wednesday Sketch Challenge on www.splitcoaststampers.com I always love this challenge but time is always at a premium. Actually…I REALLY shouldn’t be stamping this today as there is a pile of work to do. But…a girl needs a break now and then, right?!

This design uses one of Lizzie Anne Designs new releases this month, Far East. I think this set is one of my favorites of them all! So fresh and fun…I know you’ll be seeing more designs using this set in the future. 🙂 I don’t know what it is exactly but I’m totally loving this color combo lately…olive and aqua/turquoise…a little retro maybe? Whatever it is…when I saw this Scenic Route Paper Co. patterned paper…I just had to get some!

Asian Spring

jks-asian-spring.jpg

jks-asian-close-up.jpgI’m going to keep this post short and sweet as I have lots to do this morning! Basic sketch challenge layout, simple stamping, some sponging and a little stitching…that’s it! Oh! A little blue Stickles to highlight those darling little flowers! 🙂

Have a great day! And BTW…if you’re just popping in…this is my second post of the day…scroll down for another new release design. 🙂

Supply List:

Cardstock: Old Olive, Very Vanilla – Stampin Up

Patterned Paper: Scenic Route Paper Co.

Stamps: Far East – Lizzie Anne Designs

Ink: Pool, Oregano Adirondack inks, Antique Linen Distress Ink – Ranger

Other: flowers – Prima, brads – Making Memories, sewing machine, circle punches – EK Success

A Prickly Design…

Well if the thoughts of spring in the last card didn’t warm you up…maybe this one will! Definitely no snow where this cactus grows! There is very little Western in this part of the world but I love playing around with that theme. I think because it always works so well for guys and I just love that texture. This design features another one of Asela’s Trees released today. While I’m not totally sure that a cactus can be classified as a tree, 😉 I’m loving it as part of the group. Perfect for landscapes and that western feel, I can think of some fun sentiments to go with it too. For this design, I wanted to go with a totally different look than my previous one…just to show how flexible trees etc. can be. 🙂

Cactus Wishes

jks-cactus-wishes.jpg

This design features Asela’s Saguaro Cactus stamp from Cornish Heritage Farms paired up with three backgrounders for lots of fun and texture. The backgrounders work perfectly with these beautiful trees and I keep finding more in that store that I need! It is always amazing looking at other designers’ work and then thinking…wow…I REALLY need that one too! LOL For this design I pulled it together with dark Western style colors, lots of sponging and distressing and a concho I picked up at Michael’s. I haven’t quite decided who this card is for yet but it will be great to have in my stash. I’m always lacking in those masculine designs when an occasion calls for one!

Quick Tip: Use your watercolor brush after stamping an image in dye ink to carefully dampen the image and lightly pull away the color to fill in the image. It’s quick and easy!

Supply list:

Cardstock: Dark Teal, Natural Smooth, Dark Kiwi – Prism

Stamps: Cactus, Cattle Brands, Montana Cracked Earth, Weathered Wood – Cornish Heritage Farms

Ink: Broken China & Antique Linen Distress Inks, Oregano Adirondack ink – Ranger, Burnt Umber – Stewart Superior

Other: Concho – Michael’s, rawhide cord, Edge Distresser – Heidi Swapp, pewter brads – Making Memories, ribbon

Thoughts of Spring…

While we’re quite snow-covered and cold here in Ontario…my thoughts turn to Spring. It’s my favorite time of the year. Fresh spring greens, buds and shoots and a new delight in the garden each day. I thought it would be fun to give these brand new trees a fresh spring look in a quick thinking of you design. This tree stamp and others by Asela Hopkins are being released by Cornish Heritage Farms tomorrow. I just love how beautiful they are and my favorite things about trees is how flexible they are as well…change the colors, change the season. Trees and foliage are also great for masculine cards…you know they can be hard to find stamps for!

Spring Thoughts

jks-spring-trees.jpg

For this design, I stamped the image in Burnt Umber Palette Hybrid Ink. This ink is waterproof when dry and is perfect for watercoloring over. The image is lightly watercolor and then matted before matting again with my scalloped square Spellbinder’s Nestabilities. For the background…I stamped half of the card base with the Oak Leaves Backgrounder and then covered the “edge” with ribbon. I usually see this backgrounder used in Autumn colors but I thought it would be pretty stamped in Citrus for a fresh Spring look.

Supply List:

Cardstock: Frosted Kiwi, Iced Teal – Prism

Stamps: Oak Leaves Backgrounder, Silhouette Blooms ! (Sentiment), – Cornish Heritage Farms

Ink: Burnt Umber – Stewart Superior, Citrus, Aqua Adirondack Inks – Ranger

Other: Flowers – Prima Marketing, buttons – Autumn Leaves, Nestabilitiy Dies – Spellbinders, dotted ribbon – May Arts, Aqua velvet ribbon – Flair Designs

A is for Adorable…a baby design

A is for Adorable! When I saw this darling rub-on transfer from Daisy D’s…I just had to make it into a baby design for my beautiful new nephew. Travis was born before Christmas and is the most adorable little guy. He was definitely the star of the show this year as we all had to have a chance to hold him. 🙂 You might guess, that I…having five kids…am quite enamored with babies. So beautiful and innocent. I think that five is enough though. 😉

Adorable

jks-adorable_edited-1.jpg

To create this design, I used a 5.5 inch square card base of chocolate chip cardstock. This size perfectly fits this darling Daisy D’s swatch paper. Isn’t the vintage nursery alphabet cute? I LOVE the pinked edges! Yes! It comes that way. To highlight the double side print, I didn’t stitch it to the end but instead…flipped up the corner and “held” it with a clear button for a fun look. The little stars are also rub-on that I added over the striped paper and accented with copper brads. A little sponging with Chocolate Chip ink adds to the vintage look.

Have a fabulous day!

Supply List:

Cardstock: Bravo Burgundy, Chocolate Chip – Stampin Up

Patterned Paper: Lullaby Boy Swatches -Daisy D’s

Ink: Chocolate Chip- Stampin Up

Other: rub-ons – Daisy D’s, sewing machine, ribbon – Offray, clear button – Stampin Up

Tonic Scissors {C’est Bon}

jks-scissors.jpg

For unmounted rubber stamps…an essential part of the process is cutting them out well. I must admit…I struggled through cutting and mounting rubber stamps for quite a few years with just a pair of old kitchen shears. I knew they weren’t ideal but there always seemed to be something else higher up that I really needed on my wishlist and just kept putting it off.

Fast forward to a couple months ago I discovered this pair of scissors from Tonic Studios designed by Tim Holtz. When I saw the names I associate with very high quality merchandise on this product I very much needed…I looked right at the price tag. I was extremely surprised and it wasn’t more than a few minutes before I had my order in.

I’m so happy to say that these scissors have really lived up to my expectations and more. I wish I’d had these scissors throughout all those years I struggled with cutting out my rubber.

What I love about these scissors…

  • easy to hold
  • extremely strong construction and high quality
  • the position of the fulcrum (the point were the scissors swivel) makes it easy to cut through the rubber with little resistance….basic physics people! 🙂
  • large handles with Kushgrip soft coating…the same as the Tonic paper cutter
  • non-stick blades…keeps that adhesive that attaches the foam from gumming up your blades
  • serrated blades easily cut through rubber and prevent slipping
  • protective cap cover to safely store the scissors
  • Price $$$ – 11.79 US …I’m still pinching myself!

Where to buy…

  • Cornish Heritage Farms: I purchased my scissors from Cornish Heritage Farms on-line
  • Local Stamp Stores: Many local stamp supply stores as well as scrapbooking stores carry Ranger products.

Hope you enjoyed the return of my {C’est Bon} entries. I’ll be posting my next one next Sunday so stay tuned. 🙂 If you’d like to check out my past entries…just click on {C’est Bon} in my category section in my sidebar. All {C’est Bon} products are my own personal favorites and honest opinion.

Simply Saturday with Basic Grey

I’m trying to get back on schedule with some of my blog posts. It is amazing how busy it has been lately! Since it is Saturday this design is a simple one. No stamping at all actually! When designing simple cards, sometimes rub-on transfers are the way to go.

Now I love stamping and I’ll never leave it but sometimes I like to take a quick change of pace and have a little fun with rub-ons. Basic Grey makes fabulous rub-ons in beautiful designs and they go on beautifully. It is a very crisp clean look.

Paisley Birthday

jks-paisley-birthday-white-rub-ons.jpg

This card was actually designed for a Craft Critique review on the Basic Grey Rub-on Tranfers. If you’re interested in learning more about rub-ons…have fun checking it out. Rub-ons can be applied to a myriad of surfaces. I love these white rub-ons as they have a great matt opaque look that can be difficult to achieve in other mediums.

jks-paisley-close-up-2.jpgTo create this design, I simply applied my rub-ons to my Basic Grey patterned paper and then matted the layer and adhere to my card base. To highlight my sentiment and embellish the design, I attached a Hodgepodge Hardware label frame over it and then tied a scrap of May Arts ribbon to the frame.

Basic Grey Rub-ons, Patterned Paper and May Arts ribbon were purchased from Jacksonbelle Embellishments.

Quick Tip: Embellish your rub-ons for a more personal, glitzy look. To highlight flowers in the paisley rub-on transfer…I added rhinestone stickers for a beautiful look.

Hoping your Saturday is simply wonderful!

Supply List:

Cardstock: Chocolate Chip, Kraft – Stampin Up

Patterned Paper: Basic Grey

Wholy Cow Rub-on Transfers: White Birthday, White Paisley, White Borders – Basic Grey

Other: ribbon – May Arts, Hodgepodge Hardware – Stampin Up