Monthly Archives: February 2012

tagged with love

I love a challenge.

I seriously thought this would be an easy one.

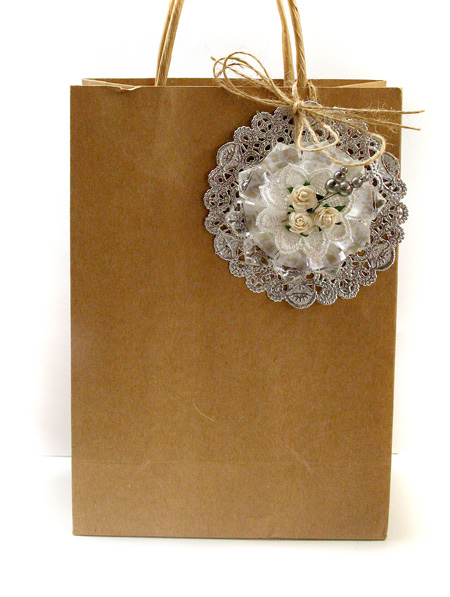
Make a valentine’s tag using 7 Maya Road products (7 SKUs)…and the freebies were paint, sewing, black and white pen, one sheet of cardstock and punches and dies. Oh yes, and one of the MR items had to be kraft.

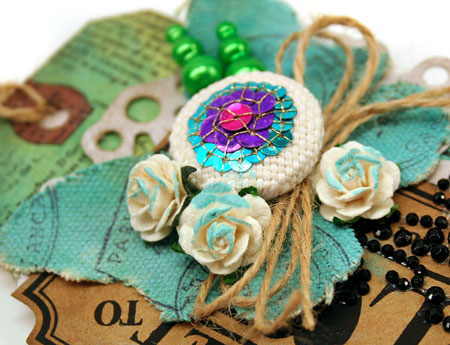
It was harder than I thought! Those Maya Road goodies are just plain addictive! After much counting and playing around, here’s what I came up with.

The little Vintage Heart Tart tins are so addictive. I’ve used them quite a bit lately so I was trying to use something else but in the end, I just couldn’t resist. You can easily punch these little tins with a Crop-a-dile for  hole for hanging the tag.

This tag was created for the latest Maya Road Designer Challenge. I hope you’ll join us for lots more valentine’s inspiration. Great ideas, lots of tips and oh yah,…the chance to win a Maya Road prize pack. Good luck!!!

If you’re wondering exactly which 7 Maya Road products I used, they are the first 7 supplies below…

Supplies:

Loves and Hugs…

mr and mrs.

Wow! Things have been busy around here since I last posted. I kept my word and really have buried myself in a spring cleaning craft room purge. I did a real clean sweep and have gotten rid of 95% of my patterned paper, older stamps and all kinds of things that I rarely use. Still can’t quite believe I’ve done that but things will be MUCH more efficient from now on.

I couldn’t resist making a few new cards from the bits and pieces I found. I’ll share those another day as they aren’t photographed yet. My daughter is on her way home and I pick her up shortly. So excited! She traveled all night to spend a couple days with us. Another girls’ lunch is in order don’t you think?

In the meantime… I have a shabby little wedding frame to share with you today. I was just thinking it would be cute on wedding tables too with table numbers in them or how about a large grouping of them with all sorts of pictures of the bride and groom?

One of the new products I have been enjoying lately is the XXL Glue Dots®. They are such a wonderful size for creating your own embellishments.

I’ve used two of the XXL Glue Dots® to create this rolled rose and tulle flower. Here’s how to do it…

  1. Punch a large circle from cardstock and apply your XXL Glue Dot® on it.
  2. Starting in the center, twist your linen ribbon and spiral it tightly around the Glue Dot until entire dot is covered.
  3. Trim away excess cardstock and adhere tail of ribbon on reverse.
  4. Apply a second XXL Glue Dot® to reverse side of rolled rose flower.
  5. Apply two layers of tulle ribbon around outside edge of Glue Dot.  Adhere to frame.

The vintage buttons are also adhered with dots to the frame. Mini Glue Dots® are the perfect size for adhering tiny buttons and their thin profile keeps them flat to the project.

Supplies: vintage buttons, Buttercup line patterned paper, frame: unknown, also…

I wrote this blog post while participating on the Glue Dots design team.
Happy creating!

Stains and other issues

Ir’s February and it’s time to do some massive Spring cleaning in my craft room. I just can’t stop making a mess! Now that a deadline and that CHA crazy-creating is out of the way, today I decided to get on with it.

I’m very embarrassed to admit that I wasn’t sorting for more than 5 minutes before I was getting my fingers stained. In the spirit of full disclosure, it may even have been less.

Here’s how it went down…

  1. start putting away three Distress Stains.
  2. in the spirit of getting organzied, decide to create a color chart of my Distress Stains
  3. pull all Distress Stains from drawer, open the ones that have never been used and dab them all on a piece of paper
  4. write down my Distress Stain names with a Copic Multiliner for future use.
  5. get the idea that the stain chart should be photographed to share.
  6. go upstairs and photograph said chart
  7. decide that more stains are needed…well, wanted
  8. put 3 more distress stains into my ongoing shopping cart
  9. go back down to the craft room to put all organized stains away.
  10. look at color chart and notice some pretty colors
  11. decide to see how the combo looks together.
  12. experiment on a tag.
  13. experiment on canvas
  14. create tag
  15. realize there is now MORE mess to clean up. oops!

Hope that made you smile and please, let there be someone else like me out there!  Please tell me I’m not the only one.

But hey! I made you some eye-candy…

  • To create the tag: apply Broken China, Tumbled Glass and Shabby Shutters Distress Stain to manilla tag. Allow to dry and stamp with background stamp
  • To create the butterfly: Apply Tumbled Glass and Picket Fence Distress Stain together for a milky blue look. Allow to dry and stamp with postage images. Heat set ink on canvas.

Just in case you’re interested in some of the Distress Stain colors, they are the same as the Distress Inks but I like looking at them on a chart so here’s my very quick and imperfect one.

I’ve made it a thumbnail as it’s long and narrow so just click on it if you want to take a closer look.

Supplies:

Now I’m off to REALLY do some spring cleaning. I promise!!!

Happy creating!

Thanks From the Heart

Two weeks ago my Mother-in-Law arrived to take care of four of our kids for a week. It was the first time hubby and I had ever gone away together for a week and it is a time that I’ll always cherish. I just cannot thank her enough. Today’s card is on its way to her.

This card is another one of my “bits and pieces” cards. I love using what’s on my desk to make something pretty. The embossing folder was a new one that I’d just ordered and as it was very similar in shape to the Basic Grey canvas, I decided to pair them together and see how it went.

My sentiment is stamped onto a piece of Maya Road chipboard. Love those wavy layerable banners! The chipboard is first stained withe Shabby Shutters Distress Stain, dried with a heat gun and then stamped.

Quick Tip:When using Distress Stains on chipboard, try it out on a scrap first. The greyish texture will slightly change the color on you. Make sure you dry it before deciding if it works as the color will lighten as it dries.

Supplies:

Thanks for stopping by!

Crystal Bliss

Sometimes ideas that pop into your head make you just so excited to see how they will turn out. I can’t tell you how much fun I had with today’s little project and while it looks pretty impressive, it’s a breeze to make. Yay!

How about a crystal flower accent that I’ve made into a tag? You can add it to a gift bag to make a beautiful wedding or anniversary gift bag or just leave it on it’s own and hang it to catch the light. My photos turned out pretty well but they just can’t compare to how pretty this looks when it catches the light.

So how did I make it? Glue Dots® has some exciting new products released for CHA this year. They are super-duper XL Glue Dots® and XXL Glue Dots® and they are amazing to work with! For this project I’ve used the XXL Glue Dots® that are 2″ in diameter and they come 24 to a package. I’ve already run out and I can’t wait to get my hands on more!

To start off with, I punched a 2.5″ circle out of some patterned paper. If you have a sharp eye you’ll notice I used some Victoria Park paper as it’s subtle and doesn’t take away from the crystals. The XXL Glue Dot® goes on next and then I spaced the crystals around the adhesive dot. I used some Maya Road crystals that unfortunately are no longer available but linked below, they have a slightly different style out that will work just the same.

After backing the crystal “flower” with a silver doily, I added in a Pop Up Glue Dots® in the center of the crystals and added in some pretty Maya Road embellishments. Now that I’ve made one, I could make more, each in a matter of minutes.

Supplies:

Additional supplies: Silver Foil Doilies and Kraft gift bag from Michael’s
I wrote this blog post while participating on the Glue Dots design team.
Happy creating!

A Twinchie Trick

Valentine’s Day is just around the corner, so yesterday I created a card for my guy. Monochromatic seems to suit him so much better than pinks and red, don’t you think?

Today I’m in the CLASSroom sharing a Twinchie trick along with the tutorial and step outs on how I created this card. I hope you’ll join me!

Have a fabulous weekend!

Celebrating From a Distance

Firsts are always a bit tricky aren’t they? Nineteen years ago today I gave birth to my baby girl. I remember every detail.  She was so precious.

She still is precious,  but this year for the first time, we’re not celebrating her birthday together. It’s making me a little sad. She’s off at school and so I’m just going to have to wait until she gets home for reading week to have a little family celebration here.

Because we’re not together, I created a couple special little projects that I put in the mail. This first design in her birthday card. Most of the papers are from my new Victoria Park line 6×6 Tiny Tablet. The Index Cards are perfect for using on card designs as well as layouts. To accent the card design, I’ve created a “bouquet” of sweet Maya Road embellishments.


This year my daughter asked for what every student is always in short supply of. A cheque seemed a little cold just to put in the mail so I altered this Maya Road Kraft Envelope to make the gift a little more special.

The chipboard butterfly was covered with Picket Fence Distress Stain and then with Diamond Stickles for some shimmer and shine.

Supplies:

So happy birthday sweetie! I hope you enjoy your special day!

Love, Mom