Category Archives: Glue Dots

Trimmed Out Gift Bag

I love wrapping gifts. Making a gift look pretty and unique just adds that special touch. One way I like to do this is to have lots of kraft gift bags on hand. It makes it easy to whip  up just the right bag with paper crafting goodies I have on hand instead of running out to the store to find one that works.

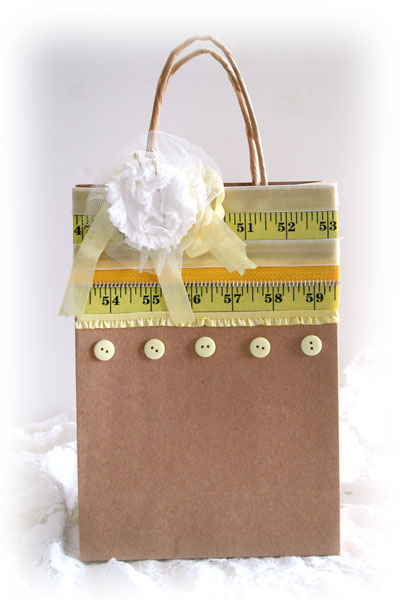
Today’s project is a sweet little yellow gift bag that I’ve worked up to hold a gift for a new little someone. I love yellow for babies as it is soft and sweet and works with either gender. I have some very fond memories of my own little ones in lovely soft pale yellow sleepers. When I look back on my life so far, I think that rocking my little ones each night rank right up there with my very favorite moments.

To make this gift bag I’ve used lots of different yellow trims together to create a striped border along the top of the bag.  Continuous Lines Glue Dots® are a great way to adhere strips of trims. I’ve also used Craft Glue Dots® to hold on the buttons.  Here’s a fun tip... tear off a strip of the Glue Dots® roll and center it along your border. Apply the Glue Dots® directly from the backing for perfectly spaced buttons.

Supplies:

I wrote this blog post while participating on the Glue Dots® design team.

Thanks for stopping by!

glorious & free

It’s the Canada Day weekend and a glorious one at that! I’m excited to be spending most of the weekend with my loved ones at the lake. I’m so happy to celebrate this weekend and so thankful to be born a citizen of this land. I think most of us take for granted our freedoms and it’s a good thing to stop and think about how blessed we are. Each year we celebrate Canada Day on July 1st celebrating the anniversary of the July 1, 1867 when we became a country.

This year I wanted to create a Canadian themed project for the celebration. As I went through my stash, I found I didn’t have any maple leaf themed items. I really wanted to use what I had on hand so came up with a red and white themed frame. There are no leaves but I think it still has some Canadian flavour with the color scheme and part of our national anthem as the sentiment.

O Canada!
Our home and native land!
True patriot love in all thy sons command.
With glowing hearts we see thee rise,
The True North strong and free!
From far and wide,
O Canada, we stand on guard for thee.
God keep our land glorious and free!
O Canada, we stand on guard for thee.

To create this project I started off with a dollar store frame and stand and altered it. The wood frame is painted with layers of paint and distress crackle paint and inked with Distress Ink for a weathered look.

The embellishments are my favourite part of this project and I’ve used lots and lots of Glue Dots®. I started off embellishing this frame with the die cut rosettes. Putting them together is super easy with an XXL Glue Dot®. Craft Glue Dots® adhere the medium sized flowers and other trims and Mini Glue Dots® are perfect for adhering the chipboard letters.

Supplies: dollar store frame and… 

I wrote this blog post while participating on the Glue Dots® design team.
Happy Canada Day!


Shabby Summer Centerpiece

I love paper crafting but I love using my supplies for more than just cards and layouts. Altering things around the house to make something new and unique makes for some fun projects. It’s a nice change of pace and today I’m sharing an altered wood crate basket that will add a fun shabby look to my kitchen table this summer.

I found this little wood crate on the top shelf in my craft cupboard just holding a bunch of odds and ends. I’m betting that some of you have see this crate before and maybe even have one of your own. It was an old Prima crate that held milk bottles of Got Flowers. My bottles have long since disappeared so two mason jars make fun little vases to bring the beautiful outdoors inside.

The wood crate as been given a white washed look by dabbing on some Picket Fence Distress Stain to all the wood surfaces. Because I’ll be changing up the flowers in the jars all summer long (gotta love those perennials), I’ve kept the accent soft, pretty and neutral so colors won’t clash.

To make the embellishment, I’ve covered some chipboard with patterned paper and then die cut it. By placing an XXL Glue Dot® onto the center of the panel, it makes a super easy way to cluster embellishments all on one adhesive. It also helps to focus them all into one place.


Last week my peonies were blooming, so here’s the top view with a pretty blossom. I have some roses about bloom so they’ll be next on my table. Can’t wait.

Totally off topic for paper crafting…does anyone have favorite easy-care roses? I’m looking for some new varieties that are hardy for a Canadian climate. One of my recent faves has been The Fairy which keeps blooming all season long.

Supplies:

I wrote this blog post while participating on the Glue Dots® design team.
Happy creating!

classics for dad

June is always a wonderful month. It brings summer, school holidays, trips to the beach and Father’s Day. Today I have a gift project for dear old dad.

Is it just me or does anyone else find dads hard to create or buy for? I always find it so tricky. The other day I was going through my stash looking for some inspiration and came across this metal cd tin. Sorry…I’ve had it a while and I can’t remember where it came from but I’m sure a Google search would help you come up with a source. My guy is a music lover so I thought it would be fun to put all his favorites on a CD or two or three. His own personal music mix. My daughter actually made me up a CD while she was away at school this past year and I loved the gift.

Because this tin will hold classics, I went with a classic vintage style to alter the tin. The edges are wrapped with Tissue Tape and give it a fun feel.

The embellishments are made up of papers from the Boarding Pass line by October Afternoon and some chipboard accent pieces that I’ve covered or stained. Adhering them is easy with Craft Glue Dots®. Glue Dots® work great even on tough surfaces like metal and wood.

Supplies:

I wrote this blog post while participating on the Glue Dots® design team.
Happy creating!

teacups and posies

Flowers are always a classic for Mother’s Day. We all have our favorites. I like bouquets that come from the garden. Things like lilacs, hydrangeas, daisies and daffodils. But how about a fun little floral arrangement that doesn’t fade?

I thought I’d put a little spin on the traditional Mother’s Day flowers with this little teacup arrangement filled with crafted flowers. To fill my teacup and provide something to adhere the flowers to, I wadded up a large piece of aluminum foil and adhered it with Craft Glue Dots® to the inside of the cup.

The beautiful big trim flowers were created with Maya Road trims and XXL Glue Dots®. I’ve gone with a sewing theme and you can see little glimpses of vintage sewing pattern tissue peeking out between them as a filler.

Little accents of tape measure trims and tulle trim are adhered just inside the rim of the teacup with Craft Glue Dots® to finish off the design.

There is no limit to what you can create with your crafting supplies. Don’t forget to think outside the box…or off the card or the page.

Supplies:

I wrote this blog post while participating on the Glue Dots® design team.
Happy creating!

for your loss

I must admit that sympathy cards are not my favorites to make. Loss is such a heartbreaking thing. I hope this card will bring comfort to a dear lady who has lost her husband of many years.

I thought a soft vintage look might be appropriate for today’s design. I’ve used some pretty vintage style text papers from Prima and then added some inking and stitching.

I wanted to highlight the sentiment and also try something a little different with it. The sentiment is stamped onto the back of a Maya Road mini ruler. Once again, Jet Black Archival ink to the rescue for very little bleeding on difficult surfaces.

Quick Tip: Think of using embellishments in new ways. It’s OK to think outside the box to get more use from your supplies.

Supplies:

Seize the day!

essay custom

Misted Canvas

Hi! I’m back! Sorry I took a little impromptu break for the past few days. It really wasn’t planned but with a holiday weekend with my family at home, I really enjoyed focusing my time on them. An Easter dinner, some shopping, some friends in on Sunday night and a birthday dinner kept me celebrating all weekend long. I also want to thank all of you for your lovely response to my Folded Chevron Tutorial and those who left me birthday wishes. You truly made my day.

Today I have a simple misted canvas to share with you. I adore mists and templates and they are a fun and easy way to create some wall art. Canvases are also great quick and easy gifts.

To create this canvas I first misted it with my blue Glimmer Mist and allowed it to dry. To create the pattern, laid a template over the top and then misted the entire thing again with Sprout Chalkboard Mist. A great trick for keeping that template perfectly in place is to use a temporary adhesive on the reverse to hold it there. I used the Removable Glue Dots® as they hold well and then remove easily.

After misting the design, I used Craft Glue Dots® to hold on the vintage button accents and Glue Dots® Lines to adhere the zipper trim around the edges.

Supplies:

Additional Supplies: 8×8 canvas

I wrote this blog post while participating on the Glue Dots® design team.
Happy creating!