Monthly Archives: October 2007

Chipboard….

Don’t you just love it?! I adore the dimension and texture it adds to your design and there are just SO many things you can do with it. This week at Craft Critique, we’ve been having a chipboard theme featuring many different makes of chipboard. I love Basic Grey chipboard and was so excited to have the opportunity to review it for today’s entry. I have one design to share with you here and to see the rest… check out my article HERE.

Infuse Chipboard Believe Design

jks-basic-grey-chipboard-believe.jpg

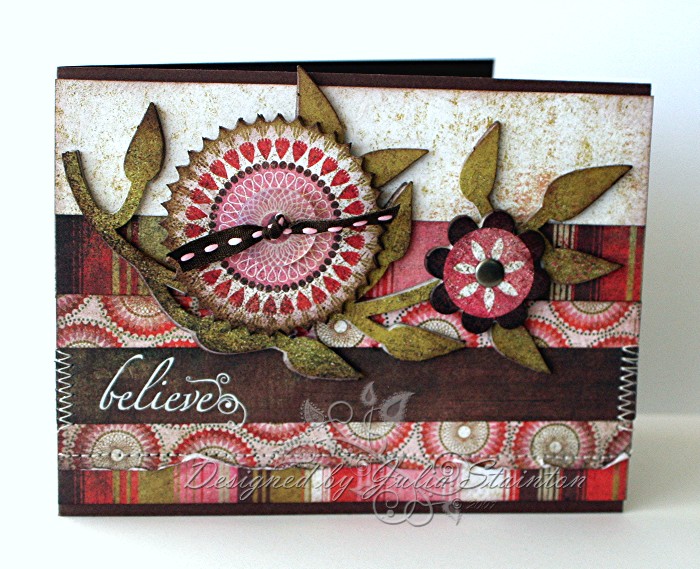
For this design, I just couldn’t resist trying out the new Basic Grey Infuse Undressed Chipboard. Love it! When I first saw it, I immediately grabbed it off the shelf. Never mind that there were very few customers in the store, I just had to get it in my hands as quick as possible! LOL And then I wondered…hmmm…how hard would this be to cover. Oh well… I was sure it was doable and there is always sponging with ink and embossing options if it gets too tricky. As I wandered the store a little more, I came to the Basic Grey paper section and found the Infuse die cut sheets… wohoo! Now that is a super idea. The die cut sheets PERFECTLY match up with the chipboard. And so, I brought it home to try. πŸ™‚

The chipboard elements were SO easy to cover using the die cut sheets and sooo much fun. You are going to be seeing more of this to be sure! I was so impressed at how well the chipboard and die cuts lined up…no trimming, no sanding, just adhere and you are done! I went to the added step of sponging the edges for a little dimension but if you are not into sponging… you really don’t need to!

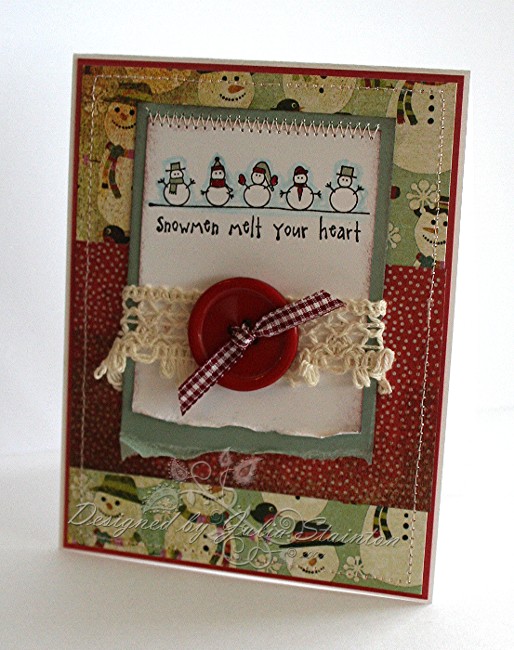
To tell you about about my actual design, I used this week’s CPS layout for my jumping off point. That big flower just reminded me so much of the design, it was a perfect fit. Using strips of Basic Grey Infuse 6×6 patterned paper, I loosely followed the layout, added some stitching and a Basic Grey rub-on sentiment. Along the bottom of the stitched layer, I ruffled up the edge a little for a little texture interest and to break up the design a little. For the centers of my flowers, the smaller one is set with a Making Memories snap and the larger one has a Stampin Up clear button tied with some stitched ribbon.

I hope you enjoyed this design and have a fabulous weekend. As you can see, this design isn’t my usual Simply Saturday entry, my Craft Critique article is most like my Sunday {C’est Bon} entries adn so, I’m going to consider this my Sunday’s post and tomorrow, I’ll do the simple design. πŸ˜‰ A little switching up is OK now and then, right? πŸ™‚

Supply List:

Cardstock: Chocolate Chip – SU

Patterned Paper: Basic Grey Infuse 6×6 pad

Ink: Chocolate chip – SU

Other: Snap – Making Memories, clear button – Stampin Up, ribbon – unknown, Wholy Cow White rub-on – Basic Grey, sewing machine, Crop-a-dile – We R Memory Keepers

A quick birthday design

I had “loads of fun” putting together this quick little birthday design. With lots of little boys in the house, I’m always needing lots of boys birthday cards. πŸ™‚ This is one I made to have on hand for those last minute birthday parties that just happen to sneak up on you!

Loads of Fun Birthday

jks-loads-of-fun-birthday.jpg

This design uses repetition stamping to give the illusion of the truck moving. I used the Simply Bits set from Lizie Anne Designs. imply stamp your image and then mask it off with a post it note cut to size. Then ink up your stamp again, stamp it off once onto some scrap paper and then stamp back once, twice, three times without reinking. Move away a little more each time from the initial image. I went back and quickly colored in my truck with my aquapainter and inks. I just couldn’t resist adding these little copper brads to the centers of the wheels.

Other quick details… the spiral punch punched along the top white layer makes a quick fun border. Add a little brad detail row in front of the sentiment to tie in with the other brads and highlight the sentiment. A torn kraft cardstock edge and some sponging adds to the “dirty” look. πŸ™‚ Oh and one more real quick detail…a little ribbon tab on the bottom right of the image panel.

Quick, fun and perfect for a little guy. πŸ™‚ Hope your Saturday is “simply”… “loads of fun”. πŸ™‚

Something to Note: Lizzie Anne Designs no longer has this stamp available from there store. Stay tuned for something new in the works with it. If you just can’t wait… Stamping Cottage still has it available HERE...

Supply List:

Cardstock: Soft Sky, Whisper White, kraft, Close to Cocoa – SU

Stamps: Loads of Fun – Lizzie Anne Designs

Ink: Black, Close to Cocoa, Soft Sky – SU

Other: Brads – Making Memories, post-it note, ribbon – May Arts, spiral punch – Stampin Up

My New Stamp Room

I just had to share this photo of my new stamp room in the making. LOL I KNOW it is going to take a little time to get there! I’ve had people ask me for photos of my stamp room but…the sad truth is, I just don’t have one yet! I design in a very messy corner of our family room on one little desk. Where do I store the supplies?! On the desk, under the desk, on the floor, in cupboards…wherever I can find an inch! And so…it really WOULD break my camera to try and take a pic… especially after how busy I have been lately!

And so…. this “lovely” photo is of my new stamping space. See that lovely hole in the ground…it extends right under my kitchen and what used to be part of my wrap-around porch. I just can’t wait…another bedroom for one of the boys, a bathroom, a storage closet and a small 8×8 foot room for me. Can you see the area right where the concrete blocks are…that’s it! πŸ™‚ Be it ever so humble, I still Can’t wait! I’m just not enjoying the process but hey…when you buy a century old house…what can you expect?! Tomorrow those blocks are going to start forming the basement addition walls. I’ve got the bestest hubby in the world for tackling this job! Don’t you think? πŸ™‚ He’s been putting 30-40 hours a week in on this job on top of his 44 hour week. Stay tuned for more updates! I’m sure that from here…it is only going to get better!

jks-the-stamp-room.jpg

A Quick Note…

I’ve had two readers e-mail me looking for the Flourishes Flourished Christmas set. Wow it is gorgeous! One of my faves of the season. It seems that lots of other stampers have felt the same way! GSMTA! πŸ˜‰ (for those of you who haven’t heard of it…Great Stamping Minds Think Alike! LOL ) And so…as of the current time, you won’t find it on their web-site. I talked to Jan today and she says that hopefully the set will be back in stock next week. So, if you want this set, don’t despair…just keep checking! πŸ™‚

Wood You Like a Challenge?

No it’s not a typo…LOL I can spell (well, most of the time!) Wood you like a challenge…. Today’s Ways to Use it Challenge is to find ways to incoporate WOOD into your designs! Hmmmm…sound like a toughie? I know you are up to it! Just stop and think for a minute. Lots of wood products out there! Wood ornaments (see my design below), wood boxes, wood letters, wood die cuts, wood frames….sounding a little easier? Adhere a pencil on your design if you are determined to make a card. I don’t care…just as long as it has some wood. πŸ™‚ I hope you’ll play along…this should be a fun one. I love a unique challenge… it always pushes me out of my box….not a wooden one of course. wink πŸ˜‰ Sorry…just couldn’t resist. I must be in a VERY strange mood this morning. πŸ™‚ If you’d like to play along…the challenge link is HERE. If you haven’t played along before…what is stopping you?! Everyone is welcome!

Wood Star Ornament

jks-wood-star-ornament.jpg

I found this darling little wood star ornament at Michael’s a week or two ago. So cute! It has a removable back panel so that you can put a photo or whatever you wish in it. Immediately the ideas and possibilities started pouring in. And now….I simply MUST go back and get some more!

To cover the star, I removed the center panel so it wouldn’t get messed up and then covered my star ornament with some Basic Grey Fruitcake paper. It’s gorgeous! But I have to tell you…I just can’t wait to get my new Figgy Pudding Line paper. It is on its way!!!! YAY! Jacksonbelle now has it listed in her store. πŸ™‚ After gluing, I trim the edges close with my little scissors and then sand them with my Basic Grey Precision File Set. After that, I sponged the wood edges with my Bravo Burgundy ink.

jks-angel-close-up.jpg

To create my inner panel, I used the flip side of my patterned paper (Fruitcake is double-sided!) and stamped on it. I pulled out my Flourishes O Christmas Tree Set and stamped the tree with Always Artichoke ink directly onto the patterned paper. For my little angel…I stamped her in black ink onto some Very Vanilla cardstock as well as a scrap of the Fruitcake red paper side and then onto the center of my sage patterned background. I trimmed out my little angel from the invory excluding her halo and glued her onto my background, lining up the halo. I then colored her bodice, skin and hair with my Copic markers and then paper pieced the skirt from the print.

To add a little decoration to the rest of the project…the little wooden star was covered with another Basic Grey scrap (I can never throw them away!) and the other wood beads were sponged. I did try sponging the little round bead with Sage Shadow ink to coordinate but it just wasn’t taking the color well. SO…cool idea! I took my Green Gray Copic marker and colored it! Worked perfectly.

For one little project…I’m certainly long-winded! LOL Lastly the tag and ribbon. Ribbon from May Arts was quickly tied on the wire hanger. That little tag was punched with my Marvy tag punch from Michael’s. The Joy sentiment is stamped with a sentiment from the Flourished Christmas set.

Here’s a quick little tip… punch two tags, stitch the bottom of the patterned layer to the tag and then tear the edge off…layering is so easy as you just use the punch. πŸ™‚

Lastly, three little buttons are from Daisy D’s and the clear rhinestone sticker from Doodlebug Designs…gotta have a little bling! πŸ™‚ Have a great day and take me up on that challenge! Everyone is welcome! Can’t wait to see what you all do!

A Wonderland Tree Ornament…

I just love this Cosmo Cricket Wonderland Paper line. Sooo pretty! I came across it yesterday as well as a paper mache ornament that I had purchased last year from Michael’s and just had to pair them up. Since I’ve also been wanting to try out my new Flourished Christmas tree stamp and it fit the style perfectly…it was simple to create this pretty little ornament. This stamp is so ornate and beautiful…a simple design worked best. Any thing else would have taken away from it in the small space.

Flourished Tree Ornament

jks-flourished-tree-christmas-ornament.jpg

So…. instructions for this little ornament…well, there aren’t too many. I will suggest two things….stamp on your paper and emboss BEFORE adhering to the paper mache ornament. The surface just isn’t that flat! Also… probably the best edge finish will be obtained if you cover the sides first.

I adhered my Cosmo Cricket Wonderland papers with Mono liquid adhesive and then sanded the edges carefully with my Precision File Set. The edges were then lightly sponged with Close to Cocoa ink. For my main image, I used the gorgeous ornate flourished tree from Flourished Christmas stamp set by Flourishes. This set also has that uber darling reindeer and is one of my favorites! The images are so pretty and require little if any coloring…perfect for quick but elegant Christmas cards. The image is stamped with Versamark and then embossed with Claret embossing powder… it shines softly in real life…I know it is so simple but I love it. πŸ™‚

To finish it off…a pretty pearl sticker from Ellen Hutson’s Online Store and a scrap of dotted ribbon tied on the cord from Michael’s. Oh…the paper mache ornament…bought it at Michael’s last season. I’m sure they are still available! I can’t wait to put up the Christmas tree now! I’m hoping to make some more too!

Do you like challenges? Check back in tomorrow for the Ways to Use it Challenge…I guarantee this one will be a bit unusual but oh so fun! πŸ™‚

Some more snowmen…

LOL I just can’t put these little Lizzie Anne Designs snowmen stamp away! SOOOO cute! I decided that they would be adorable with this Fruitcake Basic Grey patterned paper and I designed it all together to make it work for today’s sketch challenge. Some weeks I don’t manage to play with any of the challenges but I’m determined to do my best to fit in a few this week! I’m also excited to have a great start on my Christmas cards this year. Last year…I was so sad that I really only managed to send about five. Of course…now we still have to do the Christmas photo of the kids and I have to write and address them all….hmmmmmm… it is going to be busy!

Snowmen Christmas Design

jks-vintage-snowmen-2.jpg


This design was really quick using today’s sketch challenge layout. One thing to note about this stamp…there was a lot of empty space on the panel to make it work with the layout. Don’t let that deter you. This left a lot of room for embellishing! After stamping my iamge and coloring it with my Copic markers…I torn the edges of the layer and mat and then wrapped the whole thing with some gorgeous Ivory Vintage Ribbon from Melissa Frances. The great big Daisy D’s button (local scrapbooking store) is adhered with a glue dot and tied with some burgundy gingham ribbon. As always…I love adding some stitching, especially with the vintage look of this paper and embellishments. A little straight stitching around the card and some zig zagging at the top of the image panel and my card was done. πŸ™‚

I’ve another Christmas project to share with you later on today…stop back in for a peek and have a great day!