No it’s not a typo…LOL I can spell (well, most of the time!) Wood you like a challenge…. Today’s Ways to Use it Challenge is to find ways to incoporate WOOD into your designs! Hmmmm…sound like a toughie? I know you are up to it! Just stop and think for a minute. Lots of wood products out there! Wood ornaments (see my design below), wood boxes, wood letters, wood die cuts, wood frames….sounding a little easier? Adhere a pencil on your design if you are determined to make a card. I don’t care…just as long as it has some wood. 🙂 I hope you’ll play along…this should be a fun one. I love a unique challenge… it always pushes me out of my box….not a wooden one of course. wink 😉 Sorry…just couldn’t resist. I must be in a VERY strange mood this morning. 🙂 If you’d like to play along…the challenge link is HERE. If you haven’t played along before…what is stopping you?! Everyone is welcome!
Wood Star Ornament

I found this darling little wood star ornament at Michael’s a week or two ago. So cute! It has a removable back panel so that you can put a photo or whatever you wish in it. Immediately the ideas and possibilities started pouring in. And now….I simply MUST go back and get some more!
To cover the star, I removed the center panel so it wouldn’t get messed up and then covered my star ornament with some Basic Grey Fruitcake paper. It’s gorgeous! But I have to tell you…I just can’t wait to get my new Figgy Pudding Line paper. It is on its way!!!! YAY! Jacksonbelle now has it listed in her store. 🙂 After gluing, I trim the edges close with my little scissors and then sand them with my Basic Grey Precision File Set. After that, I sponged the wood edges with my Bravo Burgundy ink.
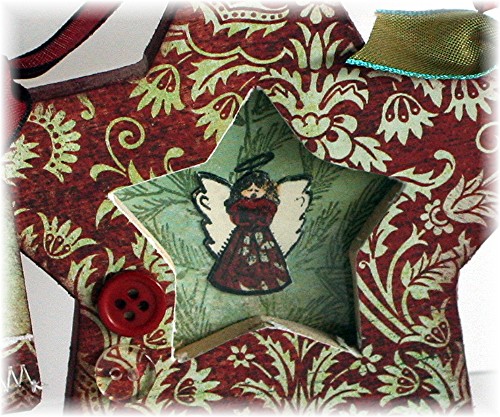
To create my inner panel, I used the flip side of my patterned paper (Fruitcake is double-sided!) and stamped on it. I pulled out my Flourishes O Christmas Tree Set and stamped the tree with Always Artichoke ink directly onto the patterned paper. For my little angel…I stamped her in black ink onto some Very Vanilla cardstock as well as a scrap of the Fruitcake red paper side and then onto the center of my sage patterned background. I trimmed out my little angel from the invory excluding her halo and glued her onto my background, lining up the halo. I then colored her bodice, skin and hair with my Copic markers and then paper pieced the skirt from the print.
To add a little decoration to the rest of the project…the little wooden star was covered with another Basic Grey scrap (I can never throw them away!) and the other wood beads were sponged. I did try sponging the little round bead with Sage Shadow ink to coordinate but it just wasn’t taking the color well. SO…cool idea! I took my Green Gray Copic marker and colored it! Worked perfectly. 
For one little project…I’m certainly long-winded! LOL Lastly the tag and ribbon. Ribbon from May Arts was quickly tied on the wire hanger. That little tag was punched with my Marvy tag punch from Michael’s. The Joy sentiment is stamped with a sentiment from the Flourished Christmas set.
Here’s a quick little tip… punch two tags, stitch the bottom of the patterned layer to the tag and then tear the edge off…layering is so easy as you just use the punch. 🙂
Lastly, three little buttons are from Daisy D’s and the clear rhinestone sticker from Doodlebug Designs…gotta have a little bling! 🙂 Have a great day and take me up on that challenge! Everyone is welcome! Can’t wait to see what you all do!

