Monthly Archives: July 2007

Girlie Gift Box

I recently created this fun little gift box for a little girl with my darling little fairy stamp from Lizzie Anne Designs. I thought it would be great for wrapping up a little gift and then she could use the box for little treasures afterwards. Combined with scallops, glitter, bling and lots of pink, it was so much fun to make!

Fairy Gift Box (click to see detail)

jks-fairy-gift-box.jpg

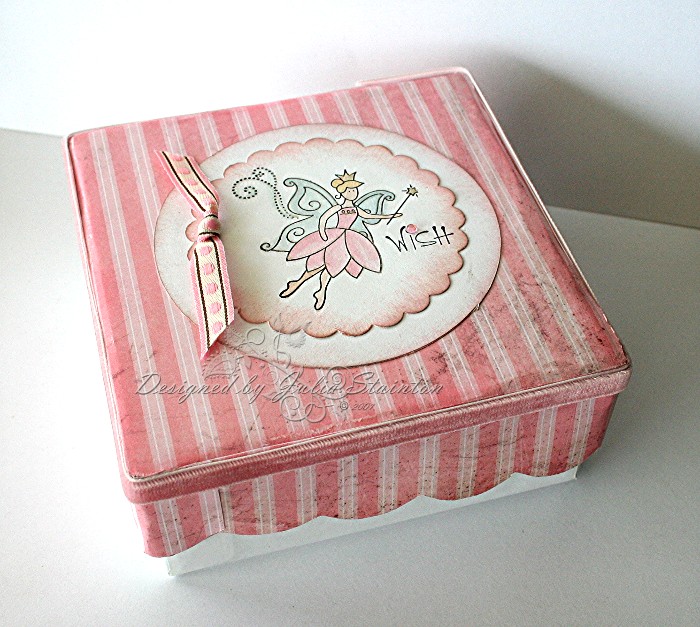
This little box was one that I picked up at Michael’s a few weeks ago. It is about 5″ square and 2″ deep and had a flower on the top. To cover the top of the box, I started out by gluing a square piece of Daisy D’s patterned paper on the top and sanding the edges. I then cut a couple strips of the same paper across the stripe and scalloped the edges using my large corner rounder by EK Success. After covering the sides, I covered the seams with some gorgeous May Arts Velvet ribbon. For the fairy image, I stamped it onto some Whisper White cardstock, watercolored her with my aquapainter and then punched her out with my scalloped circle punch.

To give my fairy a little “magic”, I used a two-way glue pen to add glitter to her wings, and added a tiny A Muse twinkle sticker to dot the “i” on the wish. I’m hoping she’ll like this box! It was so fun to get girlie again and make it! 🙂

Jacksonbelle has been having a giveaway this past weekend…you may want to check it out if you haven’t! But hurry…it ends today! Come back tomorrow as I’m madly working on that{C’est Bon} entry today to share with you! Wishing you a great day! 🙂

Supply List:

Cardstock: Whisper White – Stampin Up

Patterned Paper: Daisy D’s

Stamps: Fairy – Lizzie Anne Designs

Ink: Black, Pretty in Pink, Soft Sky, Blush Blossom, So Saffon – SU

Other: Ribbon – American Crafts, Velvet Ribbon – May Arts, Scalloped Giga Circle Punch – Marvy, Coluzzle – Provocraft, aquapainter, glitter, two way glue – SU

A Design Team Dare and a few Answers

This week, I’ve been so busy, I’m just going to have to put off my {C’est Bon} entry for a day or two. I haven’t had time to work on it yet and so I’m going to share a few other things today…

  • Have you ever wanted to be a “Dirty Girl”! 🙂 You know what I mean I hope! I’m talking about the Splitcoaststampers Dirty Dozen Design Team. I was very honored to be part of this team last year, learned a lot and had a blast sharing designs with the Fan Club members. This year, as part of the SCS 3rd anniversary they are having a special Dare to Get Dirty week of challenges for Fan Club members only. It’s your chance to be part of something fun and the designs are uploaded into a special gallery that everyone will be able to enjoy but only club members will be able to upload to. So fun! The Dirty Dozen and Dirty Dozen Alumni designers have been busy cooking up some great challenges and themes for you as well as some fabulous samples. If you are a Fan Club member…you’re going to want to take a peek and play along! If you’re not! What are you waiting for?! A membership helps support a truly fabulous site full of info, designs and tutorials and the Dirty Dozen gallery always rocks! 🙂 Come join us July 25th – 31st! 😉
  • I’ve been saving a pile of questions to answer on my blog but I’ve been so busy designing and sharing my designs lately, I haven’t had time to answer them! So sorry! I’m going to try and be good and answer a few a week starting NOW. 🙂 If I forget….please remind me! LOL

Bev asked….
A question on your sanding–do you sand near the edge on the top part of the card or do you just sand the edges–and what do you use to sand

I love sanding the edges of patterned paper! It is such an easy way to add interest! What I do is lay my patterned paper down on top of a scrap of paper. I use a piece of sandpaper and sand the top of the paper near the edges. I sand in one direction…outwards, from just before the edge to off the paper. You can also use a great little sanding tool from Michael’s as well.

For sanding patterned paper on chipboard, I use the Basic Grey Precision File kit and hold the cipboard in one hand and the tool in the other. 🙂

Elaine asked…

How do you eliminate stamps from your collection? Do you donate, sell, trade, or just keep em all?

Oh I wish I could keep them all but I just don’t have the storage space! I usually eliminate stamps that are just not getting used anymore. Because I’m often designing for a stamp company or for publication, I’m usually using recently released stamps. I keep my favorites though! Some of my stamps, I give away and others I sell on this site. This is an expensive hobby and I need to keep things turning around to keep affording it. See the top tabs above my banner for other pages on my blog. Stamps for Sale is one of them…you may wish to check it out.

Rebecca Asked…

Question…if you have time, which scrapbook stores in London do you frequent? I work near Nancy’s on Hamilton road and Dreanny Ave…I think the official name is Stamp Art.

Oh I LOVE Stamp Art Rebecca! It would be cool to run into you there sometime! Nancy is fabulous and I’m hoping to get down there again soon! I always try and go in for one thing but can never resist leaving that way. I have also shopped at the Stamp Shack which carries a fabulous line of The Artful Stamper images. Did you know they are designed in London?

As for scrapbooking stores, my long-time favorite is the Scrapbook Studio in Hyde Park. LOL They are the ones that got me into this mess! 😉 I’ve been a loyal customer since they first opened. They have a fabulous selection and are always happy to help me out. I also recently discovered Scrappin’ Great Deals as well. They are located in Kilworth and are primarily an on-line store but you can also make an appointment with Sheila and go visit the goodies themselves too. 🙂

If you stop by any of these places, say hello for me! 🙂

I also order a lot on-line for things I can’t always find in stores. There are a lot of great on-line stores out there if you are not able to find certain products in your area. Check out my sidebar to the left. I’ve linked some places that I’ve ordered from and would recommend. I’m sure you’ve noticed that I link sources a lot in my posts. Please note: I don’t get paid for this. 🙂 I just link them because that is where I purchased them and hope it will help you out if you wish to find it easily.

Simply Saturday…another summer design

It’s a gorgeous summer day here and we’re off to the beach! I’m not quite sure what I’m thinking…I have a ton of designs that need to be done next week, but….. I’ll get them done and I need a day off with the kids. 🙂

This is simple little design that doesn’t need any explanation…just playing around with some new A Muse stamps I bought about a month ago. I just love these CUTE little swimsuits! LOL This is NOT my swimsuit! Wish I could wear one but I think I’d clear the beach if I tried! LOL

A Perfect Pair

jks-a-perfect-pair.jpg

This card is so easy to create! Just a couple layers and lots of clean white space. Love white space for the summer…refreshing and easy on the eyes! For the little clothes-line…I simply drew in the little line with permanent marker, stamped in the images and then made little “v”s for the clothespegs to hang them on. Sentiment is made with my Karen Foster Snap Stamps…love how you can make any sentiment you wish. If you missed it and want to read more on the Snap Stamps, check out my tutorial and hints on them. The Prima Flower is from the Baby Girl Collection and is attached with a Karen Foster ThumbtackBrad.

Wishing you a wonderful summer weekend! Take it easy!

Supply List:

Cardstock: Whisper White, Purely Pomegranate – Stampin UP

Stamps: Bikini, Surf Shorts – A Muse, Casual Mini Snap Stamps – Karen Foster
Ink: Black, Purely Pomegranate, wild Wasabi, Brocade Blue

Other: ribbon – SU, safety Pin – Creative Impressions, Thumbtack brad – Karen Foster, flower – Prima

Rockin’ Blogger…

jks-rocking-girl.jpg

I’ve been tagged quite a few times over the past couple days as a “Rockin Girl Blogger”! Fun! Thank so much to Angel W & Kim Burmeister & Julie Buhler  & Trina McKercher for tagging me! So cool to be rockin”! 😉

Now comes the really hard part! I have to pick 5 of my favorite bloggers! Yikes! I have so many! I also just don’t get time to check in as many as I’d like as often as I’d like. Right now, I have a pretty full plate. Sooooo….

Thinking Inking – Debbie Olsen is one of my long-time favorite bloggers…If you haven’t already been there…how did you miss her?!

Simple Dreams – Ellen Hutson always has the most beautiful cards and ideas and she is sooooo nice! She has the coolest new products in her store too. Check them out!

Capture the Moment – Nicole Heady’s designs were the first ones to ever catch my eye when I started stamping and reading Papercrafts Magazine. Nicole has a fabulous clean style that is always easy to pick out and she comes up with the coolest ideas.

Paper Trufflez – Julie Ebersole’s blog was the very first one I started reading. Julie rocks!

OK….I’m going to cheat a bit here and do three for my last choice! LOL I can’t choose between Lindsey, and Michele & Trudee so I’m linking them all. They are all fabulous designers and fabulous friends!

I hated to narrow it down, I could have been linking blogs all night! LOL So many fabulous ones out there! Soooo….if you want more….scan over the my sidebar and go blog hopping this weekend! Have a great one!

Crabby?

I just love this little crab stamp…so adorable! When Gina K gave me a choice of stamps for this month’s guest designer spot, I knew this little guy was right near the top! I decided to create a fun little card with it…clean lines and a few extras to go with his fun look!

Crabby Dancer

jks-feelin-crabby.jpg

For this design, I pulled out my new SU In Colors, Soft Sky and Groovy Guava. I thought that crabby would work in this color and it is a fun change from all the red crabs out there. 🙂 Before watercoloring the design, I took a permanent marker and drew in a little stem and leaf for my Prima flower. Flowers are always a great pick-me-up and I love how it looks like he is holding up the flower with his claw.

For the sentiment, because it was a long thin piece of unmounted rubber, I could twist if up a little on my acrylic block before stamping to get a wavy effect. The sand was watercolored in wave motions and I used my Two-way glue pen to add swirls of “sand” with glitter.

The eyelets along the top right were punched and set with my Crop-a-dile and then tied with some black gingham ribbon from Michael’s.

I still have this card design so….if you are feeling a little crabby today 🙂 and would like me to send it to you to cheer you up….let me know in the comments section. First come, first serve! Hope that you are all having a fabulous Friday! Weather is gorgeous here! This morning was busy with raspberry picking and I just may be cooking up a new receipe to share with you all soon! I’ll also try and answer a tag later. It seems I’ve been chosen as a Rockin’ girl stamper 🙂 by quite a few people and just haven’t had time to post it! Sorry! My company leaves later today and then hopefully I’ll have some time to get caught up!

Supply List:

Cardstock: Whisper White, Groovy Guava, Soft Sky – SU

Stamps: Crabby Dancer, Feeling Crabby – Gina K

Ink: Black, soft sky, groovy guava, Close to Cocoa – SU

Other: ribbon – Michael’s, eyelets – Making Memories, Crop-a-dile – We R Memory Keepers, glitter, two way glue- SU, brad – Creative Impressions

Getting the corner on….

Corners! Today’s Ways to Use it Challenge is to find way’s to use those often forgotten design spots…the corners! I often neglect my corners but I’ve come across a lot of neat ideas lately for them, I thought it would be fun to challenge YOU to find new ideas as well. You’ll have to forgive me…this corner idea below isn’t too original but it worked well for this design. LOL It was busy enough withough adding more! I just had to use my new Stampin Up Basic Gray cardstock and its matching Charbon patterned paper. I think I’m going to be addicted! I’m so glad that Stampin Up came out with a great charcoal gray! I was saying to my good friend Lindsey back in January how SU was missing a good gray from their line! So glad they read my mind. 😉

If you’d like to play along with this WT122 challenge…everyone is welcome! Join in!

Tres Chic Charbon

jks-tres-chic-charbon.jpg

For this design, I started out with my favorite size card base…a 5″ square of Basic Grey cardstock. Why do I like it so much? I love the extra space to add all sorts of layers and embellishments! Also, I just find I design square layouts better. I find them easy to balance with all the goodies I love to use.

For the main image, I simply stamped my new Tres Chic background stamp in Basic Gray onto some vanilla cardstock. BTW…this stamp is a KEEPER! Love it! I stamped on the beautiful large dahlia flower onto the layer as well and then inked and distressed the edges.

For my simple corner treatment, I added little “photo corners” with brads. I love the photo corner look and always forget to try it out. I decided it would look cute with brads. I had originally planned to make the detail larger by adding more brads but I just got so carried away with all these beautiful new papers and stamps, I decided this card had about all that it could take! LOL

Today I’m off for the morning. My MIL is here with some of my BIL’s children for a few days. Today she has given me the lovely gift of a day off! I’m not sure that I’ll take all day…maybe just till after lunch. I wasn’t quite sure what I was going to do with myself! I’m not much of a shopper these days. Now if I had the day to myself in the house well….It would be a blissful stamping day but what on earth would Grandma do with 7 kids for the day?! LOL So I decided I’m off to Chapters and then to the Scrapbook Studio…it has been a while since I popped in and said hi to Diane! I’m sure I won’t leave empty-handed either! 🙂 A couple of my aunts are going to meet me for lunch. I’m so glad that they are doing this for me. I really miss doing those things with my mom.

Supply List: (all supplies from Stampin Up unless otherwise noted)

Cardstock: Very Vanilla, Basic Grey

Patterned Paper: Charbon

Stamps: Everyday Flexible Phrases, Fabulous Flowers, Tres Chic

Ink: Regal Rose, Basic Grey

Other: edge distresser – Heidi Swapp, Pewter brads – Making Memories

Flourishes…& a few other things of note…

jks-flourishes-logo-smaller.jpg

Flourishes…you know I love them…just check out my banner at the top of my blog! 🙂 Lots of flourishes there. Well, when I heard there was a design team call for Flourishes LLC , a new online company…I just had to check it out! I checked out their web-site….so beautiful! I couldn’t wait to apply and Yay! I’m so happy to announce that I was chosen to be part of their team and new venture! Thanks so much Nancy, Jan Marie & Sharon for the wonderful opportunity! I can’t wait to get designing with your new stamp line! Congrats also to the very talented members of the design team….I’m excited to be part of a great team. If you’d like to check out the rest of the design team, please visit the new Flourishes Newsletter. 🙂 The newsletter will be published monthly and you can sign up for updates, right on the site. Also on the newsletter…details on the new on-line store, opening date July 27th! and upcoming promotions. If you’d like a sneak peek at the upcoming stamp set releases, be sure to check out Jan Caruso’s Blog, The Caruso Manner.

  • You also may want to check out Jacksonbelle Embellishments over the next few days! Lindsey has half the store on sale as she heads off to CHA! Have fun Linz!
  • Check out Craft Critique for the Celebrations Contest Finalists! You can vote on site for your fave…it is worth the peek to check out the great ideas!