Wow! Where do the years go?! Today is my daughter’s 16th birthday and she’s growing up to be a lovely young lady. Of course we have those usual mother/daughter squabbles but today should be all about joy. When I think of it, it just doesn’t seem to be that long ago that I was that age myself.
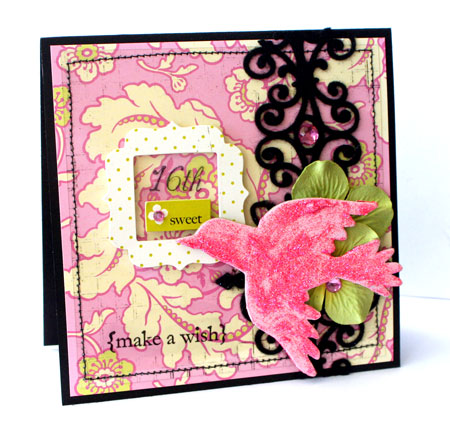
Now it may seem a little strange to you, but I’m actually a little nervous giving her this card. Why? Well… like most teenage girls, she has very exacting taste. It has to be cool! A little glitter, a cool black, pink and green combo and some fun embellishments make this a cool card in my humble opinion. I’m hoping it rates well enough in her eyes! 😉
Sweet 16th

I just love this Autumn Leaves patterned paper. I had the hardest time covering it up at all. My solution…to add a clear layer so that you can see all the pretty elements. I love the green and ivory accents in the pattern and actually..to start, I planned the layout around a particularily pretty section of the paper by adding my frame there.
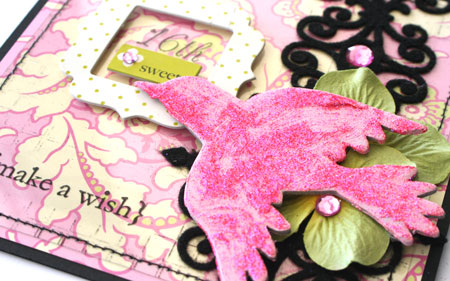
To add interest but frame the design, I actually added a tiny bit of scrapblock stamping on the Clear Card Sheet. It’s probably most apparent in the top photo. I inked up just about an inch of rubber all around where the edges of my Clear Card Sheet layer would be and then stamped. I think my Stazon pad must need to be reinked because it was much more subtle than I had anticipated. Oh well…it still works! 🙂
My glittered bird was one I was experimenting with last week and worked out perfectly for this project. I think it adds some fun texture to my painted chipboard. It’s super simple…after covering my chipboard with paint from an Adirondack Paint Dabber, I sprinkled it with some Art Institute glitter. To stamp on my design, I inked up my sentiments with Black Stazon and stamped right onto the stitched Clear Card Sheet layer. I actually made a BIG boo boo when stamping. 🙁 My bottom sentiment was crooked and I was really disappointed. After all…I’d already stitched down my clear layer. What to do?! Well…I had a moment of inspiration and tried it out on some scraps first. You’re going to love my solution so keep reading for today’s quick tip!
Quick Tip: Finally…a solution for those Stazon stamped mistakes! A Copic Clear Colorless Blender works PERFECTLY for removing the ink, even after dry. Simply brush on the Colorless Blender and wipe off with a paper towel. Isn’t that fabulous?! Now of course…this won’t work on paper but it WILL work on your non-porous surfaces. Thanks for letting me share my EUREKA moment! 🙂
Now I’m off to bake a cake this morning. What’s a birthday without a cake?!
Have a sweet, sweet, day!

Supply List:
Stamps: Distressed Grid Scrapblock™, Invitation Essentials & Birthday Centers (Mona Lisa Moments line) by Cornish Heritage Farms
Ink: Black Stazon Solvent ink by Tsukineko
Paper: Black cardstock by Prism, Zinnia Patterned paper by Autumn Leaves
Other: 5thAvenue chipboard stickers by Making Memories, flowers and Voila die cut felt by Prima, rhinestones by Doodlebug Designs, sewing machine, Clear Card Sheet by Cornish Heritage Farms, chipboard by Maya Road, Adirondack Paint Dabber by Ranger, Glitter by Art Institute
