Monthly Archives: June 2008

Video, anyone?

Sherrie Siemens has done a fabulous job on two video tutorials. Ever wanted to stamped detailed images and color them? Sherrie shows you how using CHF Friendly Kritter stamps. I’m so totally excited I manged to figure out how to embed video. I know! I’m not computer savvy! LOL

Enjoy!

Stamping the Kritters

Coloring the Kritters

Choosing a Color Combo…a short tutorial

Finding new and fresh color combos is a really easy thing to do if you just take the time to look around you. Color combos are everywhere from fashion, magazine advertisements, even your cereal box. One of my favorite places to find color inspiration is patterned paper. There are a wealth of colors and patterns out there presenting a never ending source of inspiration. Depending on how you change up your combo and the predominant color , a lot of looks that can be achieved from one piece of patterned paper. Very easy to do…I’ll show you how to put together some quick combos to try.

First of all, choose a piece of patterned paper that inspires you. It doesn’t matter whether you plan to use the paper in your final project or not. Sometimes I have created entire projects are a color scheme, planning to use the paper and then ended up not using it for more than a tiny scrap. I loved the wealth of color in this 12 x12 sheet of Crate paper (Flower from the Blue Hill Collection)
crate-paper.jpg

Simply go through with color swatches of cardstock and pull out the colors you want to use. Try lots of variations…it can totally change the look. Here is a few samples of what I came up with for this paper. I used my color picker to pull colors directly from the paper in Photoshop Elements. If you do it digitally, you still have to find cardstock that will be a close approximate to your color.


cc01.jpg

cc02.jpg

cc03.jpg

cc04.jpg

cc05.jpg

cc06.jpg

cc08.jpg

cc09.jpg

cc10.jpg

cc11.jpg

cc12.jpg


As you can see…I managed to easily pick out twelve 4-color combos. If I had decided to create 3-color combos…I could create even more variations. The paper I chose had fairly constant color values but some papers will have lots of graduations of the same you providing you with endless variations. Also look at the different combinations. I love seeing how just changing one color can change the look of the design. Some combos feel warmer, others cooler. Some vibrant, some subtle.

Quick Tip: One thing that I do when picking a color combo is to try and vary the intensity of the colors for balance. It can be quite overwhelming on a design if you use four dark deep colors. I like to throw in something a little lighter so give the eye some variation.

Feel like a challenge?…pick one of the above combos and create your own design OR pick a patterned paper and come up with your own combos. Have fun! If you decide to take up my challenge…be sure to link your project back here in my comments section…I’d love to see what you do!

Tomorrow I have a project to share with you that uses one of these combos. Which one? 🙂 Stay tuned.

Until then,

J

Avery Shipping Tags {C’est Bon}


Today’s {c’est Bon} entry is really one you can get a lot of mileage from without breaking the bank. After being given a couple of these tags by a friend, I quickly fell in love with them. So easy to use…so quick to embellish or alter, these tags work perfectly on layouts, cards and altered projects. I love the manilla paper look and their smooth surface is perfect for stamping on and distressing. Best of all…the price. One hundred tags for less than $5 CDN…that’s $.05 per tag. That is one pretty cheap embellishment!

jks-avery-tags.jpg

A Few Quick Details

  • manila paper tags
  • nice plastic storage box
  • made from recycled paper
  • 4 3/4″ x 2 3/8″
  • punched hole comes reinforced…perfect for tying
  • this product is not acid-free …if you scrapbook…this may be something you want to bear in mind

What you can do with them…

  • stamp on them
  • emboss them
  • distress them
  • journal on them
  • they are a great backdrop of clustering embellishments on
  • tie them on a gift bag or present
  • make a tag book
  • mat photos or layers with them
  • tear them…tear off the bottom to make them fit your design
  • perfect for vintage, shabby and eclectic designs
  • tie in perfectly with the office supply look
  • make a card folder and insert the tags into the openings
  • make a banner

Where to Find them…

A Few Project Ideas…

jks-paradise-found-tag-book.jpgjks-crazy-for-rubber-2.jpgeach-day-a-masterpiece.jpg

Friendship Tag

jks-friendship-tag.jpg

This design is a simple tag done in a shabby chic style. I love this style…you can be as simple or as lavish as you wish and it never has to be “perfect”. A little extra ink is a good thing. 🙂 This design uses super quick stamping for that beautiful Sandra Kuck Sisters image and how quick is it to staple on those embellishments?! Staples go great with the office look of shipping tags but if staples are not your thing, this design would look lovely without them. Some glue dots under that lace and those flowers and you would be all set. Tie this tag on a simple gift to make it extra special.

jks-friendship-tag-ribbon-c.jpg

The sentiments on this tag come from the Friend Centers set that Lisa Strahl designed. I love the fabulous sentiments that make up this set. One of the sentiments is stamped directly over the image in black ink…another of the sentiments is stamped right on the gingham ribbon at the top of the tag.

Quick Tip: Palette Hybrid ink by Stewart Superior is a fabulous ink for stamping on fabric. After some testing with the inks I own ( I have quite a lot 😉 ) this ink is the one I turn to for stamping on ribbon, twill and felt.

Hope you enjoyed this {C’est Bon} entry! I’m taking tomorrow off but will be back Tuesday with a tutorial for you.

Julia

Supply List:

Stamps:

-Sisters from Sandra Kuck line by Cornish Heritage Farms
-Friendship Centers from Mona Lisa Moments line by Cornish Heritage Farms

Ink:
Burnt Umber and Black palette ink by Stewart Superior
-Antique Linen Distress ink by Ranger

Other:
tag – Staples
lace by Prima
ribbon by Making Memories
stapler
flowers by Prima

Simply Saturday… a Special Day

While the calendar doesn’t quite say summer…in my mind summer is definitely here! Hot and sticky! I’m not one who likes the humidity but I do love tropical themed cards. This beautiful Fancy Pants Designs paper looked quite tropical to me so I played up on that by adding a little texture and a big Prima flower. On such a large flower, I wasn’t quite sure how I wanted to finish the center until I found a little jar of Art Accentz beads from Provocraft. A little dimensional glaze to glue them on makes a nice rich center. I wanted to keep this card quick and easy with a simple sentiment. This special day brown rub-on from Crate Paper worked perfectly.

Special Day

jks-tropical-special-day.jpg

My daughter’s been busy helping me with the garden this year. I am SO thankful for that! Some of my garden was torn out with the reno but some of it is still intact. I took a few pics of my perennials the other day…here’s a little peek. It’s getting a tad overgrown so I’ll be doing some back-breaking dividing this fall. The good thing is…I’ll have twice as many plants and will be able to make a new garden at the back of the house.

jks-garden-1.jpg

jks-iris.jpg

jks-peonies.jpg

jks-snow-in-summer.jpg

Enjoy a simply wonderful Saturday!

Julia

Whatcha Gonna Do?

Whatcha gonna do with those kids all summer long? It’s always a big task keeping them busy and happy, I know! I always find it a real challenge as I have so many different age groups to please…the perils of a large family. One thing I’ve learned to do is at the beginning of the summer, make a big long list of things you want to do with them. Have the kids make a list too. If it’s long, you may want to take the time to prioritize them…what are the must-dos and what would be nice but it optional. Trust me…with five kids, I never get everything on the list done. Ideas can be no cost like going to the library, walking in the park, having a friend over, low cost such as baking cookies, making treats and gifts, seeing a second-run movie as well as the more expensive vacation and site-seeing trips. My favorite way to spend a summer day is on the beach making sandcastles. Another idea I have always tried to incorporate into my children’s lives is exploring their creativity with arts and crafts. Yes…they sometimes make a mess but it is great entertainment value. I’m so glad my mother put up with me!

Paper Crafts Magazine has and awesome new publication out called PC Kids. I just got my copies the other day and I was so inspired looking through this HUGE issue. Whether you have little ones or older kids, there are so many fabulous ideas in this publication. Actually…I found a lot of ideas that I would like to use for my own crafting. This issue is not just for kids! One of the ideas I thought was perfect was a photo magnet strip for holding papers. It is just the idea I need to corral my childrens’ papers and art. I created a few designs for this issue but one of my faves was this Father’s Day design that I’m sharing with you below. Actually…not sure why but the photo I have here, is missing the dad tag…sorry! It should be on the little safety pin! The guitar and rock sentiment are from Kim Hughes’ Supah Star set. You can find this magazine in many craft or book stores and also on-line at Paper Crafts magazine.

Dad U Rock

jks-dad-u-rock.jpg

Have a great weekend and stay cool!

Julia

Picture This!

Photos, photos, photos…I have boxes of them. And that was BEFORE I bought a digital camera….now I have thousands saved on disk! I just KNOW you have some too. Today’s challenge is to pull out those photos and find ways to use them! Whether you create a layout, a frame, a piece of altered art, a photocard…pull out or print off a photo and use it as part of your design. I can’t wait to see all the creative ways you do this! Here’ the challenge link…hope you join us! If you need a little help getting started here’s a few of the many ideas you can do…

Photo Ideas...

  • a frame – everyone likes frame for their photos…altering one is a super easy way to incorporate photos
  • scrapblook layout
  • stamp on your photo
  • distress your photo
  • try a photo transfer technique
  • make a collage
  • use a photo as a background or main image on a card
  • try photo tinting
  • create a mini album

Each day a Masterpiece (click to enlarge)

each-day-a-masterpiece.jpg


I’m going to hang this in my rec room…sort of a beach theme room as we love the beach so much. The photos were taken on a trip to Nova Scotia four years ago. We were visiting Peggy’s Cove when I found this tiny rose blooming out of a crack in the rock. I was amazed at its ability to bloom in the harshness of its environment. jks-each-day-a-masterpiece.jpgThe words Inspire and Imagine from the Big Inspiration stamp set are stamped in black Stazon on the glass of the frame. Every time I think of this flower I’m reminded o the quote…bloom where you’re planted. If you look closely enough…there is beauty to be found everywhere.

My shadow box is a wood box I picked up at Michael’s. I painted the outside of it with Distress Crackle paint…the photo washed it out a little but I love the distressed look! My Basic Grey paper and Prima paper and flowers are from Jacksonbelle Embellishments.

Have a fabulous day!

Julia

Supply List:

Stamps:
Big Inspiration (Mona Lisa Moments line0 by Cornish Heritage Farms
Motivational Centers(Mona Lisa Moments line) by Cornish Heritage Farms
Vintage Ledger Scrapblockâ„¢ by Cornish Heritage Farms

Ink:
Black Stazon by Tsukineko
-Vintage Photo Distress ink by Ranger

Other:
-old paper an brushed corduroy distress crackle paint by Ranger
=flourish chipboard by Maya Road
-tag by Avery
-Noteworthy clip and ribbon by Making Memories
-gingham ribbon by Creative Impressions
-button by Autumn Leaves
-frame from Michael’s

Paper:
-plaid from Basic Grey Archaic lin
-dotted brown by Prima Marketing

Crazy for Rubber… a layout

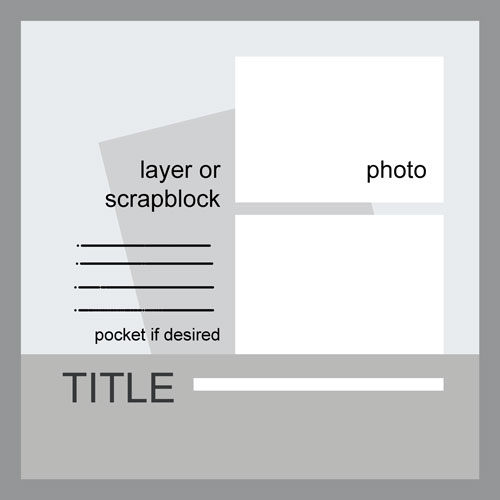
It’s time for another bi-weekly layout challenge and hope you’ll take the time to play along. This time I designed the sketch and hope you like it. It’s a fairly easy one to use. I think I got carried away with my actual layout though! LOL I was having a crazy day yesterday. You know those heavy humid days?! It had rained all morning and I was in a bit of a funk. What cheered me up was a mailbox full of new rubbah! Nothing like happy mail, right?! Well…my new rubber just had to be used in more ways that one. I did use some of it on my layout but also…designed the layout and journaling about my crazy love of rubber. 🙂 Here’s the sketch if you want to play along….

jks-scraplayout-design-4.jpg

Make sure you check out these links for some awesome layouts created with this sketch…

Becky

Kim

Lori

Alli

Crazy For Rubber

jks-crazy-for-rubber-2.jpg

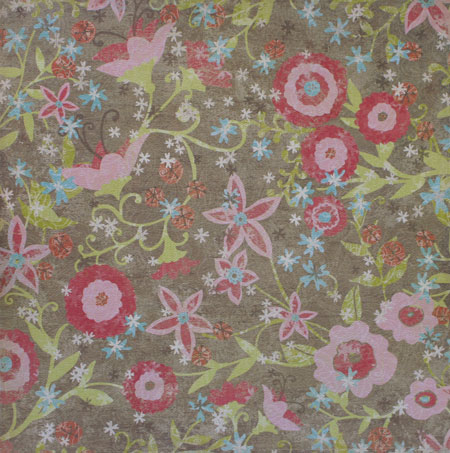
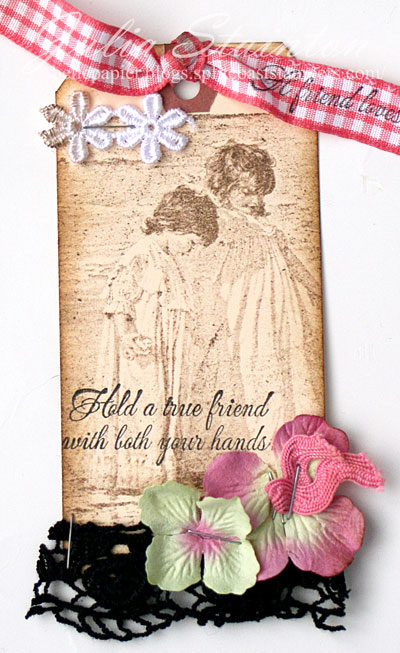
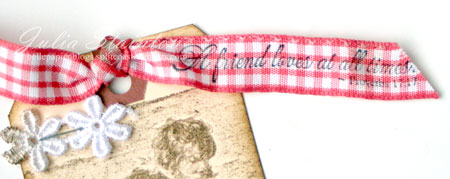
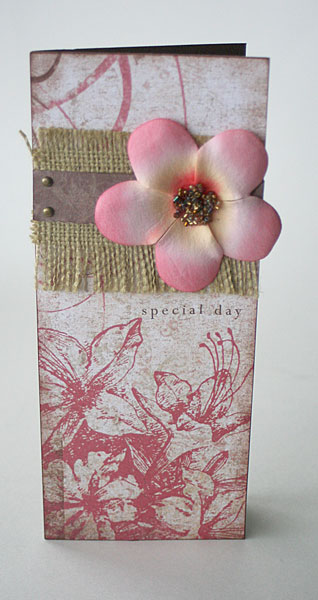
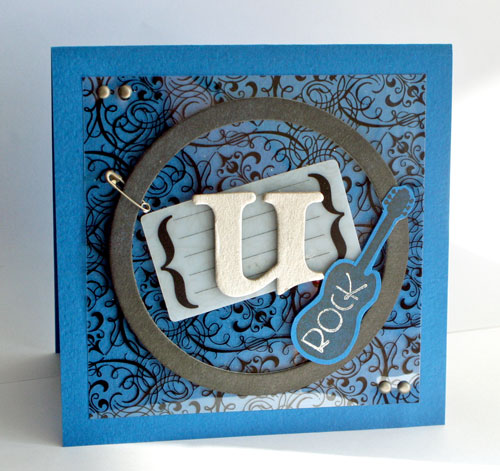
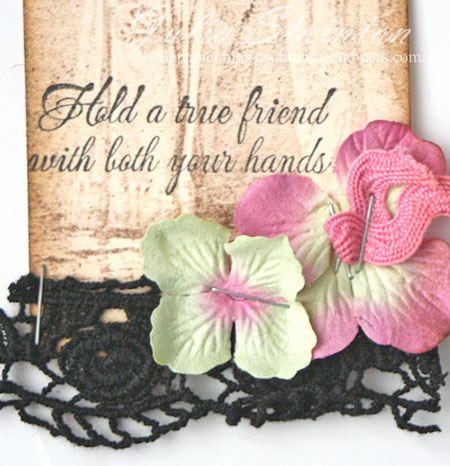
As you can see…I’m a little crazy for rubber. 🙂 Nothing quite like new rubber to make your fingers itch to stamp! I took some photos and then put a few of my new stamps to good use. Featured on this layout…some of the new Noteworthy paper from Making Memories along with my new Big Inspiration(to be released Thursday), Scrapblocksâ„¢ and the Round and Round We Go sets from Cornish Heritage Farms.

jks-crazy-for-rubber-color.jpg

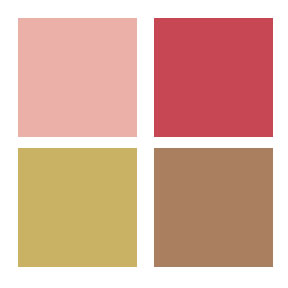
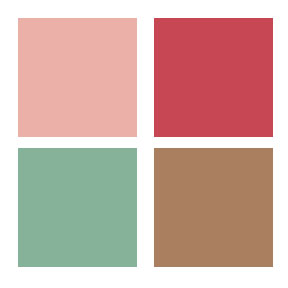
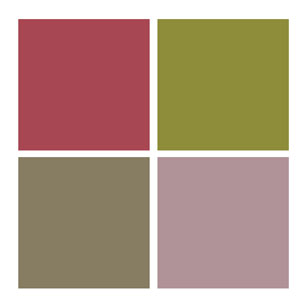
Since I had used another fun and funky color combo…I’ve included it again here for you to play with if you wish. Lots of fun embellishments tucked in around this design. Perhaps it is a little bit on the busy side…maybe a little crazy but it all goes with the theme of the layout I think. If you can’t have a little fun creating…well…why create?! Buttons, flowers, rhinestones, lace…all my favorite “stuff” is here. 🙂

Hope you enjoyed my layout and hope you join us for some scrappin fun!

Have an awesome day and check back tomorrow for a new Ways to Use it Challenge!

Julia

Supply LIst:

Stamps:
-Round and Round We Go (The Rummage Bin Line) by Cornish Heritage Farms
-This belongs to: & coffee stain from Ledger Me stamp set (The Rummage Bin Line) by Cornish Heritage Farms
-Perfect Plaid Scrapblockâ„¢ by Cornish Heritage Farms
-Big Inspiration (Mona Lisa Moments line) by Cornish Heritage Farms

Ink:
-Black and Burnt Umber Palette Ink by Stewart Superior
-Raspberry Adirondack Ink by Ranger
-Vintage Photo Distress Ink by Ranger

Paper:
-Noteworthy 2 line by Making Memories
-Prism cardstock

Accessories:
-chipboard letters by Scenic Paper Route
-die cut strips by Doodlebug Designs
-gingham ribbon by Creative Impressions
-buttons by Autumn Leaves
-flowers by Prima
-rhinestones by MAMBI
-plastic tab from Office Sheers by Maya Road
-markers by Copic