
I told you I’d share my favorite Flourishes design and this is it! I had so much fun getting a little creative with the set. You’ll have to look close…see the vase? It is the fancy pedestal for the cake plate! The flowers are tiny flowers for embellishing the cake! I was just tickled with this one. 🙂
Now if you are checking in today, Thursday, you are probably wondering about the Ways to Use it Challenge! Because I’m so swamped at the moment… Shelly (papermoon04) is so kindly helping me out! Make sure you check out the super fun WT123 Product Parade on SCS and play along if you can! Thanks so much Shelly! I hope that those of you who are SCS Fan Club members are having a fabulous time on the second day of Dare to Get Dirty! 🙂 Actually…LOL….you are all probably so busy that you don’t have time to blog surf! Have fun creating!
Two things you may want to take note of for tomorrow! First of all…Flourishes is having their Grand Opening! So exciting! Be sure to check it out! The second thing…Friday is my day to post a challenge in the Dare to Get Dirty challenges. Stop by and play along! It is sure to be a lot of fun!
Flourishes Vase
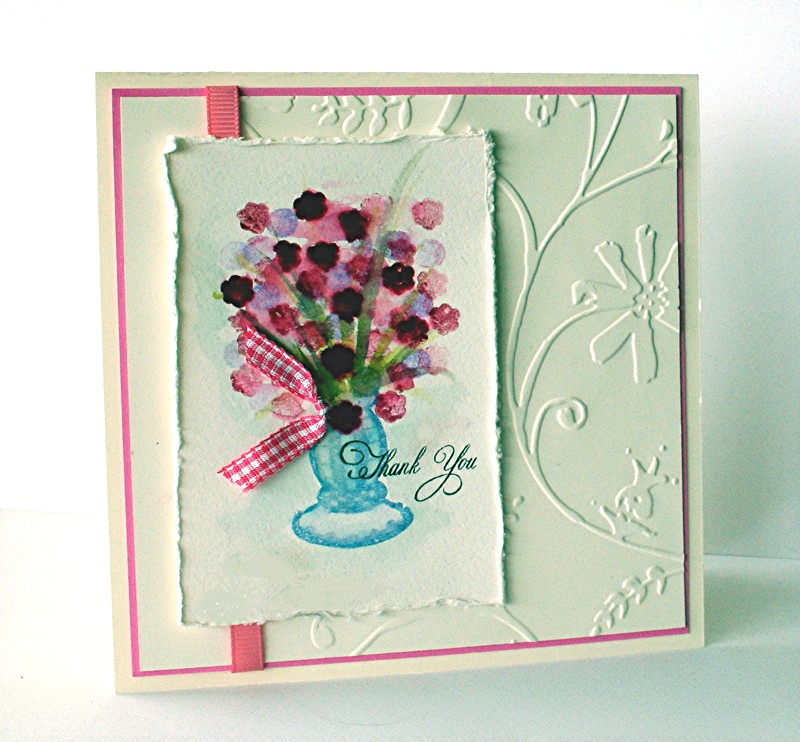
For this design, I had to try a few things to get it to work. I’ll share them here and then you can do it on the first try. 🙂 USE watercolor paper! It makes a huge difference!!! First of all I stamped my vase with Brocade Blue classic ink. I then watercolored in some strokes of greenery with my Aquapainter and Old Olive ink. With one of the tiny flowers, I repeatedly stamped first and second impressions of flowers in Lavendar Lace to get good coverage and then repeated with another flower stamp and Purely Pomegranate. I then added in more greenery strokes with Always Artichoke. Really…this didn’t take long…it just sounds like more work than it is! With a wet aquabrush or a spray bottle with fine mist of water…lightly wet the flowers so they blend like a watercolor. Go back and lightly brush the edges of the vase to pick up the blue color and lightly color in the vase.
Quick Tip: If you find your paper too wet or your colors are bleeding….quickly blot with a tissue.
After allowing the paper to dry well, I then stamped the sentiment over the vase and adhered a little scrap of knotted ribbon with a glue dot. I decided I didn’t want to mat my image to keep the design subtle and play up on texture rather than harsh contrasts. To do this and still define my edges, I used my edge distresser to add texture.
To keep the focus on my “watercoloring”, I decided to keep the background very subtle and simple. I decided to emboss my vanilla cardstock with the Cuttlebug Stylized Flowers folder. This one is my fave! Now these folders do have there limitations. When making a square card, it has to be a pretty small layer or you can’t emboss the whole surface. What to do? Make it part of the design! And so, I embossed just over 3/4 of the surface by inserting as much of the square as possible into the folder and then embossing. I then ran a rose ribbon over the “seam” to incorporate it into the design and to anchor my main image. 🙂 Easy! The panel was then matted with an 1/8″ layer of regal rose and then mounted onto a 5″ square vanilla card base. C’est tout!
Supply List:
Cardstock: Very Vanilla, Regal Rose – Stampin Up
Stamps: Flourished Words, Cake Decorating 101 – Flourishes
Ink: Purely Pomegranate, Lavendar Lace, Old Olive, Brocade Blue, Always Artichoke – SU, Black Palette Noir – Stewart Superiour
Other: Cuttlebug & CB embossing folder – Provocraft, aquapainter & Ribbon- Stampin Up, Edge Distresser – Heidi Swapp, gingham ribbon – Wal-mart
13 responses to “Watercolor Blooms…”