Category Archives: Papercraft projects

Paper Gift Bow Tutorial

Paper gift bows are so crazy easy to make and  I just adore the custom look. I may never buy another gift bow again! Give them a try and tell me what you think.

Paper Gift Bows Tutorial

Supplies: cardstock or patterned paper, stapler, adhesive

1. Cut strips of paper to these sizes… 3 – 3/4″x10″ strips, 2 – 3/4″x8.5″ strips, 1 – 3/4″x4″ strip

2. Start your bow by twisting each of the five long strips into a figure 8 shape and stapling in the center.

3. Adhere the large three looped strips together and the medium looped strips together.

4. Adhere the smaller strips into the center of the larger. Staple the small strip into a single loop.

5. Adhere the small loop into the center of your bow to finish it.

Use these fun paper bows to decorate packages and gift bags. They are perfect for a coordinated gift or for using of scraps of paper. If you have a 4.5″ x 10″ scrap of paper, you can make this bow. For this project I’ve used the Al Fresco paper from the Picket Fence line by Lily Bee Design.

Happy creating!


Mother’s Day…It’s a Wrap

Happiness is homemade. Growing up, your mom is that person who makes every day special. She’s a caregiver, a teacher of life lessons, the nurturer, the one who comforts. Mom is a huge part of making your world a happy place. There is just no one quite like a mother.

I’ll never stop missing my mom. We lost her four years ago to cancer but there isn’t a day that goes by that I don’t think of her and wish I could tell her something. I’d love to tell her again just how special she was.

While I miss my mom, my mother-in-law is a wonderful mom as well. We are so blessed to have her. She’s always been good with her hands and loves everything I create for her. This year I decided to make the gift wrapping special and do a little paper crafting magic for it.

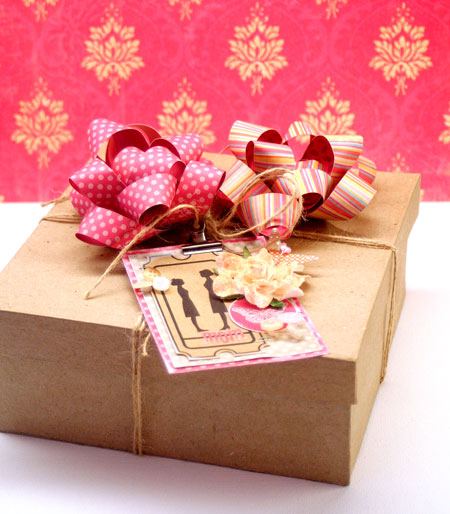
This box is a paper mache box I picked up at Michael’s. I love the look of simple kraft wrapping and the simplicity of the box highlights the pretty trims. I’ve used lots of beautiful Lily Bee Design product to create this gift wrapping.

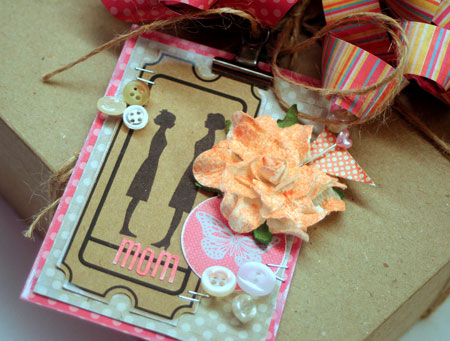
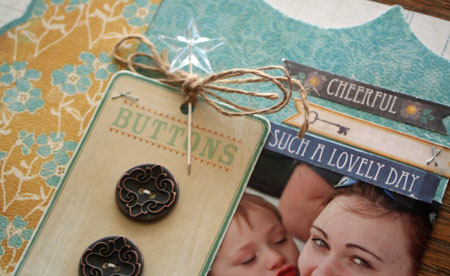
I love creating gift tags. They are fun, quick and a great way for using up leftover paper crafting supplies. For this tag I’ve used the mother & daughter stamps from the Lily Bee This & That line. They work perfectly for Mother’s Day. The patterned paper is from the Stationery line. It’s a sweet subtle print that makes it a great cardstock alternative.

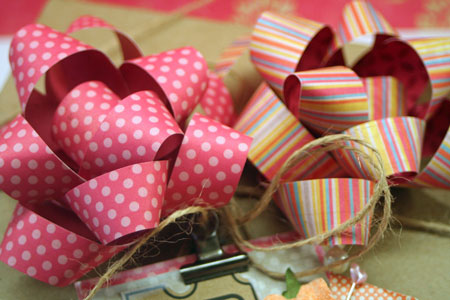
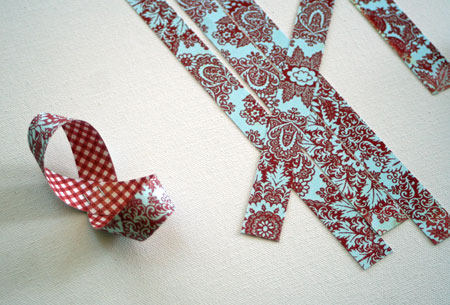
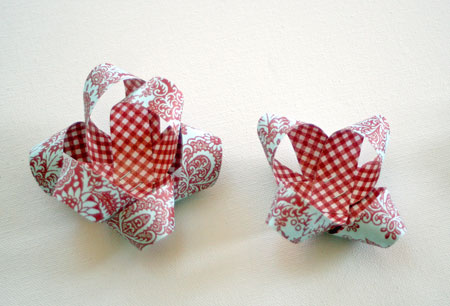
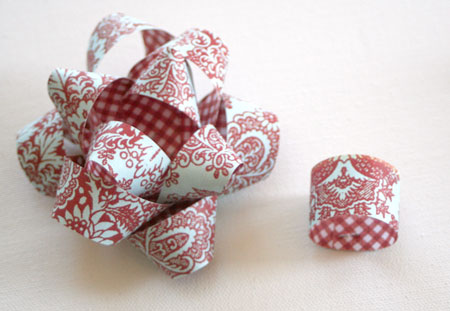
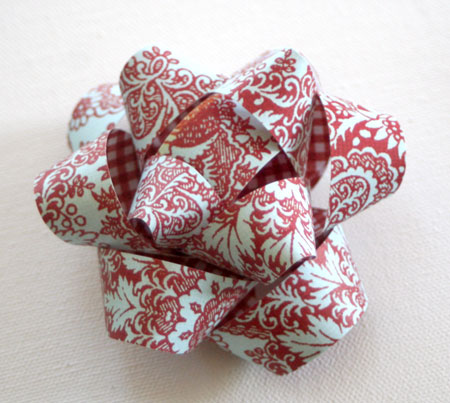
Here’s a closeup of the paper-crafted bows. I may never buy another again. I love how easy they were to create and how much personality they add to the gift. I don’t have a tutorial made yet on how to create these but stop by tomorrow and I’ll share the how-tos.

Today I’m sharing this project on the Lily Bee Blog. We’re celebrating mothers all week there so stop by and check out some great inspiration.

Supplies: Paper Mache Box from Michaels, twine, Stroll-Happily Lost patterned paper, Mushroom & Cotton Candy patterned paper from Stationery Line, This & That Stamps, Happily Lost Mixed Cardstock Stickers and Happily Lost ABC Stickers by Lily Bee Design, flower by Prima, Kraft Ticket & trinket Pins by Maya Road, Hinge Clip & Tiny Attacher by Tim Holtz, Jet Black Archival ink by  Ranger, White Colorbox Pigment Ink by Clearsnap, Glimmer Mist

Have a great day!

It’s a wrap,

life

This time of year is all about new life.
Thinking about life has me remembering to make the most of each moment as I’ll only pass by this way once.

I’ve also been thinking about creative risks and experiments. Making my own art.

Here’s a little peek of some canvas wall art I’ve created.

I really enjoyed creating something new.

Want to see more or give it a whirl? I hope you’ll join me today in the CLASSroom for the entire project and step outs.

Wishing you a blessed Easter!

so much more

“so much more delightful than you know”

Don’t you just love that? That’s how I feel about my kids and so that journaling die cut was all I needed to inspire me to get creating.

This layout also comes as part of a challenge…

This project uses the latest Up the Street Scrapbooking kit and is also a challenge for you. If you’re like me you love die cut patterned paper but sometimes it is so pretty, it’s just hard to cut. I hope you’ll be inspired to try cutting into it and having some fun. Check out the challenge here.

So Delightful

We had such a great time on our family vacation in Florida. We loved every minute but the best thing was sharing the adventures and time with my children. I was so proud of how well they all got along and behaved throughout the trip. Yes the drive was long. Long, long, long! Over 21 hours to be exact and we drove straight through. We also had a wide variety of ages and personalities to work with. So while I could scrap fun moments and pictures of gators and palm trees, beaches and boats, this layout focuses on a sweet moment between siblings. Love you guys!

This little birdie just may be my new favorite die. Who would have thought I’d get so addicted to die cutting?!

Isn’t this a darling little button card by My Mind’s Eye. It’s part of the kit and while the buttons are gorgeous, I just couldn’t bear to take them off the original card. It’s sanded and tied with twine to make an instant embellishment.

And finally, the journaling. I wish I had bettering printing and handwriting! Oh well…it’s the thought that counts, right?

Enjoy your day!

Canvas Love

Canvas is such a great surface to work with. Pretty much anything you can do with paper, you can do with canvas.

Maya Road creates the most fabulous canvas albums that make unique mini albums. But why not take them apart? You can use them for so much more.

I’m super excited about the new Paper Crafts Magazine special issue, 350 Cards & Gifts. It arrived in my mailbox last week and I’ve been sitting down and enjoying all the wonderful ideas and possibilities. It’s chock-full of fabulous gift ideas. You’ll love it!

You’ll find one of my favorite projects from this issue below. I’ve used a couple Canvas Banner Maya Road albums as the base for it.

For a quick photo op, I just tied it on the front of an old dresser but it’s going to be hanging in my entryway to welcome people in.

Don’t you love how using the canvas album as a base makes it super easy to create? This banner uses the Cosmo Cricket Circa 1934 line for a classic look.

Quick Tip: Cut out letters with a digital craft cutter for quick letters in any size you want. I’ve used the Silhouette here.

It’s always so difficult to photograph a banner for blogland so here’s a closeup.

Happy creating!

for my home…

My home is my favorite place to be. It’s not fancy. It’s an old well-loved farmhouse that is constantly being renovated. It’s come a long way and we are slowly making it our own. We do this by doing the work ourselves and adding pieces of our own style throughout.

One thing I always love incorporating is text. Lucky for me it’s a great trend in home dec lately and I thought it would be fun to create my own frame using some papercrafting products I had on hand.

Printed Canvas Frame

This product uses Natural Sticky Back Canvas by Claudine Hellmuth. I {heart} this product! You can run it through your printer! Of course, you can paint it, stitch it, stamp it, ink it, die cut it, etc. etc. etc. too!

The texture is so cool…

Want to make one?

Open the above file by clicking on it and then print onto some Sticky-Back Canvas. I’ve used the Natural as I love the warmed look. I print it out at 8×8″ in size and then place right onto a wood 8×8″ frame from Michaels. The edges of the frame are painted with Claudine Hellmuth Charcoal Black Studio Paint.

Easy peasy!

Have a creative day!

It’s In the Bag

It’s the thought that counts when it comes to gift giving, isn’t it? Just saying that you care and you took the time to share. While I’m not quite sure that I buy into “presentation is everything”, it sure does add a nice touch.

I love making altered gift bags. They are really quick and fun to create and add that special touch to a gift that says you care.

This fun gift uses the gorgeous Crate Paper Restoration line and was part of a Sweet 16 ensemble I create for the March/April issue of Paper Crafts Magazine. I was actually going to share the banner from this set but sigh, the original photo isn’t the best and my poor banner met its demise in the craft room flood.

Have you checked out this latest issue from Paper Crafts? It’s one of my faves! Two or my other projects can also be found as on-line bonuses here and here.

Quick Tip: Keep a stash of white and kraft gift bags on hand to quickly & easily alter when the need arises.

It’s the last day of March Break here and we’ve had a quiet but fun week with the kids. I guess quiet is a relative term. It hasn’t exactly been quiet per se, but rather, we didn’t plan much. It’s always nice to take it easy. Tonight we’re having friends over and tomorrow we’re off to the sugar bush. Pancakes and real maple syrup. I can’t wait!

Happy Friday!