Monthly Archives: November 2008

It’s Better to Give than to Receive…

 jks-dream-gift-clip.jpg

The season of giving is upon us. I find that hand crafted gifts can be among the most treasured (baring electronic games 😉 I do have lots of boys you know) and love creating them for holiday gifts. This particular altered wood plaque is for my daughter this Christmas. She’s chosen a new bedding ensemble as her gift and I thought this coordinating plaque would be a nice surprise. Today I’d like to challenge you to create a holiday gift and share it to inspire others. To play along with this challenge, check out the CHF Forums.

If you’re looking for some fabulous ideas…these other designers from the CHF team have created some great gifts. Check out  Julie, Kim, Dawn, Jen
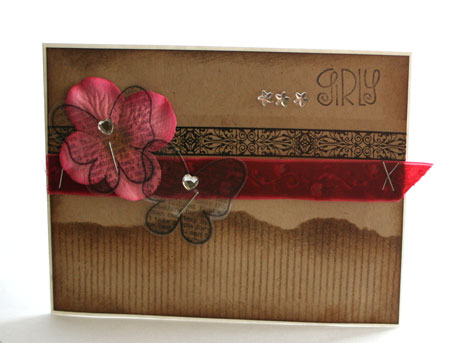
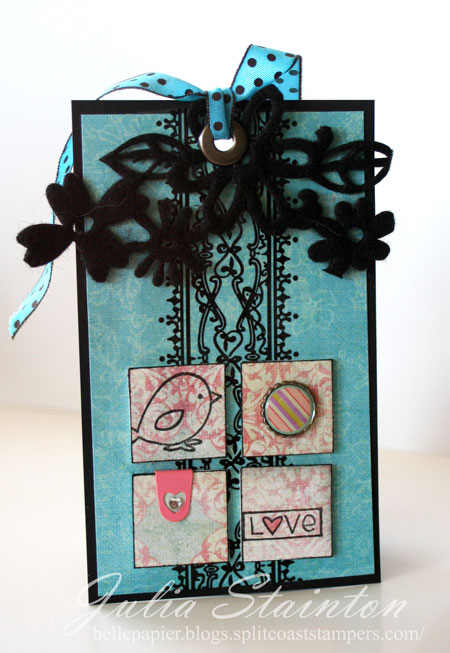
Dream Gift Plaque

jks-dream-gift-plaque.jpg

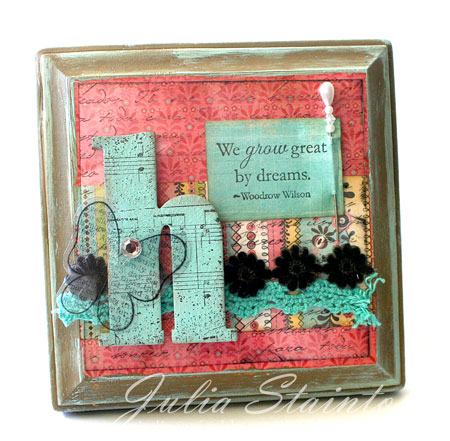
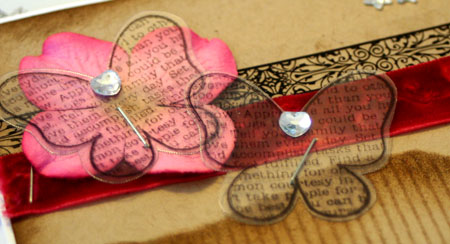
While this design looks more scrappy than “stampy”, guess how many stamps I’ve used here! Four! Can you find them?

I also used my new Urban Prairie paper pad. Didn’t I tell you I couldn’t put it down?! 🙂

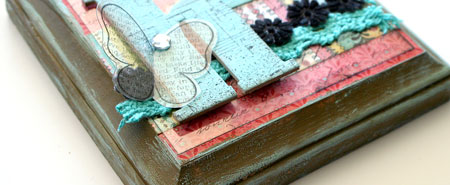
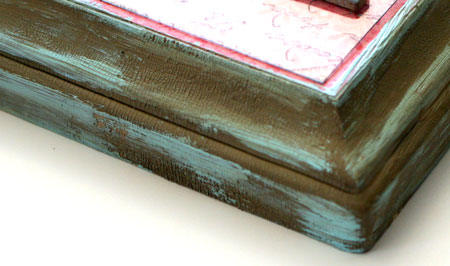
Now when I painted the edges of the frame…it seemed a little dark and heavy in the Distressed Corduroy Crackle paint but I REALLY wanted the texture and I didn’t have anything lighter that would work. Check out how I made it not only lighter, added to the texture and tied in my Aqua color throughout the design.

jks-dream-paint-texture.jpg

Have a fabulous day!

a-signature-2.jpg

Stamps:
Aged Sheet Music Scrapblock™ by Cornish Heritage Farms
Spanish Script Backgrounder by Cornish Heritage Farms
-Butterfly from Little Gal stamp set (Kim Hughes line) by Cornish Heritage Farms
Motivational Centers (Mona Lisa Moments line) by Cornish Heritage Farms

Ink:
-Black Stazon by Tsukineko
-Black Memento by Tsukineko
-Brushed Corduroy Distress ink by Ranger

Paper:
-Urban Prairie 6×6 paper pad by Basic Grey

Other:
-Aqua Adirondack Paint dabber by Ranger
Clear Card Sheet by Cornish Heritage Farms
-pin by Making Memories
-lace by Prima
-wood plaque from Michael’s
-Brushed Corduroy Distress Crackle Paint by Ranger

Prima Decorative Tape {C’est Bon}

Tape is one of those products that we use on a regular basis to wrap presents, hold things together and we just really never think much about it. It’s usually one of those things we DON’T want seen. Leave it to Prima to come up with some cool decorative tape that makes an awesome embellishment, is economical and so easy to use. You may have seen this product before but never really thought about how to use it. I like to use mine just as you would any strip of paper or ribbon…as a layer to break up the design and add a fun look.

jks-prima-tape.jpg

Why do I love it?

  • quick to use…just pull off a strip and use it
  • fresh and funky product
  • sticky backed and easy to adhere
  • gorgeous classic decorative patterns that can be used in traditional, vintage, shabby, grungy or even clean styles
  • I love clear accents and this product adds a nice visual interest without adding bulk
  • they are a great embellishment for masculine designs as well as feminine
  • mostly comes in black but is available in a few other colors
  • available in packing tape size width or the smaller tape size
  • inexpensive ….$2.99 US each

Make A Wish
jks-make-a-wish.jpg

Stamps: 1938 Suburban GM line by CHF, Birthday Centers (Mona Lisa Moments line) by CHF

Ink: Black Palette ink by Stewart Superior, Brushed Corduroy Distress ink by ranger

Paper: Simply Smooth White by Prism, Ambrosia 6×6 paper pad by Basic Grey

Other: sewing machine, decorative tape by Prima, decorative brad

For this design I adhered the Prima tape directly over my patterned paper layers to add an ornate, vintage look.

Ideas for using it…

  • over seams on layers
  • layer under ribbon
  • use like ribbon
  • adhere on clear acrylic pages or cards
  • create a frame
  • create a binding

A few more samples that you can find on my blog…
jks-sweet-sixteenth.jpgjks-girly-close.jpgjks-girly.jpgjks-love-tag.jpgjks-travel-card.jpgjks-layout-wild-ride.jpg

Where to buy it…

Got any great ideas for this product or have any questions? I’d love to hear from you!

Have a great day!

a-signature-2.jpg

Simply Saturday… simply airbrushing

Happy Saturday! I like to keep Saturdays as simple as possible around here. So many people home and so much to cram into one day! I have two simple cards to share with you today, both using some quick and simple airbrushing. I’m loving how fun this airbrush is to use! In both these designs it gives a fresh graphic look. My first design doesn’t even use any stamping. Simply a masked, airbrushed background, a rub-on transfer and a couple embellishments.

Holiday Ornament Design

jks-airbrush-holiday-orname.jpg

Supply List: Simply Smooth White Cardstock by Prism, Copic markers and airbrush, rhinestones by MAMBI, blue Velvet ribbon (airbrushed to purple) – May Arts

Airbrush Elvis

jks-airbrush-elvis.jpg

Now this Elvis image is so cool and funky looking…I thought it just had to be airbrushed. Since the image is quite large and indestinct in style…I didn’t even mask. I think Elvis is lookin pretty cool! The background is stamped with my Aged Sheet Music Scrapblock™ and then airbrushed in two blues and a pink. This was just so fun and quick to do!

Both these projects were part of a Craft Critique Copic Airbrush Review. If you’re thinking of buying this airbrush…you may want to check it out.

Enjoy your weekend!

a-signature-2.jpg

Supply List:
Stamps:
Sheet Music Elvis by Cornish Heritage Farms
Aged Sheet Music Scrapblock™ by Cornish Heritage Farms

Ink:
-Black Memento Ink by Tsukineko

Paper:
-black Prism
-Simply Smooth White Prism

Other:
-stars by creative Impressions
-black velvet ribbon by Creative Impressions
-Copic Markers
-Copic Airbrush system

Little Guardian … a sweet angel

I have another Copic colored image for you today. This sweet little angel is one of today’s Sandra Kuck releases at CHF. They are so sweet for Christmas and while Christmas Angel is my favorite, I think this little guy is a close second. I kept this design really simple as there is lots going on in the image and a lot of visual texture. While these colored images may take a little longer to complete than some designs, I have to tell you…I’m really enjoying slowing down some evenings and just relaxing by coloring. I think the hardest part is deciding who to send them to as I get quite attached to each one.

Little Guardian

jks-little-guardian.jpg

To get a crisp even impression when stamping these detailed images, I find technique, ink and paper make all the difference.  I used Black Memento Ink (Rich Cocoa works great too), brayer to distribute evenly and then stamp on Simply Smooth White Cardstock. While you might think that one white cardstock is pretty much the same as others…they are not.

Quick Tip: To get the highlights back in the face and clothing of this little angel, I take my Colorless Blender Pen and remove some of the color after coloring.

Have a wonderful Friday!

a-signature-2.jpg

Supply List:
Stamps
-Little Guardian (Sandra Kuck line) by Cornish Heritage Farms
-Scratchy Straw Backgrounder by Cornish Heritage Farms

Ink:
Tea Dye Distress ink by Ranger
Rich Cocoa Memento Ink by Tsukineko

Paper:
-simply smooth white, kraft, Blush Red Dark by Prism

Other:
-hemp cord
-makers by Copic
-brayer

Cutting Corners

One little tool that I love but haven’t pulled out in a while is my corner rounder. Now why is that? Do you have a corner punch tool that is just sitting around begging to be used? If so…this challenge is for you. The Cutting Corners challenge is to challenge you to find ways to use those corner punches. Don’t have any? GO faux and pretend by using some decorative scissors or some ingenious idea! 🙂

Wedding Wishes

jks-wedding-wishes.jpg

I kept my design pretty simple and just used the large corner rounder from EK Success. I rounded the corners on the main panel and also created a scalloped border by removing the guide from my punch. These simply snap on and off. To create the border turn your punch so that you can see the bottom punching mechanism and punch a semi circle along the edge. Move punch along until the next scallop lines up with the previous and punch. Repeat until the entire edge is punched.

This design uses lots of new product. The latest Kim Hughes’ stamp sets, I Thee Wed and The Birds and the Bees are both released today. I paper pieced the cake with my new Urban Prairie 6×6 paper pad. I have a serious addiction to this paper and I guarantee you’ll be seeing lots of designs created with it. I just can’t put it down. Not only are the patterns fabulous…they are in my very favorite colors of light teal, celery and pink. It’s a little difficult to see in the photo because of the shine but the top row of icing on the cake is a series of tiny heart rhinestones.

Quick Tip: Buy corner rounders in a couple different sizes. This will allow you to mat rounded corner layers and also create different sized scalloped edges.

Have fun with the challenge and happy creating!

a-signature-2.jpg

Supply List:

Stamps:
I Thee Wed (Kim Hughes Line) by Cornish Heritage Farms

Ink:
Rich Cocoa Memento Ink by Tsukineko

Paper:
Simply Smooth White cardstock by Prism
Urban Prairie 6×6 paper pad by Basic Grey

Other:
pin by Fancy Pants Designs
ribbon by May Arts
flowers by Prima
rhinestones by MAMBI
corner rounder by EK Success

Joy!

Joy. It’s one of the words I most associate with the holidays…how about you? I love CHF’s Ornaments of Joy SOTM image for November. It’s so easy to use with the sentiment and image all in one stamp. You can ink the ornaments with markers, stamp with a technique or simply emboss it for an elegant look. I decided to keep this little gift card project clean and simple but make it fun with some non-traditional Christmas colors. This way it’s still fun but you can create a lot in a hurry. After all…you’re probably like me and very short on time during the holiday season! I’m sure you can figure out this project by just looking at the photos but the directions also come with the stamp when you order it. I think I’ll be whipping up a few more of these for those thank you gifts this Christmas.

Joy Gift Card Holder

jks-joy-sotm-upright.jpg

jks-joy-sotm-open.jpg

Have a happy Wednesday!

a-signature-2.jpg

Supply List:

Ornaments of Joy SOTM rubber stamp by Cornish Heritage Farms

Aged Sheet Music Scrapblock ™ by Cornish Heritage Farms

Black Memento Ink by Tsukineko

White Stazon Ink by Tsukineko (optional)

Birthstone Kaleidacolor pad by Tsukineko

Clear card Sheet by Cornish Heritage Farms

Glossy Cardstock by Ranger

Intense Pink cardstock by Prism Papers

Black Prismatic cardstock by Prism Papers

Dotted pink ribbon by Creative Impressions

Circle punch

Brayer

Airbrush Masking…a new spin

Here’s a design I’m really excited about and it’s so simple to do. As you know…I’ve been having fun with my airbrush tool lately and this is one project that shows you a neat idea for masking. Masking is one of those essential techniques when doing most airbrushing and you can use a mask you’ve created yourself, mask using a stencil or purchased mask or just use something you already have on hand by laying it on top of your project. I love KI Memories die cut papers and had a scrap leftover just large enough to use on the front panel of my design. As you can see…I didn’t actually keep the lace paper on my project but used it as a mask.

 Sweet Sixteenth

jks-sweet-sixteenth.jpg

Quick Tip: This is one great way to get lots of mileage (and a new look) from those expensive diecut papers. You can use the paper as a mask over and over OR simply use it as a mask once and then reuse the airbrushed mask in another project.

How to….Julia’s Airbrush Die-cut Paper Masking Technique

  1. Stamp  paper with Backgrounder Stamp.
  2. Lay piece of Lace die-cut paper over top to mask surface.
  3. Airbrush parts of the design using one color.
  4. Repeat airbrushing with two more colors till completely covered.
  5. Removed Lace paper mask.
  6. Cut panel to size and use on project.

This project is part of a Craft Critique review on the Copic Airbrush System.

Have fun with this technique!

a-signature-2.jpg

Stamps:
-Invitation Essentials (MLM Line) By Cornish Heritage Farms
-Spanish Script Backgrounder by Cornish Heritage Farms

Ink:
-black Memento ink by Tsukineko
-Pink Adirondack ink by Ranger

Paper:
-Simply Smooth White by Prism
-KI Memories lace paper (removed after spraying)

Other:
-flower and tape by Prima
-sewing machine
-Copic markers and airbrush system