Monthly Archives: May 2007

For Father’s Day…

I originally designed this card for a Father’s Day call. My first ever attempt at getting published. While this one didn’t make it, I was SO excited to have Papercrafts take another Father’s Day card I made. YAY! My first acceptance letter…I was pretty excited! The card that did get published is now on the stands in the June/July 2007 issue of Papercrafts at the bottom of page 57. It is an online bonus project. The full instructions are now posted on the Papercrafts web-site at the following link, No Matter how Tall.

This card could also be used as a birthday card and that is actually what I’m going to use it for. My dad’s birthday is tomorrow. Happy Birthday Dad!

Bohemia Dad

jks-bohemia-dad.jpg

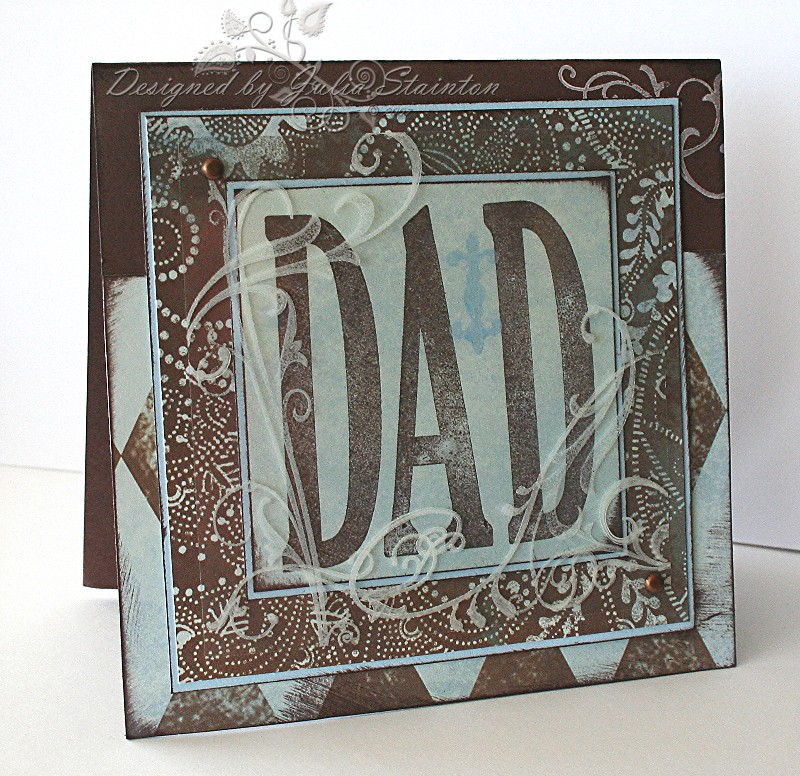
For this card, I started out with a Chocolate Chip cardstock base. This card measures 5.25″ square. I direct to paper inked the edges of the diamond patterned paper and adhered it to the cardstock. For the main image & sentiment, I used my Technique Tuesday Eiffel Tower Capital Letters Tall. I inked them up with Chocolate Chip craft ink. These stamps are clear polymer stamps & I find that with large surfaces with this type of stamp, it is better to use the craft ink. You get a better, more solid impression that way. For lining up letters, clear stamps are the way to go. So easy to see through those acrlic blocks!

After inking all the edges, I then matted the sentiment layer with some Bashful Blue cardstock. I also wanted to add a layer of the gorgeous Paisley style paper. I cut it to a width that would give me enough border on each layer to enjoy the pattern, layered it and adhered it all together.

Quick Tip: For a nice, fine matted look…mat your layers with 1/8″ larger mats. Also, make sure that your blade is always sharp or it will be very difficult to get a nice clean edge.

For the last touch, I pulled out an acetate transparency. I love them for adding a discreet touch of interest and layer. Also from Technique Tuesday, my Whirlygig stamps needed to make an appearance. I stamped them on the acetate with white stazon for a neat look. To hold the transparency on the card, I pieced two holes in corners diagonally from each other and inserted two copper brads.

I love the vintage style look of this card and had so much fun making it. I hope my dad likes it too!

Crystal Effects {C’est Bon}

jks-crystaleffects.jpg
Crystal Effects is a dimensional glaze product sold by Stampin Up. I just love this product…it has so many uses! It comes in a small bottle that seems to go on forever. Crystal Effects is perfect for adding that little bit of shine and dimension to any project. With a nice long narrow nozzle, it is easy to apply to your project in just the right amount of product. Crystal Effects is also acid free and is perfect for using on your scrapbook pages. When used in relatively small quanities, Crystal Effects dries quite quickly allowing you to get on with your project. Another fabulous use for Crystal Effects is as an adhesive. It is perfect for gluing on small items to your design and it forms a nice strong bond.

Crystal Effects is a very inexpensive product, only $8.95 Cdn. I hear it is $6.25 US, (thanks Angel)! One bottle of Crystal Effects goes a very long way…mine lasted for almost three years and I’ve just purchased a new one. Crystal Effects can be purchased from any Stampin Up Demo. Visit their web-site, www.stampinup.com to find a demonstrator in your area. If this is not an option, there are other similar dimensional glaze products on the market you may want to look into. I have never had any experience with them so I’m sorry, I can’t help you with product names or recommendations.
jks-crystal-effects-stamp-repair.jpg

Great Ideas for Crystal Effects

  • Use it on stamped images to make glass, water, even eyeballs =) realistic
  • Glue on beads with it
  • Repair stamps
  • Repair household items with it 🙂
  • Apply with paint brush to use as a sealer
  • Adhere microbeads with it
  • Sprinkle glitter on it
  • Paint with it…add drops of ink from an ink refill to it. Paint onto acetate or other hard surface that it is hard to get ink to stick to
  • Add it to flower petals to look like dew drops
  • Create water puddles or raindrops
  • Use it to make faux page pebbles
  • Try a fun stamping technique such as Caught in Crystal or Tissue and Acetate

Quick tip: Cut the tip of your new bottle of Crystal Effects off carefully. You don’t want to large a hole or you may have difficulty applying the product. Another idea is to keep your nozzle down until completely done adding your glaze to prevent bubbles from forming.

My Mom gave me this darling little ornament. I treasure it because of the sentiment. My mom is one of my very best friends. I keep it on a little roll-up desk in my hallway. Unfortunately, it fell off and one of the flowers came off. I quickly repaired it with Crystal Effects….now it is as good as new! 🙂

jks-flower-fix-combo.png

 A quick little design using crystal effects and microbeads… it IS the Canadian Long Weekend after all! 🙂

Spot of Happiness

jks-spot-of-happiness.jpg

As I mentioned above…busy weekend with the family so when I pulled this together yesterday morning, I wanted something quick. I happened to notice this poor neglected set in the back of my stamp drawers and pulled it out. For the main section of the design, I stamped the little circles randomly in Certainly Celery, Cool Carribean and Cranberry Crisp. I just adore all these colors and am so sad to be seeing the last two of them go. They were part of SU’s In color line and will be replaced with 6 other brand new colors. The white stamped piece was matted with black cardstock and then adhered to a 4.25″ square cardbase of Cool Caribbean.

I then stamped the large circle with Cranberry Crisp and then stamped the small flower in the center in the Caribbean. I punched it out and then matted it with more circles punched with my EK Success punches. In the center of the flower, I added some Crystal Effects and then sprinkled on some microbeads. To tie it all together, I adhered some beautiful black velvet ribbon from Jacksonbelle across the design. Under it I stamped Happiness Always from the Happy Harmony set from SU’s sellebration promotion in black ink. Lastlly, after allowing the Crystal Effects a few minutes to dry, I adhered the circle over the ribbon to complete my project.

Please Note: I am not a SU demo or affilitated with any manufacturer or product that I feature in my C’est Bon entries. Crystal Effects is simply a product I love and feel is worth trying out.

Chocolate Brownies & Other Ramblings

Are you sensing a trend here among my recipes?! Lots and lots of chocolate. We all love it. Probably way too much! I made this recipe Thursday and thought I’d share it here with you. It is one of my faves and so easy! Perfect for a large family. I had GOOD intentions of taking a photo of them for you….alas, they promptly disappeared before I had the chance! So I guess you’ll just have to take my word for it that these are good! LOL Or maybe the fact that they disappeared quickly will do it for you. 😉

We’re off the the lake today! Can’t wait! It’s been since last fall and even though it’s not warm enough here yet to swim…just feeling the sand between our toes will be awesome! It’s been a stressful week here and what is better for that than walking on the beach and breathing that fresh air?! The boats will be mostly in the harbor by now and the kids always love to walk down to see them too.  I’ll try and take some pics to share with you later! This weekend is Victoria Day long weekend here in Canada. Long weekends always seem extra special just made for spending time with your family.

One Bowl Chocolate Brownies

This recipe originally came from a Baker’s Chocolate package. I’ve altered it to use cocoa instead of semi-sweet chocolate in the recipe.

3/4 cup cocoa

1 cup butter or margarine

2 cups sugar

2 or 3 eggs (two for fudgey brownies, three for cakey brownies)

1 teaspoon vanilla

1 cup all-purpose flour

Cream butter and sugar together. Add cocoa and mix in eggs and vanilla. Stir in flour and 1 cup of nuts if desired. Spread inot greased 9×13 inch pan. Bake at 350°F for 30-35 minutes. Do not overbake.

Frosting (if desired): Mix 2 tablespoons butter, 2 squares of semi-sweet baking chocolate and 1/4 cup milk together in saucepan. Heat over low heat, stirring until smooth. Remove from heat and stir in 2 cups icing sugar. Spread over cooled brownies. Cut into squares….enjoy! 🙂

This recipe freezes well if you can keep it around that long! LOL

A Quick Card before the long weekend…

This is a fun little card I created for today’s Limited Supply Challenge. The challenge was to design a quick card using one image stamp with a flower on it, one sentiment, some doodling and a few other restrictions. One of them being…no patterned paper! Gasp! If you’d like to see the entire instructions or to play along…the link can be found here.

Funky Birthday Friend

jks-funky-birthday-white-bg.jpg

For this card…I started out knowing that I wanted to use white doodling on black cardstock. I had been flipping through a scrapbooking magazine this morning while I ate my breakfast and saw a darling layout with white gel pen handwritten on black cardstock. It really popped and I wanted to try it out. Enter the challenge…you had to doodle…well this mornign was the time to try it out. 🙂 I had no idea what other colors I wanted to use with it until I saw this darling ribbon hanging out of my ribbon drawer. I’d bought it and only used it once…it would work great as a jumping off point. Black, white, Pink Passion & Real Red…great combo and one I rarely use!

From there I had to pick a stamp set….I wanted to try out some more of my new Lizzie Anne Designs stamps and found this darling little purse and yes! it had a flower on it. That would work! If you are looking for it, it is part of the Happy Birthday set. I stamped the purse on a small scrap of white cardstock and then inked the edges with black ink for definiton and tied it with the ribbon. The purse was then colored in with my pink Gelly Roll Glaze pen by Sakura. I love the fun glossy look! In the center of the flower, I added a little red crystal brad from Making Memories.

The card itself if a 5.25″ square card base of Pink Passion Cardstock. I added a black layer and then strips of red and pink cardstock for a fun, fresh look. After adhering my image, I stamped the [happy birthday] sentiment in black across the strips of cardstock. To add the doodling feature, I pulled out my White Signo Gel pen and wrote words and doodled flowers around the left side of the design.

jks-funky-birthday-closeup.jpg

For the final touch, I added a flower embellishment to the bottom right corner. On the challenge list, it didn’t mention Prima flowers 🙁 but it did mention a flower punch. I bought the cute little Marvy punch from Michael’s a few months ago and for the most part, it has been hidden in a drawer. I punched out two flowers from vellum and then pulled out one of my new treasures to hold it together….corduroy covered brads! So darling!

Quick tip: To make your colors pop…pair them up with black! Black can be elegant but it can also make this fresh and fun!

This card took me 20 minutes to make…well within challenge limits and perfect for a busy morning! Actually uploading it and writing this blog entry has taken me way longer than that! LOL

Wishing you all a wonderful weekend and to my fellow Canadians & friends…a very safe and happy Victoria Day long weekend!

Small Stamps – a list of tips on how to use them…

Today for the Ways to Use it Challenge, the challenge is to use small stamps. Often these small stamps can be difficult to use. I know that I tend to gravitate towards larger stamps and usually overlook the smaller ones. I’ve discovered a few tricks to using them over the past couple years and I thought I’d share my ideas and the others I’ve picked up along them way (sorry I have no idea where!) with you. First of all, I’ll start with today’s card and then move on to the list of tips. If you’d like to play along on this weeks Ways to Use it Challenge, you are most welcome at WT113.

Sweetpea

jks-sweet-pea.jpg

I’ve had this small sweetpea stamp from Ellen Hutson’s store sitting on my desk since I received my order a couple weeks ago. I’ve been really looking forward to using it but life has been a little crazy, even more so than usual these past few weeks. Because I spent all last evening in the Walk-in Clinic, I’ve made this card really simple. Lots of clean white space which is good too as I had really wanted to make a card design for last Friday’s Wide Open Spaces challenge and never managed to do it!

Which brings me to my how I designed this card with a small stamp… Most of the time I tend to make more detailed designs but there is nothing wrong with a simple design. Actually, they can be among the hardest to pull off well. I always think of Julie Ebersole when I think of clean, simple great designs. I just loved the curve of this little pea stamp…so sweet! It just seemed to want to be nestled in the bottom right corner of the card. After watercoloring my pea pod with Certainly Celery and Old Olive and allowing to dry, I covered the tiny round peas with my Sakura Clear Gelly Roll Glaze pen. I love how it gives a rounded glazed effect to the little peas. This dries very quickly and I love that! Crystal Effects would also work well if you have a steady hand in that tiny an area and are willing to wait for it to dry.

The white image panel was then matted with Certainly Celery and then adhered to a 4.25″ square card base made from Kraft cardstock. I’ve been wanting to try out this combo and I just love it!  It looks so fresh in person…perfect for spring or a new little sweet pea. I then tied on this darling dotted ribbon from Starlitstudio. I love the repitition of the circles on the ribbon with the shape of the peas. To finish it off I stamped my brand new congratulations stamp from Lizzie Anne Designs. This stamp is from the Simply Sentiments set. I just love the script on this and it is the perfect size…I know it is destined to become one of my faves!

Ideas On How to Use Small Stamps

This list is by no means exhaustive…just a few ideas I’ve learned. I’m sure that you have some fabulous ones of your own as well and I am by no means the expert on this…just sharing what I know. 🙂

  1. Simple & Clean can be a great way to use small stamps. Don’t be afraid to leave some empty space in your design. Do plan your layout well if you do this. It often helps to add a small touch of wow when you do this…a little bow or bling always works well!
  2. Repetition is another way to go. Stamping an small image repeatedly for a background it a great way to use small stamps. See below entry from an example.
  3. Cluster stamps together in a group to make an larger image. For example, if you have a small flower on a stem, stamp three or more to create the effect of a garden. Masking is a great technique to combine with this as you can overlap the images and still get a natural look.
  4. Layer small stamps over a background stamp. I love the look of small flowers stamped over a background stamp such as Linen or Canvas by Stampin Up. It adds some fun to the background stamp and the larger stamp helps tie the little images together.
  5. Tags are fabulous for little stamps. Because of their smaller size…they help break up the design and the small stamps fit perfectly on them. You can use cardstock tags, metal tags, vellum tags, whatever you wish.
  6. Borders are a great way to use little stamps. They can be stamped in a line or even a circle to create a border at the bottom or side or your design, or around a focal point.
  7. Design is a big factor in making any project work well. Breaking up the space well with layers or embellishments helps add interest. A small image layer can work well with an interesting design. Scroll up to above entry to see example of this.
  8. Patterned Paper adds lots of pizzazz to a design. Pairing up a small image stamp with patterned paper for interest is a great easy way to use a small stamp.
  9. Ribbon is fun to stamp on and small stamps are the perfect size for this. Try your ink out on a ribbon scrap first to make sure that is works well with the type of ribbon you are using. Twill is another great alternative.
  10. Scale down the size of your card is another of the easiest ideas. If you are having trouble designing with a larger card….scale down to a 4×4″ card, a 3.25 x 6.25″  card, even a 3×3″ mini gift card.

I hope this gives you some ideas to think about and hopefully incorporate into your designs. Pull those small stamps out of the back of the drawer, dust them off and have some fun! Wishing you all a fabulous day!

Some more Lizzie Anne…

Another Lizzie Anne Designs card. This is actually the second time I’ve typed this out today…as if I need the extra work! LOL For some reason…I lost the first one when I hit publish. Little boys are still sick….I think we’re off to the Walk-in Clinic tonight!

Vellum Florals

jks-vellum-blooms-2.jpg

I haven’t used vellum in a while and thought it would be a pretty, fresh look for spring. I actually only used ONE stamp for this entire card! Unheard of for me, I know. 🙂 I started off with the beautiful paper by My Mind’s Eye. It’s from the Tres Jolie collection that is brand-new and I am totally addicted to! The square card base is made from the double-sided designer paper and I put the patterned side on the inside to create a nice surprise. As I was covering the outside with vellum…I didn’t need the extra competition of patterns there as well.

For the vellum overlay, I cut vellum cardstock from Stampin Up the same size as the card. I stamped the front of it with the freestyle flower from Lizzie Anne Designs Funky Floral set in White Versamagic ink. This ink is specially formulated for use on vellum as well as other paper and dries really well. The bottom front edge is scalloped with my small corner rounder and then the little scallops are punched with a hand circle punch to create a white lace eyelet look. The vellum was then attached to the card base on the back of the card with two small glue dots. To hold it together in the front as well as work into the design, I tied dotted organdy ribbon around the front layers of the card.

The little tag was made by punching a scrap of the designer paper with my Marvy tag punch. I used the patterned side this time to give a sneak peek of the inside design. I then stamped and embossed two more of the flowers on some scrap vellum and cut them out. I then layered them and attached them to the tag with my Crop-a-dile and an eyelet.

This is a very simple, pretty design. I was inspired by the beauty of the paper. It seemed very feminine and pretty and I wanted to compliment it.

Supply List:

Paper: Tres Jolie line by My Mind’s Eye, Cardstock Vellum – Stampin Up

Stamps: Funky Florals – Lizzie Anne Designs

Ink: Versamark, White Versamagic – Tsukineko

Other: ribbon – Michael’s, white embossing powder – SU, tag punch – Marvy, eyelet – Making Memories, Crop-a-dile – We R Memory Keepers

An update and another prayer request….

cancer-ribbons-2.jpg 

I just wanted to give you an update on my mom (Kathleen) for all those who are interested. Many of you know that she has been fighting Melanoma (the most agressive type of skin cancer)  through 2 major surgeries as well as interferon and radiation treatments. She is still having chemo treatments…3 days every three weeks. Next Tuesday she will start her next round. After that they may give her 6 weeks off. She is quite exhausted from it all. We appreciate your continued prayers.

I also have a prayer request for my Mother-in-Law, Arlene. She was diagnosed with Breast Cancer a couple weeks ago and is having surgery on Friday and then treatment to follow. If you could remember to pray for her, we would most appreciate it as well.

 Thanks so much for your support! We strongly believe in the power of prayer.