Category Archives: recipes

Living in a Material World…

Well…we’re living in a material world.And of course, we wear material of some sort every day. I thought it would be fun to combine more of the Sew Special images with this Fashionista paper by Graphic 45. A very vintage material girl look. Can you imagine what it must have been like to sew every item in your wardrobe and that of your family? What a huge job! I’m so glad we have the mall now! Release date for this set is this Tuesday. 🙂

Material Girl

jks-material-girl.jpg

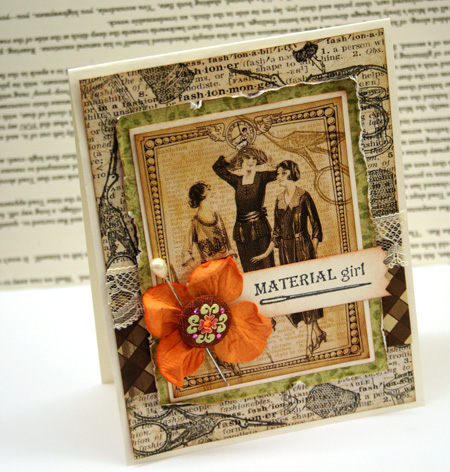
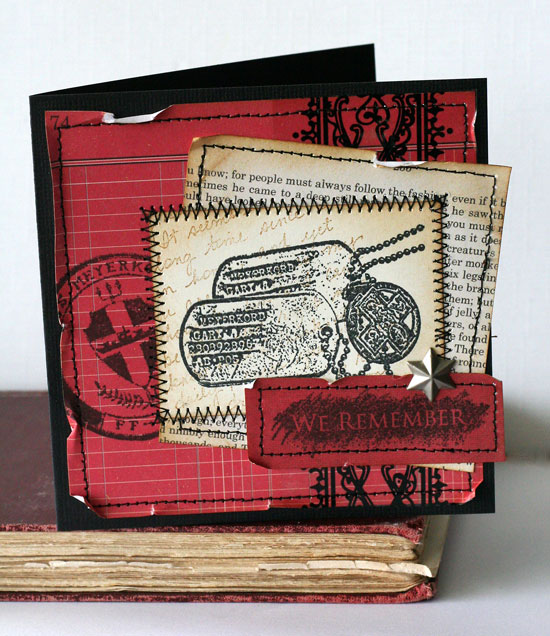
You can see many of the fun vintage sewing elements stamped onto the text paper on this project.

Quick Tip: Use both sides of a double sided patterned paper to get more prints from one page.

Supply List:

Stamps: Sew Special (Rummage Bin line) by CHF
Ink: Black Memento Ink by Tsukineko
Paper: Simply Smooth Vanilla cardstock by CHF, Fashionista Haute Couture patterned paper by Graphic 45
Other: flower by Prima, brad by K & Co., edge distresser, corsage pin

Now totally off-topic…We had the yummiest potato salad last night with shish-ka-bobs for dinner. I’m QUITE sure this is not the most diet-friendly dish but we enjoyed it. I hadn’t made it in years…over TEN! I know this because I made it once at our old house. It was from the back of a Miracle Whip salad dressing jar and hubby was mentioning it Friday night. “Why did I never make that again?” Because I had totally lost the recipe, that’s why! LOL After a little searching, I found it on the Kraft.com web-site and I’m reposting it here so that I never lose it again!

Roasted Potato Salad

4 cups quartered unpeeled small red potatoes

3/4 cup  MIRACLE WHIP or MIRACLE WHIP Light Dressing

4 slices OSCAR MAYER Center Cut Bacon, crisply cooked, crumbled

2   hard-cooked eggs, chopped

1/4 cup green onion slices

1/4 tsp.  salt

1/4 tsp. pepper

PREHEAT oven to 425°F. Place potatoes in 15x10x1-inch baking pan sprayed with cooking spray.

BAKE 30 to 35 minutes or until potatoes are tender and golden brown, stirring after 20 minutes.

MIX dressing, bacon, eggs, onions, salt and pepper in large bowl. Add potatoes; mix lightly. Serve warm or chilled.

Have a beautiful day!

a-signature-2.jpg

We Remember

Two things to share with you today… a card and a recipe.  It’s rhubarb season here and yesterday I put together a rhubarb recipe. It’s a compilation of a few different recipes so I made one of my own. What does it have to do with today’s card? Well…honestly, not much except that I wanted to remember it. 🙂 I have a bad habit of losing recipes and sharing them with you is a win-win situation. You might enjoy them & I know exactly where they are!

We Remember

jks-we-remember.jpg

Today’s card uses a new stamp set to be released tomorrow from the Rummage Bin line. Lisa Silver is a long-time talented designer with CHF. If you follow the tutorial each week, Lisa always does a fabulous job with those. I’m so excited for Lisa as this is her first stamp set she’s designed and it is fabulous! We Remember is a classic military themed set that is perfect for so many families. For this design I thought I’d use some red Jenni Bowling paper with a few of the images from this set to create a Remembrance Day themed design.

Supply List:

Stamps: We Remember (the Rummage Bin) by CHF
Ink: Black Memento by Tsukineko, Brushed Corduroy Distress ink by Ranger
Paper: black cardstock by Bazzill, Natural Smooth cardstock by CHF, mini papers by Jenni Bowlin
Other: sewing machine, star brad by Creative Impressions, decorative tape by Prima

And here’s the recipe…

 Rhubarb Betty

6 cups of chopped rhubarb, fresh or frozen

1 ¼ cups sugar

Topping:

2 ½ cups flour

1 cup oatmeal

1 ½ cups packed brown sugar

1 cup butter or margarine, melted

1 tsp salt

1 tsp. cinnamon

Fill 9 x 13 with rhubarb and sprinkle with sugar. Mix flour, oatmeal, brown sugar, salt, cinnamon and butter together until crumbly. Scatter over rhubarb. Bake, uncovered in 375° oven for 40 minutes. Serve with ice cream. Makes 24 small servings or 16 large.

Thanks for stopping by!

jks-spring-signature.jpg

A Last-minute Holiday Recipe…

Eggnog Bread…Love this recipe. If you have a bread machine, this is so quick to make up and we look forward to it all year. Wish you could buy eggnog off-season! and so…I’m busy with all my Christmas preparations right now. It’s always such a crazy time of year. You may be like me and busy in the kitchen or looking for something new to try. I just put this recipe in the bread machine and thought I’d pop in and share it here with you. Enjoy! If you’re looking for some more fun holiday recipes…I shared some of my favorite holiday baking recipes here last year.

Holiday Eggnog Bread

{this recipes makes a 2 pound loaf}

3/4 cup eggnog

1/3 cup water

1 egg

2 tablespoons butter or margarine cut up

4 cups bread flour (I just used all-purpose)

3 tablespoons sugar

1 teaspoon salt

1/2 teaspoon ground nutmeg

1 1/2 teaspoons bread machine yeast

1/2 cup mixed candied fruits and peels

Add all ingredient to the machine according to manufacturer’s directions. Select basic white bread cycle. Drizzle Cooled loaf with Eggnog Glaze…as follows…

Eggnog Glaze: In a small mixing bowl mix together 1 cup sifted powdered sugar and tnough eggnog to make a glaze….drizzling consistency.

Wishing you a wonderful holiday season and blessed Christmas!

winter-julia.jpg

Mmmmmmmmmmmmmm… Gourmet Goodness

Do you love cooking as well as paper crafting. I don’t know about you but these cold Fall days just beg for yummy home-cooked meals and after a very busy summer, I’ve been pulling out my recipes and baking more too! I’m really excited about this new special publication by Paper crafts called PC Gourmet. I’ve seen a sneak peek at a few of the recipes as I have a few designs coming out in this issue. Today though…I have a couple great things to share with you! Paper Crafts has send me two copies of this magazine, one of them to share with you. Since I’ll already be getting my own copies, I thought it would be even better to give them both away for you to enjoy! 🙂 If you’re looking for copies of this great magazine (they’d make some great Christmas gifts) you can purchase them on-line here.  Fpr a chance to win, simply respond to this post by Friday October 31st at 10 pm EST. If you like, tell me what you’re crafting or cooking up these days! Please enter only once. I’ll be posting the two random winners on Saturday.

I also have a great recipe and project to share with you today designed by Alisa Bangerter. Enjoy!

Cheesy Garlic Drop Biscuits

by Alisa Bangerter

This is a perfect recipe to pull out if you are short on time because there is no rolling or cutting. The cheese and garlic add extra kick to a plain biscuit, and kids love them. They are the perfect accompaniment to serve with soups or stews, and are great served with a salad.

INGREDIENTS

2 c. flour

2 tbsp. granulated sugar

4 tsp. baking powder

1 1/2 tsp. garlic powder

1/2 tsp. salt

2/3 c. butter or margarine

1 1/2 c. grated cheddar cheese

1 1/4 c. milk

Chives (optional)

DIRECTIONS

Mix together dry ingredients. Cut in butter with pastry cutter until mixture is fine. Add cheese and mix well. Add milk and stir until just moistened. Drop by spoonfuls onto greased baking sheet. Sprinkle top with chopped dried or fresh chives if desired. Bake at 400 degrees for approx. 15 minutes.

Enjoy Halloween Tag

Designer: Alisa Bangerter

SUPPLIES: Cardstock: (ivory) Dye ink: (Black) Stewart Superior Corp.; (Summer Sun) Stampin’ Up! Specialty ink: (Mango Lemonade color wash) Stewart Superior Corp. Color medium: (black chalk) Craf-T Products Accents: (black brads) Making Memories; (chipboard bat, moon) Melissa Frances Fibers: (black striped ribbon) Pebbles Inc. Font: (Black Family) www.dafont.com Adhesive: (foam tape) Finished size: 3″ x 4 1/2″

1 Make tag from cardstock. 2 Crumple tag and smooth out. Spray edges with color wash; let dry. Apply chalk. 3 Ink chipboard moon; let dry. Chalk edges and adhere. 4 Ink chipboard bat; let dry. Adhere with foam tape. 5 Print sentiment on cardstock; trim and tear edges. Chalk edges and adhere with foam tape. Attach brads. Attach ribbon with brad.

I’ll share one of my projects with you once this issue goes on sale. 🙂 Good luck winning your copy! I think I’m off to try baking these biscuits for dinner!

Have a great week!
Julia

Happy Thanksgiving!

Happy Thanksgiving to all my Canadian friends! We’re enjoying an absolutely gorgeous fall day here. I’m busy with the turkey stuffed and in the oven, the squash and the pies baked and am just starting to work on some salads and veggies. Yummm! I was hoping to have a Thanksgiving card to share with you today but a busy weekend just seemed to fly by! Instead, I just thought I’d share a “blast from the past” with you today. A design I created two years ago for the Dirty Dozen Gallery. I’m thankful for so much today! My family, my husband, my home, a relationship with God, plenty to eat, my health, my job and being able to do what I love. Truly I am blessed!

Time to Give Thanks

jks_ddgallery_oct_time_to_g.jpg

I’ve made my Dutch Apple Pie yesterday…yummmm and some pumkin pie too. I thought I’d share another requested recipe I get for special occasions…Raspberry Cream. I’ve made some alterations to the original recipe to make it fit our family. Even if you don’t have a large family…make it big anyway! You’ll want leftovers! 😉

 Raspberry Cream

3 – 3oz packages of Raspbery gelatin

2.25 cups boiling water

3/4 cup sugar

2 cups Frozen raspberries

2 cups small marshmallows

1 large tub of Cool Whip

Dissolve gelatin in boiling water in medium large bowl. Add sugar. Stir to dissolve. Stir in frozen raspberries. Chill until syrupy stirring a couple times. Fold in marshmallows and Cool Whip. Pour into serving bowl. Chill.

* * * * * * * * * * *

We’ve been having a fabulous weekend. Spent a lot of the day Saturday on the lake. On Saturday’s, as part of the Jessica Sprague Now We’re Rockin class, she challenges us to create a 30 min. quick layout. This week it was to design a layout featuring photos you took on Saturday on the theme, this makes me happy. Here’s mine…

Happy

happy.jpg

I hope you’re having an absolutely wonderful day!

a-signature-2.jpg

Mmmmmmmmmmm……Fall!

As much as I love summer, now that Autumn is in the air…I’m lovin’ it! Some favorite Fall things…crisp air, colorful leaves, a trip to the apple orchard, cozy sweaters and one of my long-time favorite activities…baking! Yummmm… Nothing like all that yummy harvest produce. One of favorite fall treats is pumpkin. Pumpkin pie and a really good Pumpkin Spice Bread.

Pumpkin Spice Bread

jks-pumpkin-spice-bread.jpg

2 cups pumpkin, canned (NOT pumpkin pie filling)

3 cups sugar

1 cups water

1 cup vegetable  oil

4 eggs

3 1/3 cups flour

2 teaspoons baking soda

2 teaspoons cinnamon

1 teaspoon salt

1 teaspoon baking powder

1/2 teaspoon nutmeg

1/2 teaspoon ground cloves

Heat oven to 350°F. In large mixing bowl, combine pumpkin, sugar, water, oil and eggs, Beat well until mixed. Measure the flour, baking soda, baking powder, salt and spices into a separate bowl. Stir till combined. Slowly add the dry ingredient to the pumpkin mixture, beating until smooth. Grease two 9″x5″ loaf pans and dust them with flour. Evenly divide the batter between the two pans. Bake for 70 minutes or until a toothpick inserted comes out clean. Cool for 10-15 minutes , then remove from pans by inverting them onto a rack and tapping the bottoms. Cool, slice and serve. This recipe freezes well…if you can keep it in the house that long. 😉

Now I just had to make a card to go with this recipe. Wouldn’t this to be fun to pair up with a wrapped pumpkin loaf?

Happy Harvest

jks-happy-harvest.jpg

Quick Tip: Oops! Get the sentiment crooked? It happens to us all! Simply tear off, roll back the edges and stamp on the layer beneath. It looks like a cool design element! shhhhh…. I won’t tell if you don’t! 😉

Do you have favorite things to do in the Fall? Have a wonderful day!

a-signature-2.jpg

Supply List:

Stamps:
-Great Canadian Stamp Set (maple leaf) from Rummage Bin line by Cornish Heritage Farms
-All Things Fall (The Rummage Bin line) by Cornish Heritage Farms

Ink:
-Pitch Black Adirondack ink by Ranger
-Brushed Corduroy Distress ink by Ranger

Paper:
-Suede Brown dark cardstock by Prism
-Simply Smooth White by Prism
-MochaChica Paper Pack (Kim Hughes line) By Cornish Heritage Farms

Other:
-jumbo eyelet – WE R Memory Keepers
-faux leather cord
-stapler
-button by Autumn Leaves
-copic markers

Got Strawberries?

Mmmmmmmmmmm….I love this time of year. Strawberries and the promise of a beautiful summer ahead. It seems that we spend so much time longing for summer here in Canada that the days pass by so quickly.

It’s been a crazy busy week here. Deadlines. Projects. A visit from Grandma and a baby cousin among others. The first week of all the kids home from school. I’m sorry I don’t have a project to share with you today but I do have a recipe. I made this simple but yummy dessert yesterday for my company and thought I’d share it with you.

If you’re looking for the Ways to Use it Challenge today…Lindsey has graciously stepped in to host it for me and you can find it here. Looks like a super fun challenge! I’m wishing I had thought of it!!! I hope you have a little more time than I for some stamping fun! 🙂

Strawberry layer dessert

Large package of mini jelly rolls

2 Quarts Strawberries

1 6 serving package of vanilla pudding mix, cooked variety not instant

1 package Strawberry gelatin

1 large tub whipped Topping

Slice jelly rolls approximately 3/4 inch thick. Line bottom of 9×13 pan with rolls. Wash, hull and slice strawberries and layer evenly over jelly rolls. Cook vanilla pudding mixed with gelatin and 3.5 cups water on medium heat, stirring until thickened. Cool slightly. Pour over strawberries and chill. Once set, cover with whipped topping. Enjoy!

Sorry no photo to go along with it. I had eight kids in the house yesterday… I think you’ll get the idea! 😉 Hmmmm…maybe I should make it again. 😉 Just for the photo of couse! 🙂

Have a great Thursday! I’ll be back with a project tomorrow!
Julia