Monthly Archives: April 2007

A Type Question

It seems as if this new template is working pretty well with the banner. I did get one comment though that the type was too large and another comment that it was too small. Both were using Internet Explorer. Why this is happening, I have no idea! If you are getting strange sized type…could you please let me know? It looks fine on my screen. Thanks!

Trying out those templates again!

I’m trying out a new template that has a customizable banner. I’m hoping to find something that I can actually use my new banner with! Yes, you have seen the banner before but the template I was using it with, was having a few glitches with comments when I used it! Please bear with me! Could I ask for a favor? I need to know if comments work with this as that has been the problem in the past! If you could comment on this entry, I’d be most grateful! If you cannot comment…please e-mail me (to the left right by my photo)  so that I am aware of the problem! Many thanks, my friends!

 EDITED TO ADD…Thanks so much everyone for all your help! Lots of comments and so far only one not able to comment! I think it’s a keeper for now! If you do run into problems commenting down the line…please let me know! Thanks!

Some darling new stamps!

Im so excited that I finally got around to trying out my brand new Lizzie Anne Designs Stamp set! My first set is called Funky Florals.  I just love the little stitched-look stems! Darling! I just knew I had to use a little of my sewing machine stitching with it! The Lizze Anne Designs stamp line are rubber unmounted stamps that come pre-trimmed with a fabulous foam/cling mount that you can attach directly to your clear stamp block. This gives you the best of borth worlds…a great rubber impression with the ablility to easily see where you are stamping and the storage aspect is fabulous! The stamps come in little clear CD cases and take up very little space!

Stitched Thank You

jks-lizzie-anne-thanks.jpg

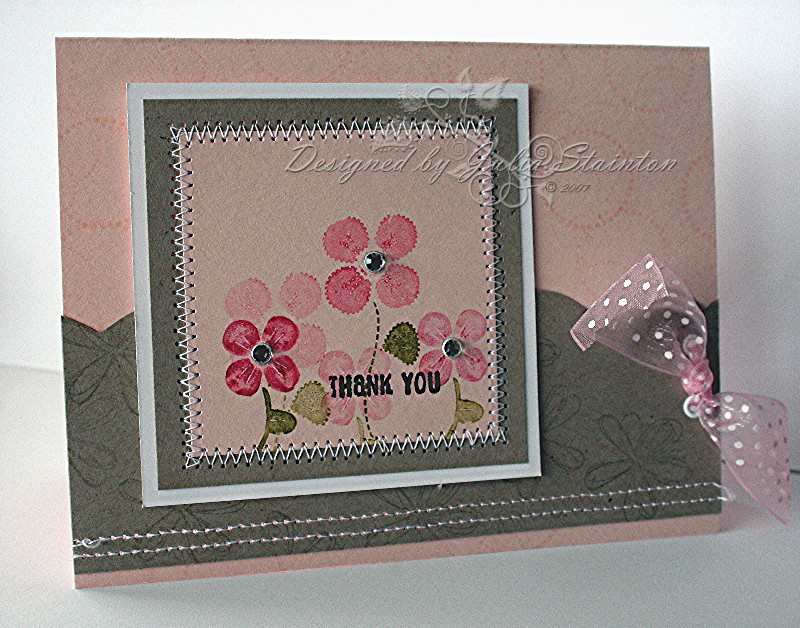
For this card, I decided to start off with a Blush Blossom card base. Why do I never use this color…so fresh and pretty for spring and nice and light for stamping directly on! I paired it up with Kraft and Whisper White for a pretty, girlish look. The flowers I colored directly on with my SU markers and then stamped once and then again for a lighter look on some of the flowers. I just love adding a little bling to my designs! I pulled out my Hero Arts gemstones and added little rhinestones to the centers fo my three main flowers….good things always come in threes, you know! 😉 For my blush card piece, I stamped it all in the darling dotted circles stamp in Blush Blossom. The Kraft layer is stamped with Sahara Sand in a darling little sketched daisy. I find that Sahara Sand ink works great with the Kraft paper. The top edge was scalloped with my large corner rounder by EK Success. I then stitched a double row along the bottom. The image needed a little definition so I zig zag stitched around the central image. I found that the dotted soft pink organy ribbon works perfectly with Blush Blossom and tied it through a couple little eyelets I set with my Crop-a-dile.

Supply List:

Cardstock: Blush Blossomm, Kraft, Whisper White – Stampin Up

Stamps: Funky Florals – Lizzie Anne Designs

Ink: Regal Rose marker, Rose Red Marker, Old Olive marker, Blush Blossom Classic, Sahara Sand Classic, Chocolate Chip

Other: Sewing machine, ribbon – Michael’s, white eyelets – Making Memories, Crop-a-dile – We R Memory Keepers, gemstones – Hero Arts

Flowers for Mom

With Mother’s Day coming up four weeks from today…I thought I’d share a Mother’s Day card I designed. I’ve been having fun alternating my styles from a Shabby/Distressed look with a cleaner fresh look for Spring. I decided to have a little fun creating the “image” with embellishments and just use stamping for the sentiments on this card. One thing I like about this card is it would not have to be specific for Mother’s Day. Moms are pretty special people and more than worthy of being cherished every day.:)

Cherish Mother

jks-cherish-mother.jpg

When I was making this card, the color scheme came directly from the products I had on hand. I had noticed that I had Prima flowers that matched my  dotted organdy ribbon from Michael’s. Why not make the stems from the same color? Fun! I added a stitched sentiment border across the top to highlight the word cherish. For the “mother”, I took a little “bite” out of the side of my card with my circle punch. I then took a circle punch one size smaller and punched a circle out of the Cool Caribbean. I adhered it to the inside of the card so that it peeks through the card and is visible both when the card is closed as well as open. The excess of the circle was folded to the back of the card and after stamping the sentiment, I set a little white eyelet with my Crop-a-dile. To add a bit of “pop”…not a technicle term I know!….I tied black gingham ribbon through the eyelet and also throught the clear buttons that I used for flower centers.
Supply List:

Cardstock: Whisper White, Cool Caribbean – Stampin Up

Stamps: Warm Words, Everyday Flexible Phrases – STampin Up

Ink: Basic Black – Stampin Up

Other: circle punches – EK Success, Martinique flowers – Prima Marketing, sewing machine, white eyelet – Making Memories, Crop-a-dile – We R Memory Keepers, ribbon – Michael’s, Clear Buttons – Stampin Up

Sweet Pea

It’s been a busy day here but I just had to sit down, take a break and make a quick card while the boys were napping. I just adore this darling little sweet pea stamp from Papertrey Ink! It is part of their Green Thumb set which is my favorite set of theirs to date. Now that is a tall order as I love them all and knowing Nicole Heady, she has lots more fabulous ideas to come!

Sweet Pea

(removed for publication)

This card is clean and simple…a nice way to go for a baby design. I STILL cannot put my kraft paper away…this time I’ve paired it up with white and barely banana with a tiny dash of Celery. I’d been wanting to use my new Prima flowers…I just love these cute plaid flowers! I had an awesome order arrive this week from Jacksonbelle…so many new goodies to try! I first came up with the layout for this card…it just popped into my head and then I went looking for some stamps that would work well with it. When my eyes fell on the sweet pea…I knew it would be darling. To give some fun dimension to the card…I used a large size pewter brad, covered it with Certainly Celery Craft Ink and then embossed it with clear embossing powder. I just love the flexibility this gives you….you can always have a brad that matches your ink! Celery brads are hard to come by and you know how often I like to use Celery! I decided to add a little band around the card front to break up the design. I cut a long strip of cardstock and wrapped it right around both sides of the card front. I torn the overlapping edge of the band that adheres at the front for fun. The leaves were once again fashioned from a small scrap of Celery ric rac from StarlitStudio and were adhered with SU’s fabulous glue dots. Wishing you all a fabulous weekend. I hope you are enjoying the sweet days of spring!

Butterfly Wishes

I promised I’d share the first Butterfly Wishes card I made for Wednesday’s Take Two challenge today. I’m just loving my new Papertrey Ink sets! I’ve been having so much fun seeing how many different looks I can get with them! Things have been really busy around here. My mom has finished her third round of chemo yesterday and is very tired but doing well. As always there is lots going on with a large family. My oldest son especially seems to have no end to his schedule. Tonight he is singing in a music festival with his choir and we are looking forward to attending that. I hope to get some shopping done this weekend. I have some birthday money to spend and I am in serious need of a few new outfits so that should be fun! I hope you all have a fabulous weekend as well!

Butterfly Thanks

jks-butterfly-wishes-thanks.jpg

For this card, I made a 5.25″ square card with Cranberry Crisp cardstock. I sanded the edges with some sandpaper for a vintage distressed look and then freestyle stitched the edges down. Stamping directly onto the patterned paper is a technique I’ve been playing around with lately so I decided to give it a whirl here. With versamark, I stamped the Floral and Paisley butterflies onto the paper and then embossed them with Copper embossing powder. I love the way the embossing powder catches the light and the butterflies see so float above the paper. For more definition, I added white gel pen to the butterflies, highlighting the dots and swirls that were left un-embossed. I inserted little brads for the heads of the butterflies and embossed Heartfelt Thanks in black embossing powder for the sentiment. The flower is another beautiful Prima flower from their Prima Essentials Romance collection that I purchased from Jacksonbelle. The leaves were created from huge celery ric rak by May Arts. Starlitstudio carries it in here store here. The center of the flower is a pearl brad from K&Company. I love how it works with the vintage feel.

Spritz it up!

I decided to pull out my Color Spritzer by Stampin up for todays Ways to Use it Challenge. Each Thursday I host a challenge on splitcoaststampers.com and this week the challenge is to use markers. If you’d like to play along, we’d love you to join us here. There is also a very cool Marker Carnival at Craft Critique. You’ll want to check it out!

The Sweetest Flower

jks-the-sweetest-flower.jpg

Busy morning here today. We were out last night and I’m running out the door to visit my mom before she goes to the hospital. I already had these colors on my desk from yesterday’s card so I thought I would go for another look with them. I just HAD to use my cool new Papertrey Ink stamps again…so fun! I just adore their just released Green Thumb set. Actually they sold out of it in the first few days and I noticed on Nicole’s blog…they’ll be available again on the 17th. 🙂 The stamps were inked and then stamped on SU’s watercolor paper. I added some bling for the flower centers…Hero Arts Gemstones are one of my favorite products! They come in fabulous strips in four sizes and I just snip off what I want. I then used my Close to Cocoa marker in SU’s color spritzer…I love the quick easy background look it gives. The edges were then distressed using my Heidi Swapp edge distresser…a little pink gem that does the tric kperfectly and I bought it for next to nothing!

For the main card design, I matted the watercolor paper with cool caribbean. The white scalloped edge was made with my slit punch…a little trick I came up with my first month on the Dirty Dozen SCS Design Team. I little panel of sage shadow anchors the design and I love the Caribbean, Sage and Kraft color combo. After adhering all the layers, I stitched around the central image to creat a border and a little extra interest. The kraft layer is stamped with Sahara Sand ink with the dotted flower stamp. I think it may be my fave in the set! Now you know me….I rarely make a card design without adding one of my gorgeous Primas! I just got these in from Jacksonbelle….SO darling!!!! They come in pink, blue or yellow and are so fun and perfect for Spring. Check them out HERE. Last but not least…I used a darling little Karen Foster thumbtack brad for the center.

Wishing you all a fabulous day! {{{{{{{{{{{{{{Hugs}}}}}}}}}}}}