Daily Archives: April 3, 2007

I couldn’t resist…

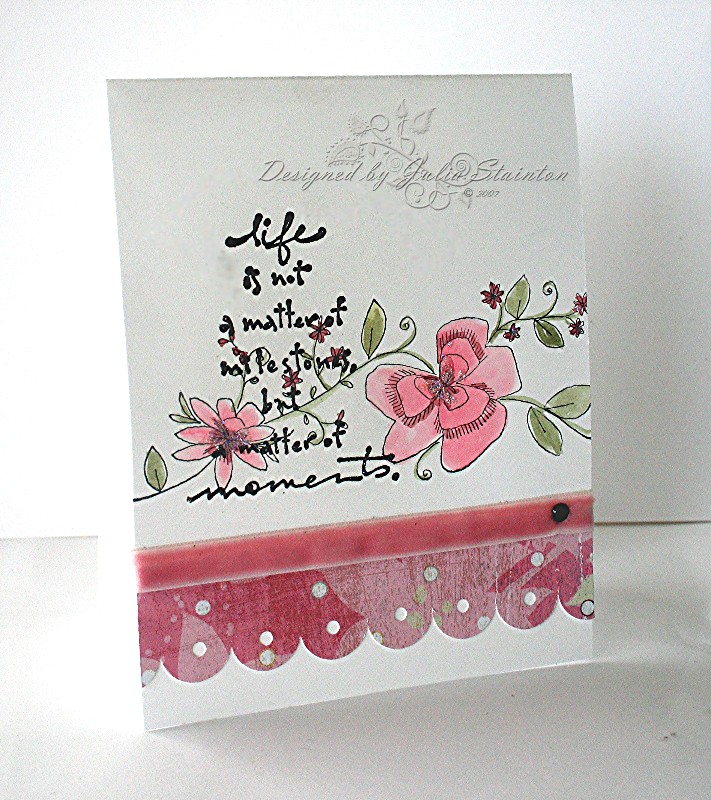
Some new goodies while I was out running errands today! I just ADORE Penny Black stamps… and their fresh new line is SO gorgeous! I especially love this doodle-style image that is so flexible. Depending on the coloring it can be elegant or funky! I needed another birthday card and I decided to work this card in with today’s color challenge…Pretty in Pink, Bravo Burgundy and Always Artichoke. I actually used Regal rose instead of Pretty in Pink…it has been a long day and somehow I got it mixed up…it DOES look pretty close! If you want to play along, the link is here.

This card is nice and clean stamped right on the card and a little border added. I used my slit punch to punch a little strip of Basic Grey Phoebe paper (love, love, love it!) that I bought from Jacksonbelle. One of my other favorite new embellishments it the gorgoeus Pink velvet May Arts ribbon from Starlitstudio. the image was stamped with Black Stazon and then watercolored with my SU Aquapainter. The flower have a little glitter on their centers and I added a darling little black embossed brad. I have no idea where I came from and I really wish I did. I’m almost out of them and I’d love to replace them! The beautiful Penny Black sentiment actually is much more legible in person. My photography skills are improving but alas…sometimes I just can’t get it quite right.

Floral Moments
jks-milestones-moments.jpg

Supply List:

Cardstock: Whisper White – SU

Patterned Paper: Phoebe 6×6 pad – Basic Grey

Stamps: Penny Black

Ink: Stazon Black, Regal Rose, Bravo Burgundy, Always Artichoke – SU

Other: Slit Punch, Aquapainter, Black embossing powder

All Stitched up – A Machine Stitching on Paper Tutorial

Many of you who know my designs, know how much I love sewing on paper. At least 50% of my designs have some stitching on them…it is  something I love to do and seems to go well with my style of creations.  When I was asked to do a little sewing machine stitching on cards tutorial, I must admit it that it had never occurred to me before. It is just something I do and don’t think about. For some of you, this may be pretty basic, for some of you…a new technique to try. I do hope it will inspire you to add a little more machine stitching to your papercrafting!

This tutorial was requested by Amy Westerman who attempted machine stitching for the first time yesterday. Every Tuesday Amy tries out something new on her blog and she always has a hit! Sunday’s Amy also does a FABULOUS sketch challenge.  Check out her great first attempt at Heartfelt Greetings!

I’ve included cards throughout this tutorial from past uploads to my blog. If you would like more info on any of these designs, simply click on the design title and it will take you to the original entry on my blog. To see any of the designs close-up, just click on the picture. If you’d like to comment on this tutorial…I’d LOVE to hear from you. The comment button is WAY down at the bottom of this tutorial!:)

Hula Celebrate

jks-celebrate-hula.jpg

Your Sewing Machine

The first thing to address is your sewing machine. I own an electronic Brother sewing machine with lots of fun goodies and stitches on it but don’t worry…a regular sewing machine will work just as well! I have mine from days when I was obsessed with sewing and smocking. I’ve always had to be  making something and once I discovered papercrafting…well….. Also my daughter sadly outgrew home-made smocked dresses. I’ll have to share a photo of her sometime…she looked adorable! I digress…. I hope this intro doesn’t discourage you! Sewing on paper is something anyone can do…you just need a little practice  and patience and soon you’ll be stitching everything! Any regular sewing machine should work…nothing fancy is needed. With the price of sewing machines having dropped so much in the past few years, a sewing machine is a great investment for your papercrafting projects, as well as any fabric alterations and repairs you may need to make. I will caution you… a few craft companies have in recent years come out with small inexpensive “craft” sewing machines. While I have never tried one…I have never heard anything good from anyone who owns one. If you are reading this and HAVE had great success….please comment on this tutorial…I’d be most interested to hear about it and also which company produces it. That way I can pass the information along!

Sewing Quick Tip: Make sure you keep your sewing machine clean, lint free and oiled to get many years from it. Read your machine directions and make sure you thread the machine correctly and with the presser foot in the raised position. If you are having trouble with your machine, it may be time for a tune-up. Your sewing machine distributor will be able to help you with that.

Tension

I believe on of the biggest problems people have with their sewing on paper is machine tension.

Read more here…