Category Archives: Glue Dots

deck the halls

It’s that time of year again…

Time to deck the halls and make everything look so warm and festive. How about a little paper crafted decor piece that looks like a present but started off as a humble block of wood?

To create this fun block, I had hubby cut me an 8″ piece off an old 4×4″ piece of lumber we had on hand. I adhered some Lily Bee Jingle Patterned paper on each side of the wood block to add some color and then tied it with some hem tape ribbon to look like a present. To hold the ribbon exactly where I wanted it, I placed a Craft Glue Dot® under the bow and the initial starting point. This is a great gift wrapping tip as well!

My Poinsettia is made up of 9 leaves die cut with the Tattered Leaves die with their stems cut off. I formed each leaf with my hand or rolled it around a pencil for dimension. To put it together, Craft Glue Dots® work perfectly. The Glue Dots® also are rolled and placed into the center of the flower and then sprinkled with silver glass glitter for a festive look.


I wrote this blog post while participating on the Glue Dots design team.
Happy creating!

a wintery gift

Holiday goodies combine two of my very favorite things of the holidays…giving to others and enjoying some great seasonal treats. In my household, candy cane bark is a must-make candy each year and we also love to share it with others. To make it even more special this year, I’ve crafted this fun little mason jar to pretty up my gift.

This project uses a pint-sized mason jar I had on hand and then embellished it. They are fun and quick to create and have limitless possibilities for personalizing. I love that I can put them together with some of my favorite goodies and Glue Dots® adhesives for a fast project.

I started off my project by trimming up the mason jar ring with some sweet and frilly trims. I took my color combo straight from the goodies themselves..cream, pink and a touch of red from the candy canes.

Continuous Lines Glue Dots® are perfect for adding on trims. They are just like Craft Glue Dots® only it’s one continuous line of adhesive. I simply press the glue line onto the mason jar ring and  then remove the backing. Press on your trims and you’re done.

Quick Tip: Looking to add a snowy look? Just brush on Picket Fence Distress Crackle Paint for a quick frosty feel.

I totally have a thing right now for stamped tags. I just couldn’t resist adding this sweet canvas tag after stamping it with some little snowflakes.

Adding my flower and snowflake embellishments is easy with Craft Glue Dots®. I love how clean they are to apply and how quick it makes creating.

Candy Cane Bark Recipe


I’m not even sure you can call this a recipe. 🙂 It’s soooo easy. Place 3 cups white candy coating wafers in a quart sized glass mixing bowl. Heat in microwave on 50% power until melted. Be sure to stop at every 1 minute interval and stir to prevent scorching. When candy is melted, stir in three broken candy canes and pour onto a wax paper covered cookie sheet. Smooth out bark and place in fridge until firm. Break into pieces and enjoy.

Supplies:


I wrote this blog post while participating on the Glue Dots design team.
Happy creating!

falling…

Playing in the leaves is one of those special childhood things. Last year we did a lovely family photo in the leaves and then my two littlest ones had the best time playing in them. Of course, getting them to stay still was almost impossible. This resulted in more than a few blurry photos but all in all, I love the movement in them so why not scrapbook them anyway? I love the photo on the right. Yes there is camera blur but there is so much joie de vivre, it’s actually one of my faves.

Right now the leaves are just starting to fall. I’m excited that my daughter is home for a fall break for the next week. It will be the perfect time to do that family photo shoot again. Of course it needs to stop raining first. PLEASE let it stop raining.

There’s a lot of stamping and inking going on in this layout so I’ve kept the design of it very much in a square grid style. All the photos and embellishments are anchored in the main square of the design.

I always love adding in all my embellishments with Glue Dots®. They work perfectly for so many different things. Plastic buttons, paper flowers, wood and they are also perfect for keeping that little tiny canvas banner in place.

My craft room is in the basement. After the summer, it’s been a little damp down there and I keep the dehumidifier running all the time to keep things dry. Sometimes though, my chipboard alphabet stickers get a little less than sticky. I HATE it when they fall off the layout. Soooo not cool! A great trick it to adhere them with Glue Dots® and then you don’t have to worry about this happening.

Here’s a little detail of the stamped banner. I probably sound like a broken record here but yes, once again I’ve stamped my canvas with the Ranger Archival Inks.

Supplies: Harvest Market Patterned Papers by Lily Bee Design, Buttons by Basic Grey, Chipboard Letters by American Crafts, Twine, Sewing machine, Copper Mist Spray by Maya Road, Leaves by Prima Marketing, Large Rose Lily  Flower by Prima Marketing, Green Leaf Trinket Pins by Maya Road, Leaf Print Stamps by Hero Arts, Tissue Tape by Tim Holtz, Wood Bingo Motif by Maya Road, Mini Pennant Canvas Banner Pieces by Maya Road, Mini Triangle Canvas Banner Pieces by Maya Road, Ultra Thin Glue Dots®, Craft Glue Dots®, Brushed Corduroy Distress Ink by Ranger, Vermillion Archival Ink by Ranger, Sienna Archival Ink by Ranger

So…what has you falling in love with Autumn?

Enjoy the leaves!

I wrote this blog post while participating on the Glue Dots design team.

festive fall candle

One of my very favorite quick and easy projects to give away is a wrapped candle. With the days getting shorter and cooler, candles have been flickering in my home for the past few weeks. I love the spicy food scented ones like cinnamon, apple and pumpkin. I love how warm and wonderful they are.

Today I have a wrapped candle project to share with you. I love all the texture and warm colors of fall and have incorporated them into this design.

To create a candle wrap, first measure the height of your candle so that you can plan for the size. I’ve cut 3 – 12″ strips of patterned paper in varying widths.

I like using Glue Dots® when stitching paper layers to hold them in place. One or two dots does the trick and I place them in areas where I’m not going to be stitching.

After you stitch the strips together, you should have a 12′ wrap. Mine is 2-3/4″  high.

Apply Glue Dots® to wrong side of each end. Wrap around the candle and adhere.

Glue Dots® is the adhesive I turn to time and time again to adhere my embellishments. I can’t begin to imagine how many boxes I’ve used over the past few years. They are clean, quick and easy to use and I love how well them hold my embellishments in place.

To finish off my candle, I’ve tied it with some twine. A Glue Dots® dot under the twine bow keeps it from sliding down the candle. After misting the flower with Glimmer Mist I adhere it and the fabric leaves with Glue Dots®.

Supplies: Glue Dots®, scented candle, twine, sewing machine, Harvest Market Collection Kit by Lily Bee Design, flower by Prima Marketing, Leaf by Prima Marketing, Tiger Lily Glimmer Mist by Tattered Angels

Thanks for stopping by!

I wrote this blog post while participating on the Glue Dots design team.

Paper Crafts magazine Presents: 12 Days of Christmas Blog Hop

Christmas is coming! It’s that time of year when I start getting excited about Christmas cards and crafts and cookies and all the wonderful things I plan to do this year. Of course, most often my dreams exceed my available time but oh well! That’s life.

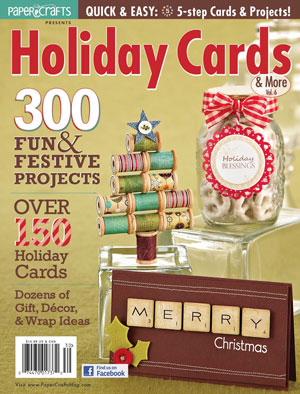
Can you tell that I seriously enjoy Christmas? It’s my favourite time of the year. It’s a time of peace and hope, a time for family and a joy for the senses. If you’re looking for some fabulous Christmas inspiration, look no further. I’m so excited about this latest Paper Crafts Magazine issue, Holiday Cards & More.

Why?

So many reasons. It’s always one of my favourite issues as it is packed chock-full of ideas for my favourite holiday. The creative ideas always get me in the mood to create. Just look at that uber-cute spool tree on the cover. That’s a must-do project for sure! I just can’t wait to get started.


Speaking of getting started, I actually did get a head start on Christmas last spring when working on designing submissions for this issue. I’m excited to have 12 projects in it. When it comes to designing for Christmas in the spring, it’s always a bit of a challenge to get your head in the right time of year but once I pull out those holiday papers and goodies, the joy of Christmas pops right back up again.

Looking for this issue? Find it on-line here.

Christmas can be a busy time though, right? It always sneaks up. Holiday Cards & More features lots of quick and easy projects so you can squeeze them into your hectic schedule. They are easy to mass produce and great to mail.

So how about a blog hop featuring quick and easy holiday cards for today? I actually created two. I just couldn’t help myself! 😉

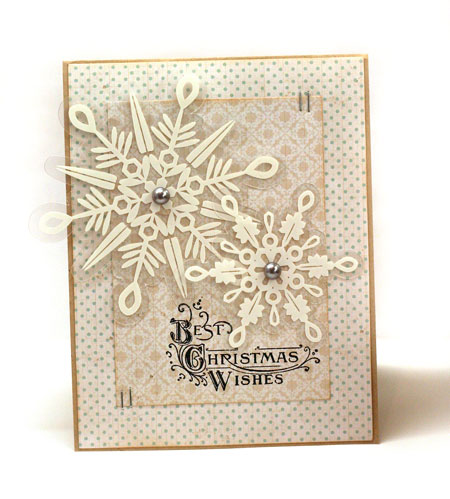
This card uses the new Jingle collection from Lily Bee Design. I just adore the muted holiday colors. I’ve die cut the snowflake from patterned paper over chipboard for a simple wintery look. Now if you just can’t help yourself for a few special cards, this design would also be easy to step up a notch if for some strange reason you have an overabundance of time. Some tied on twine, some bling or some glitter on the snowflake will do the trick.


Supplies: Kraft Cardstock by Bazzill, Jingle 6×6 Tiny Tablet by Lily Bee Design, Snowflake die by Sizzix, Craft-a-Board by Essentials by Ellen, buttons by Basic Grey, Tissue Tape by Tim Holtz, corner chomper by We R Memory Keepers, Glue Dots®

Tips for Creating Quick Holiday Cards

  • limit your layers – it will save time, money and also postage fees
  • purchase 6×6 paper pads for your cards as all the papers will coordinate and save time
  • choose a simple layout
  • die cutting your own embellishments can save money. to save time adhere your patterned paper to your chipboard before cutting so that you can die cut in one single step
  • adhere buttons and other embellishments with Glue Dots for instant adhesion
  • stamp your sentiment or leave without one for even quicker cards
  • go for a clean look. i love inking and distressing but they do add time
  • mass produce your cards by doing all the cutting in one block of time, the stamping in another block of time and adhering layers in another.
  • i love bows and twine but leaving them off your holiday cards will really speed things up
  • don’t over think your design – use the kiss approach (keep it simple stupid 😉 )
  • remember…it’s the thought that counts!


This card also uses the Jingle 6×6 paper pad. Once again I’ve used a simple design and added some pretty snowflakes for a wintery look.

Supplies: Jingle 6×6 Tiny Tablet by Lily Bee Design, White Snowflake Transparencies by Maya Road, Christmas Emporium Cling Stamp 3 by Hampton Arts, Jet Black Archival Ink by Ranger, Pearl rhinestone stickers, Tiny Attacher by Advantus

I hope you’ll doing some blog hopping today for some fabulous quick and easy holiday card designs. I know they are going to rock! Just check out this line-up…

Lastly, you just KNOW that Christmas means giving and this blog hop is all over that! There’s lots of ways to win!

Check it…

  • leave a comment on my blog (this post) by midnight (MDT) on Sunday, Oct. 2 for a chance to win a copy of fabulous Holiday Cards & More, Vol. 6
  • stop by all the above blogs on the list and leave a comment for more chances to win a copy of this issue
  • Don’t miss this one!!! Stop by the Paper Crafts Connection for a chance to win an absolutely wonderful stampalicious paper crafting prize. Seriously. I’m totally jealous of whomever wins it! Good luck!

Whew! Aren’t you glad you stayed with me to the end?

Ready, set…start hopping! And good luck!
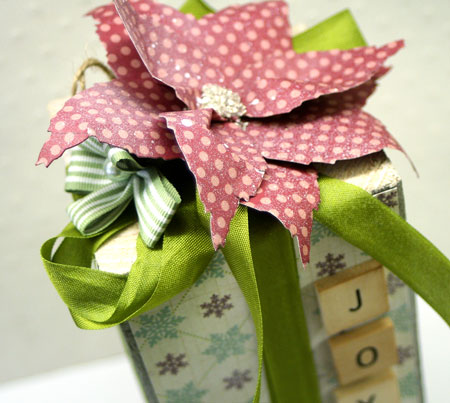
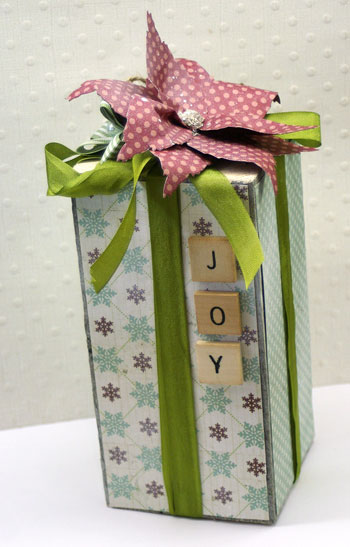
 

Pretty Petals

I’m always had a thing for little boxes. They are just so cute.

Lately I’ve been diggin’ pillow boxes. I had one of my desk the other day and the end of it reminded me of a petal. Which got my mind whirling. What would a bunch of them look like together? Could I make a flower?

So here it is. My petal box flower. It’s a fun and unique gift wrap option for a bunch of little things. There are seven petals on it. Odd numbers always look so much better don’t you think? There’s also seven days in the week. Hmmm… how about filling it with treats or notes, one for each day of the week? It’s a possibility.


To create this fun flower from pillow boxes, I used a pillow box die and put together seven little pillow boxes. You can use a template but using the die really makes things precise and speeds things up. I put together seven in NO TIME! The fun papers are from Lily Bee Design.

Once the pillow boxes are assembled, I held them together at the inner edges with Glue Dots. The flower is tied together with some tulle for stability and also to hold on the tiny little stamped tag.

I created this fun box to share on the Lily Bee Blog the other day. Stop by and check it out if you have the time.

Supplies: Happily Lost Tiny Tablet by Lily Bee Design, ABC Stickers by Lily Bee Design, Picket Fence Stamps by Lily Bee Design, Pillow Box Die by Sizzix, tulle, Jet Black Archival Ink by Ranger, Wedding Shoes Flower by Prima, Tiger Lily Glimmer Mist by Tattered Angels, leaves by Prima, Kraft Tag by Maya Road, Glue Dots

Have a fabulous weekend!