Monthly Archives: July 2010

July Zva Blog Hop Winners announced

We’d like to congratulate the five July Zva Blog Hop winners!  Their names will be found on the following blogs:

Debbie Olson

Veronica Goh

Kim Moreno

Jillian Deiling Cassity

and…mine!

How exciting that one of the Zva blog hop winners comes from my blog today. Random.org chose number 40 and so, the winner is…

Sandra v.d. S.on 19 Jul 2010 at 1:26 pm  40 What a beautiful romantic LO! I love the flower!

Congrats Sandra v.d.S. Please e-mail me (link is in the sidebar near the top) and we’ll get that prize out to  you asap.

One winner from each of the 5 blogs will receive a Zva prize package worth $30.00.
Congrats winners!

I have another Zva Creative project to share with you today. It’s an altered frame project that I’ve created for a challenge at Splitcoaststampers.com Each year the SCS Dirty Dozen Design Team and Alumni host a fun week of challenges for the Fan Club Members. Fan Club Members help support the site and this is our way of saying thank you. I was thrilled to be part of the Dirty Dozen in 2006/2007.  Creating a sample for one of today’s challenges was a great way to have some stamping fun.Want to learn more about the Fan Club and challenges. You can find the details here.

doily-frame.jpg

Wow. A paperless project from me.  Pretty rare, huh? Pulling out my Claudine Hellmuth Studio Paints and getting messy was a lot of fun. To get this very old layered look, I kept brushing on layers of paint until I got the look I wanted. I worked wet in wet to blend the paints. I wanted to get the look of old furniture that has been painted time and time again and has bits of color coming through.

After I had the look I wanted, I stamped the surface with the Hero Arts Circle Lace Doily stamp. Instead of stamping with ink, I brushed the rubber with Blank Canvas Studio Paint and then stamped randomly on my frame.

flower-and-bling-detail.jpg

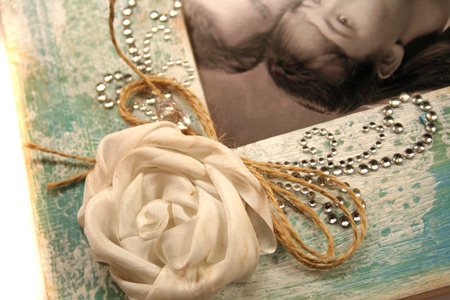
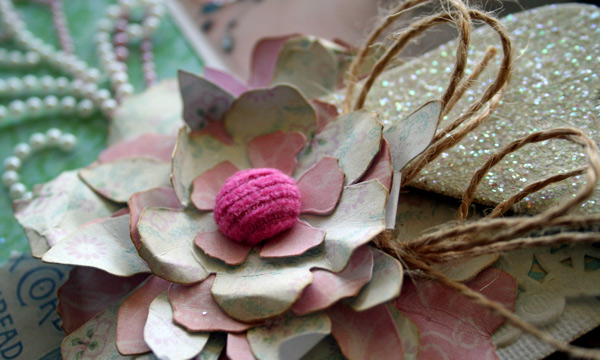
I’ve used two pieces of the Zva Creative Clear Swirl Frame CR01CB116 here to embellish the top corner of my project. The silk ribbon rose is handmade and I’ll have a tutorial for you on Friday for it.

doily-crackle-detail.jpg

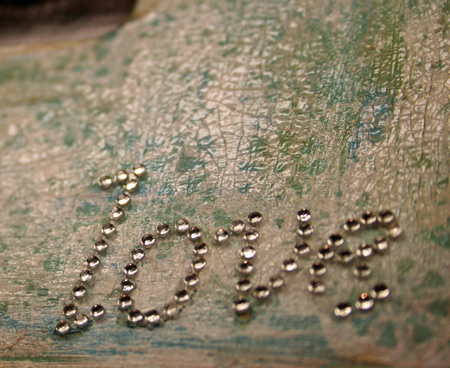
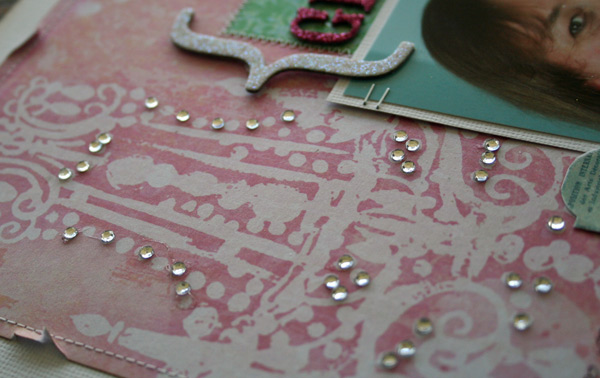
Sorry about the poor quality of this shot but it was the one that show the crackled surface best. As a final step to make this project look vintage, I brushed the entire surface with a thick coat of Rock Candy Distress Crackle Paint. I love finished surface. The love is spelled out with some more Zva bling…the Alpha Page Crystal Clear Crystals CRB02BC111.

Supplies: wood frame, twine, white silk ribbon, CRB02BC111 & CR01CB116 rhinestones by Zva Creative, Claudine Hellmuth Blank Canvas, Landscape Green, Traditional Tan, Sable Brown, & Sky Blue Studio Line Paints by Ranger,  Circle Lace stamp by Hero Arts, Rock Candy Distress Crackle Paint, silk ribbon by May Arts

Thanks so much for joining me today!

birthday prince

Scrapbooking is about capturing those special moments and the everyday ones too. Birthday Prince is about one of those special moments, my son’s birthday. He had been looking forward to his birthday for MONTHS. Seriously I was a bit worried as he had built it up so much in his mind that I didn’t think the actual event would hold up to the dreams in his head. He did end up having a wonderful family party.

I’m not sure where he got the idea but the morning of this birthday he decided he needed party hats. I didn’t have time to run back out and get any but came across a little dress-up crown while tidying the house. It saved the day and he became the…

 Birthday Prince

birthday-prince.jpg

Lily Bee Design has sneak peeks of their three fabulous new lines. Check them out here. Which do you like the best?

I love the bright and fun colors in the Hello Sunshine line by Lily Bee Design. I created a fun collage using up some of my paper scraps to create this layout.

You can alter chipboard many different ways. The Lily Bee scalloped chipboard accents have been cut in half and sanded. The plain chipboard pieces have been covered with patterned paper to coordinate, or painted with acrylic or distress crackle paints.

Quick Tip: Using a black cardstock background for this layout makes the bright primary colors pop.

Supplies: Hello Sunshine papers and chipboard by Lily  Bee Design, French Swirl Voila felt strip by Prima, Flocked and Felt Thickers by American Crafts, sewing machine, black & white cardstock by Bazzill,  Kraft Ticket by Maya Road, chipboard crown & Calendar Rub-on by Maya Road, Tiny Attacher by Advantus, chipboard by Basic Grey, Dash of Red Studio Line Paint by Ranger, Brushed Pewter Distress Crackle Paint by Ranger, Symphony Tissue Tape by Advantus

If you haven’t already, don’t miss commenting on yesterday’s post for a chance to win some Zva bling!

Have a creative day,

Zva Creative July DT Blog Hop!

Ready to hop again?

The Zva Designers are joining together today to share a project that we have created using some of our favorite Zva Creative products. I am hoping that you will take some time to join us for a little bit of fun again this month!

The Blog Hop begins at Kim Hughes’ blog. She will have the complete list of all blogs that are participating in case there is a glitch along the way. If you would like to play along, I am linking to one of the Zva designers and that designer is linking to the next and so on. There are 19 design team members, so be prepared to be inspired along the way.

Hidden on 5 of the blogs is a ZvaCreative prize package …YAY! Those blogs will be randomly chosen after the hop is over, so it’s important to leave a comment on as many blogs as you can along the way.

This Blog Hop runs through midnight US Eastern Standard Time on Tuesday, July 20th and the 5 winners will be announced on Wednesday, July, 21st on each of the winning blogs and the full list will be found on Kim Hughes‘s blog (linked above). We will do our best to notify each winner, but it’s best if you can pop in to all of the blogs once again on Wednesday…plus, you never know what kind of inspirational creation that you may find there. All you need to do is leave a comment on this Zva Blog Hop post…you do not need to leave a comment on each and every designer’s blog post to qualify. The more times you leave a comment along the blog hop path though, the more chances you will have to be one of the lucky winners.

{us GIRLS

us-girls.jpg

With so many boys in the family, I really appreciate having one girl in the house. Us Girls is about balancing out all that masculinity with some girly fun.

us-girls-pearl-flourishes.jpg

I’ve layered two different Zva Creative pearl flourishes (PEB02CB113 & CR02CA112) over one another for a dimensional look. The white and pink pearls look so pretty together.

us-girls-brad-detail.jpg

This paper flower is created by die cutting papers with the Tattered Florals die. The center of the flower is one of the beautiful Zva Creative Corduroy Brads BR01CB104.

us-girls-rhinestone-detail.jpg

Finally, to accent the chandelier on the  patterned paper I adhered some Zva loose clear rhinestones  CRRC02CA102 over some of the detail.

Supplies:rhinestones, pearl flourishes and brad by Zva Creative, patterned paper, stickers, rub-on & chipboard by Melissa France, sewing machine, twine, Glitter Thickers by American Crafts

Please hop on over to see:

Tara Orr

Thank you SO MUCH for joining us!

Mmmm…. summer

There are so many things about summer that make it one of my favorite times of year. I’ve created this layout about one of my favorite things about summer, the food. Fresh berries, cool desserts and BBQ make meals fast and delicious. I’m just waiting for the corn here to ripen for corn on the cob.

Today’s layout was inspired by some fun vintage food labels paper from Graphic 45 to create a color blocked page. The tutorial is at the CLASSroom so stop by and check it out.

sweet-summer-layout1.jpg

Also…if you’re looking for some fabulous stamp bargains, all CHF remaining stamps are now 50% off here.

Have a wonderful summer weekend!

Paper Crafts Magazine Presents: A Card Style Mystery Blog Hop

Welcome to the Paper Crafts Magazine Card Style Mystery Blog Hop. I’m super excited to be part of today’s Card Style Celebration, blog hop and to be part of this very special publication.

edited to add… there have been a few blog issues today with some of the links. If you are finding yourself unable to scroll down in a blog, go back to the original and try opening the link in a new window. If you just want to scroll down, you can also try using the arrow keys on your keyboard to solve this issue.

Card Style is Paper Crafts’ latest special publication and it’s a very exciting and unique issue. The magazine is broken into four distinct styles with cards for a myriad of occasions in each. There’s Fun & Cute, Clean & Graphic, Classy & Elegant and Shabby & Vintage and something for everyone.

I was assigned to create Shabby and Vintage designs for this magazine which were a lot of fun to work on. I love distressing, inking and painting, not to mention adding lots of layers and goodies to my designs. The most challenging thing about it was making each design distinct and unique while still capturing the essence of the Shabby and Vintage style.

Card Style has just been released for sale this week and if you’re looking for a copy, you can find it here at Paper Crafts Shop.

cardstyle2010_coverweb.jpg

I love a myriad of different styles but one I return to time and time again is Shabby & Vintage. Why do I love it so much? Is it the stitching, the beautiful muted colors, or the well-worn and loved look? Perhaps it’s the love of ink and paint left over from my art class days. It could be my inner girly-girl love of lace and flowers or even my fascination with pattern and all that texture. Perhaps it has something to do with my love of all things old and my childhood daydreams of being Laura Ingalls Wilder. I’m sure it’s a combination of many of the above but can I pin it down to one? Absolutely not.

bs-birthday-card.jpg

Today’s card is a classic Shabby & Vintage card with lots of layers, stitching, ribbon, lace and all manner of goodies. In the Shabby & Vintage style I can group all my favorite embellishments together to make a special card.

Supplies: patterned paper, chipboard, stickers and applique by Melissa Frances, sewing machine, doily by Little Yellow Bicycle, Brushed Corduroy Distress Ink by Ranger, pearl Flourishes  by Zva Creative, Crystal Trinket Pin and Medallion flower by Maya Road, twine, hem tape ribbon.

Quick Tip: It may be difficult to see in the above photo but I distressed the  beautiful Maya Road ribbon flower. By taking ink and sandpaper to pre-made embellishments you can easily make them look old and well-loved.

Have some fun today with the Card Style Blog Hop by clicking on the Card Style button below to find out the next mystery blogger. Which style will the next blogger be creating in ? Knowing this blogger, she’ll have something wonderful to share!

cardstyle_button.jpg

Now as with most fun blog hops, this mystery hop has a fabulous prize. Three prizes to be precise! Each prize is valued at over $350.00 and you can find pictures of the loot on Moxie Fab World and Paper Crafts Connection.

How can you win one? You’ll have 20 chances to win by simply leaving a comment on each of the 18 mystery bloggers entries as well as both Moxie Fab World and Paper Crafts Connection. All comments must be posted by Sunday, July 18th. Winners will be announced on both the Moxie Fab World and Paper Crafts Connection blogs on Tuesday, July 20th.

You can start by leaving a comment on my blog here.

Have fun with the mystery hop and have a wonderful weekend!

chalk it up

It’s been a while since I’ve made such a “stampy” card. Going back and dusting off some old supplies and combining them with new stamps always gives things a fresh look.

I’ve always loved using chalks but lately they’ve been forgotten in the bottom of one of my craft drawers. Today’s Ways to Use It challenge is a great time to pull them out and give them a whirl again.  Chalks are so easy to use and I love their soft dreamy feel. I remember the first time I saw the simple Versamark and Chalk technique and couldn’t wait to try it out. The soft dreamy look is so pretty and timeless. I’d love to have you play along with today’s challenge! Check it out here.

Celebrating the Moments

celebrating-the-moments.jpg

Quick Tip: Liquid Applique is great for adding dimension. The soft textured puffy surface achieved when heating it is perfect for chalking.

celebrating-the-moments-clo.jpg

Supplies: Damask stamp from Speckled Elements, cupcake from Wonderful Birthday & sentiment from Life is Not Perfect set by Hero Arts, Neenah Solar White Cardstock, sewing machine, kraft cardstock by Bazzill, ribbon by Making Memories, button by Jenni Bowlin, chalks by Pebbles Inc., Versamark and Black Memento Ink by Tsukineko

Happy creating!

celebrate

Sunday we had a great time together celebrating David’s 15th birthday. Roast beef dinner, roast potatoes, gravy, broccoli and yorkshire pudding finished off with cherry cheesecake made everyone very happy and VERY full.

I created a card for David using the new Oliver line by Basic Grey. While there are a few young boy papers, the majority will work for any age and I just love the beautiful prints. Oliver and Olivia lines are in stock at Ellen Hutson LLC.

15-day-to-remember.jpg

Supplies: Oliver 6×6 paper padOliver Sticker Elements by Basic Grey, Tiny Attacher by Advantus, chipboard letters by Pink Paislee, Kraft Ticket by Maya Road, Tim Holtz Washers & Mini Screwtop Fasteners by Advantus

* * * * * * *

I thought I’d share one of the birthday photos with you. This one just cracks me up.

boys-davids-birthday.jpg

How is that for a laugh? My youngest is always full of enthusiasm.

He also LOVES crafting. I have a hard time getting anything done as he always wants to create alongside me. He made this card all by himself using some of my discards and a few items that I was actually saving to use of something else. Oh well!  He was so proud of it I just had to take a picture and share.

little-guy-card.jpg

By the way, he’s five.

Super cute, huh?

 Take care!