Monthly Archives: May 2009

Anyone else love rubber?

jks-luv-u-dad-flat.jpg

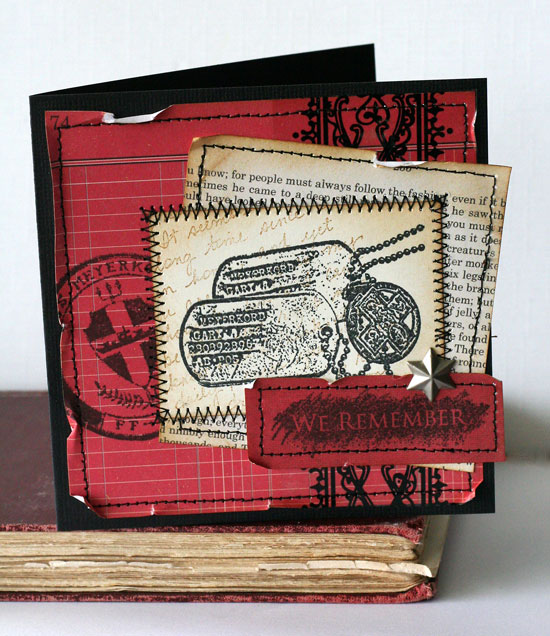
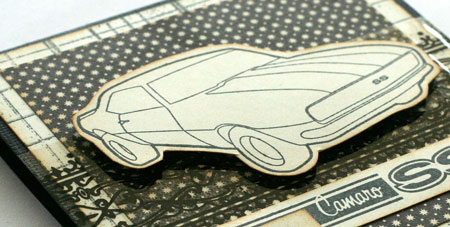
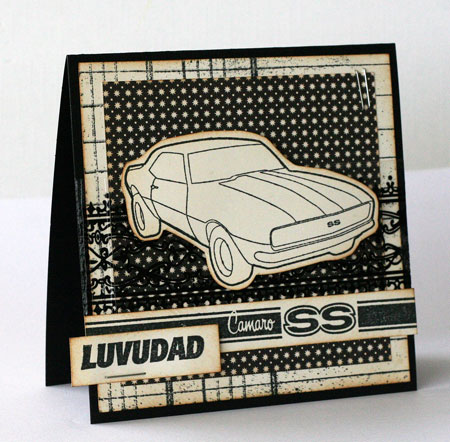
Now that Mother’s Day is past, it’s time to gear up for Father’s Day. Trust me…this time of year goes quickly so start thinking ahead. I have a Father’s Day Card to share with you today. Actually you could use it any time of the year as well. I love the hip look of these new GM Camaro stamps and think this is one card that hubby will really like this year. And it actually has a little personalized quirk… a Camaro SS card for a man whose initials are SS.

I spent yesterday getting things cleaned, sorted and put away in my new storage units. It’s amazing how much the right storage for the job holds. I also got rid of a lot of things. I tend to be a paper and embellishment pack rat.  Things feel much better after the clean sweep. I still have things to sort through but the worst is over. It should make moving into my craft room much easier. Getting my new storage also meant a place to put my other Clip It Up. I’ve had one out on my desk filled with embellishments and I brought out the other Clip It Up that goes on top of my other unit. I was thrilled to find that it worked just like I’d planned. Plan here. I had actually expected to fill it up with more embellishments ( I know…I have a serious addiction) but instead decided to give Becky’s suggestion a try. Becky has been clipping up here unmounted stamp sets on it and said it worked wonderfully. It does! I now have most of my sets clipped on one Clip It Up and it’s so much easier to find what I need.

Luv U Dad

jks-luv-u-dad.jpg

Supply List:

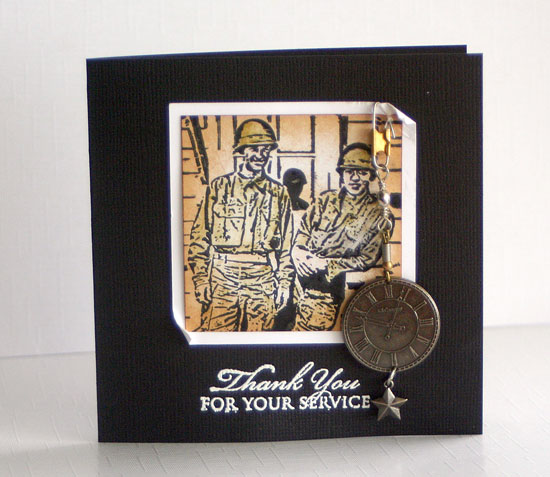
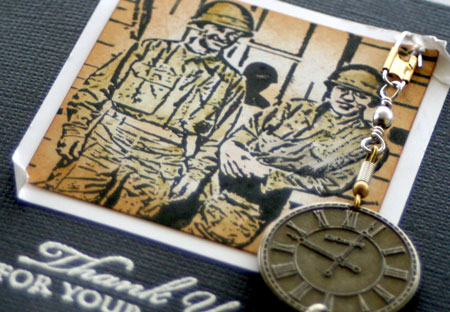
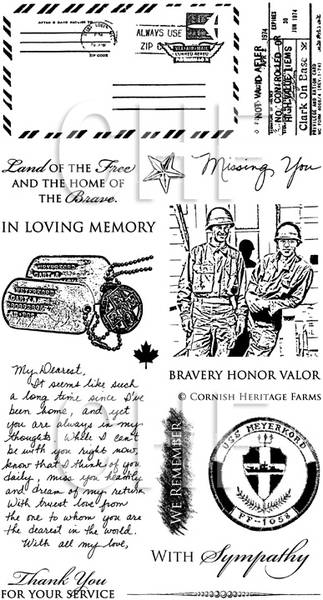
Stamps: Camaro Style (GM line) by Cornish Heritage Farms
Vintage Ledger Scrapblock by CHF
Ink: Black Memento by Tsukineko, Brushed Corduroy by Ranger
Paper: Natural Smooth by CHF, black cardstock by Bazzil, patterned paper by Jennie Bowlin
Other: stapler, tape by Prima

* * * * * * * * * *

I have a little more rubber to share with you today and this time I’m not talking about the wheels on the Camaro. I’m talking about a rubber giveaway. Sometimes to my great dismay, I actually get more rubber than I can use so I have four brand new rubber stamp sets to share with someone who can give them a good home. They are great sets that I fully intended on using but now that they’ve retired and there will soon be more rubber arriving at my door, I really want to share. So… if you can use it, post a comment below before Tuesday at 9pm EST and I’ll draw a winner and announce on Wednesday morning. Sound good?
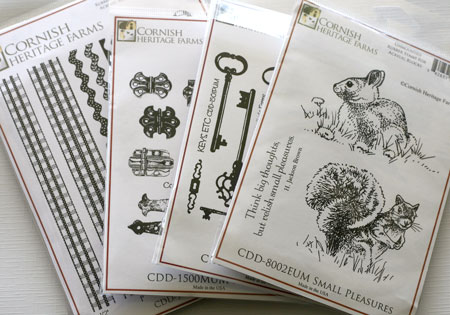
jks-rubber-giveaway.jpg

  • Small Pleasures
  • Hinges
  • Keys Etc.
  • Ribbons

All rubber is new in package and uncut red rubber.

Good luck and enjoy the rest of your weekend!

jks-spring-signature.jpg

Simply Saturday… Simply BBQ

One of the best things about summer time is quick easy entertaining and BBQ’s with friends. I thought it would be fun to kick it off with this clean and simple invitation. After all… summer crafting should be just as easy as summer cooking letting you spend more time enjoying the good weather. We’re enjoying a great Victoria Day weekend here in Canada.  I have some steak marinating for dinner tonight. BBQ for sure! I also had a great day yesterday. Hubby got some soil and framed in a new side garden for me. My daughter and I rescued some perennials that had been put at the back of the property when they were dug up for the addition. Most of them survived nicely and are not happily planted in their new homes. It was an awesome mail day too as my new craft storage arrived by UPS and my oldest put them together for me. I guess everyone was in the mood to get things done and I certainly wasn’t argueing about it.

jks-welcome-summer.jpg
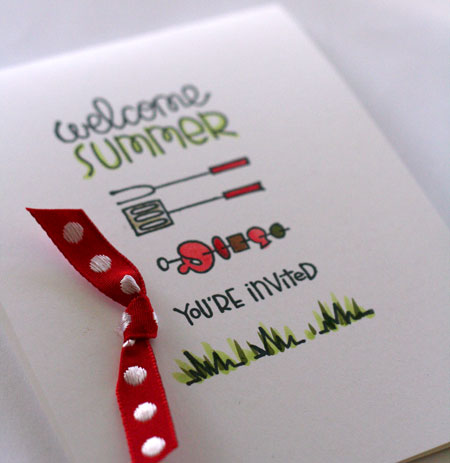
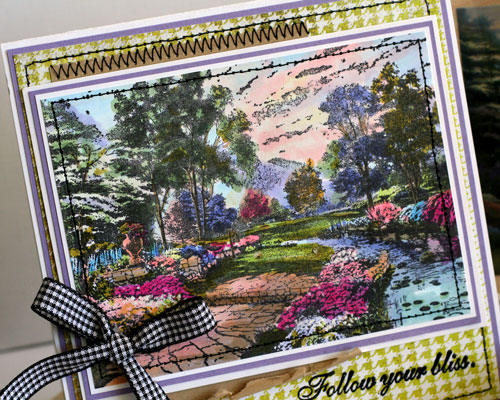
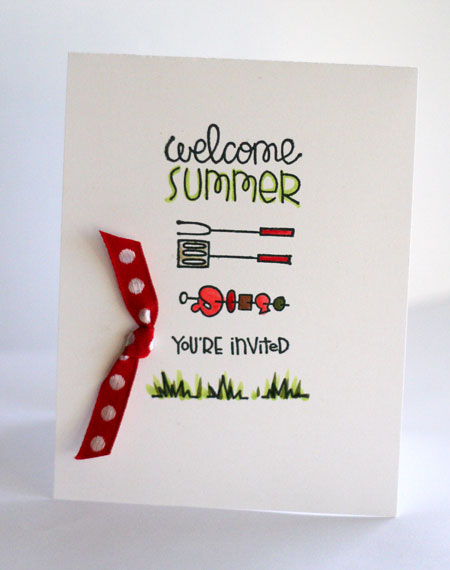
When I first  cut up the Kim Hughes Summer Trees set I was struck by how similar in length a few of the images were and thought it would be fun to make up a graphic style card. This also speeds up the process by far and allows you to place all your elements before stamping your finished project. It’s also such easy to just ink and stamp as many invitations as you wish without changing the block.

Here’s a photo of how I lined up all my images onto one block for stamping. Try stamping on a scrap piece of paper to make sure they are all exactly how you want them to appear.

jks-rubber-on-block.jpg

I used Copic markers to add some super quick color to the design. You can personalize it to suit your taste. A knotted ribbon provides a simple embellishment in keeping with the style and highlights the You’re invited sentiment.

jks-welcome-summer-close.jpg

Supply List:
Stamps: Summer Trees (Kim Hughes line) by Cornish Heritage Farms
Ink: Black Memento By Tsukineko
Paper: Simply Smooth White cardstock by Cornish Heritage Farms
Other: ribbon by Making Memories, copic markers

And here’s what else I’ve been having fun with lately….

ben.jpgj-in-sepia.jpg

heather.jpg

…now if I could just get the rest of the family to pose for me.

Take care and have a simply wonderful day!

jks-spring-signature.jpg

Follow Your Bliss

I just love the detail in the Thomas Kinkade images and look forward to each release. I know that many people are intimidated by coloring these images but if you just take your time and build up the color, they really aren’t that hard. Honestly…it’s the less detailed images that provide more of a challenge for me. When I start coloring in a Thomas Kinkade image, I start with the lightest colors and then keep building up until I have the right look. In this particular design, I added in the lightest blues first for the sky and wate, then added in the pale greens and purples. To get a better sense of the overall scene, I usually color in the darker purple areas with my lightest purple marker, the darker greens with the lightest etc. This gets rid of that start white and building up the color with Copic markers always works really well for me.

Follow Your Bliss

jks-follow-your-bliss.jpg

The image is stamped on Simply Smooth White cardstock by Cornish Heritage Farms. The highest quality smooth cardstock gets the best impression and brings out the detail on these gorgeous stamps. I used to think white cardstock was white cardstock. It’s not. If you’re on a tight budget, use the less expensive cardstock to mat layers and create your card base while saving the Simply Smooth for stamping detailed images.

When stamping a sentiment onto patterned paper, I usually like to emboss it to make it stand out. To tie in the dark black, I used a black thread to stitch around the layers in this design. Of course, I also had black thread in the machine at the time and it also saved a step. I’ve never used black on a Kinkade before and I tell you…I was sweating a little as I didn’t want to start over on this design when I’d taken an hour to color it!

jks-follow-your-bliss-close.jpg

Quick Tip: To blend the sky colors together, I go over the area with my Brick White Copic marker. This way I don’t take away any color but  still give it a natural looking blend.

Stamps: Golfer’s Paradise, Living Waters (Thomas Kinkade line) by Cornish Heritage Farms

Follow Your Bliss (Thomas Kinkade line) by Cornish Heritage Farms
Ink: Black Memento by Tsukineko
Paper: Simply Smooth White cardstock by CHF, purple cardstock by Prism, Kraft cardstock by Bazzill Basics, patterned paper by Basic Grey
Other: copic markers, ribbon by Creative Impressions, black embossing powder, sewing machine

Have a wonderful weekend and to all my Canadian friends…a safe and happy Victoria Day weekend,

jks-spring-signature.jpg

Thomas Kinkade & a challenge…

It’s a very rainy morning here today. I know what they say about April showers but we’ve totally had our share this May as well. It was so windy last night that I didn’t sleep well but I’m up and at it now to get the challenge posted this morning. Today’s challenge is to find Ways to Use Tins. I’m sure you have one or two kicking around. If you don’t…get creative and check your recycling bin. There’s so much talk these days about going green. Alter your tin to make a great container, gift packaging, even a pencil holder…whatever you wish. I can’t wait to see what you come up with so check out the challenge here.

Here’s a quick enabling tip – if you’re looking for some great deals on rubber…Cornish Heritage Farms has a great clearance sale going on right now. Some fantastic Backgrounders & Rumamge Bin sets that I’m really sad about saying good-bye too so check it out here. Also…if you’re looking for a great Canadian set…the Great Canadian Stamp Set is there as well. It’s one I’m definitely hanging on to! This is the last week so don’t delay if you’re interested.

The tin of this tin is a stamped Thomas Kinkade design. This new image, released tomorrow, is called Living Waters, Golfer’s Paradise. It’s a gorgeous floral scene of the first hole and even if you’re not a golfer, the beautiful scene will catch your eye. I decided to play up on the floral aspect of them for this design, rather than the golf and created this soft feminine gift tin.

Golfer’s Paradise Tin

jks-paradise-tin.jpg

To stamp this design, I used Burnt Umber Memento Ink . The Black and Burnt Umber Memento Inks have been my go to inks since I purchased them months ago. I just love them. The top of this tin has a clear acrylic panel so I cut out my circle shape using a circle die by Spellbinders and embossed it. If you look at the original stamp you would find that I only used the left half of the image. Don’t be afraid to die cut or cut down part of the design to focus in on what you what.

I used chalks to softly color in the image. It’s hard to get much shading with chalks but the beautifully detailed and shaded design does that work for you.

jks-paradise-tin-side.jpg

Quick Tip: Sand the edges of the tin to let the metal shine through. It emphasizes the shapes and layers of the tin top and gives it a more softly vintage look.

Supply List:

Stamps: Golfer’s Paradise (Thomas Kinkade line) by Cornish Heritage Farms
Ink: Burnt Umber Memento Ink by Tsukineko
Paper: Simply Smooth White cardstock by CHF, Porcelain patterned paper by Basic Grey
Other: ribbon by May Arts, chalks by Pebbles Inc., brad by Making Memories, flower by Prima

Happy stamping!
jks-spring-signature.jpg

In the Garden

jks-gardeners-hands-close.jpg

Can you believe we’re almost halfway through May?! I can’t! Rule of thumb here is that we plant out frost sensitive flowers and veggies after the May 24th long weekend. It’s actually early here this year as Monday the 18th is Victoria Day. I think I may be holding off just a little longer. I had a little fun with today’s card. Is it a little too bright for the eyes? I couldn’t resist pairing up these two fun papers for this design as they each reminded me of some old garden gloves I used to have. At the time I wondered about the retro prints and colors but now that I think of it…you certainly couldn’t lose them in the grass. 🙂 Hubby has been busy making me a new flower bed along the side of the house. My old one was torn up with the addition and now its going to be twice as wide and hopefully much easier to manage. My daughter likes to garden so we’ll be heading off to the garden store to get some new plants. I love perennials but we’ll be getting a few annuals to put in there too.

A garden is a Friend

jks-gardeners-hands.jpg
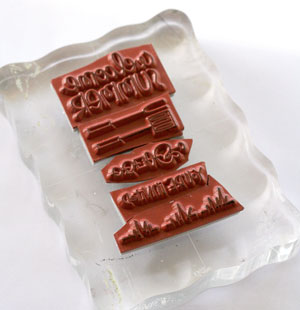
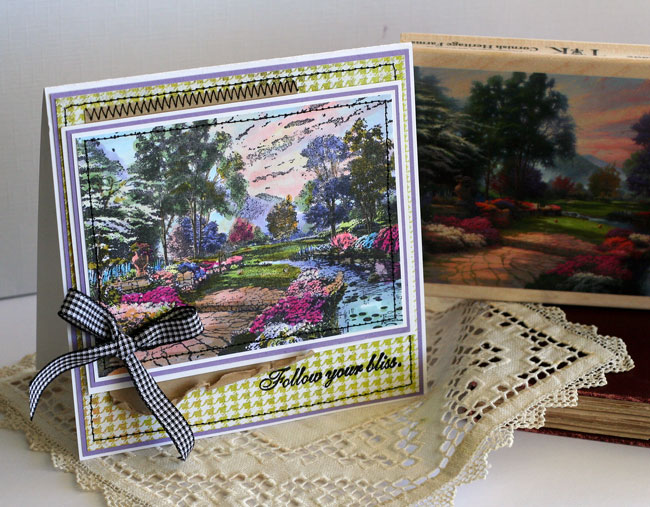
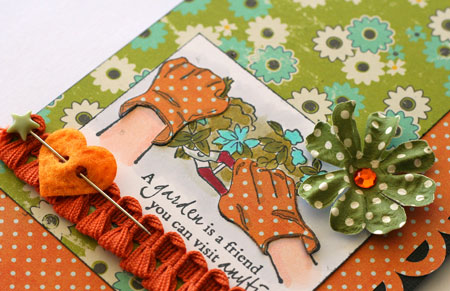
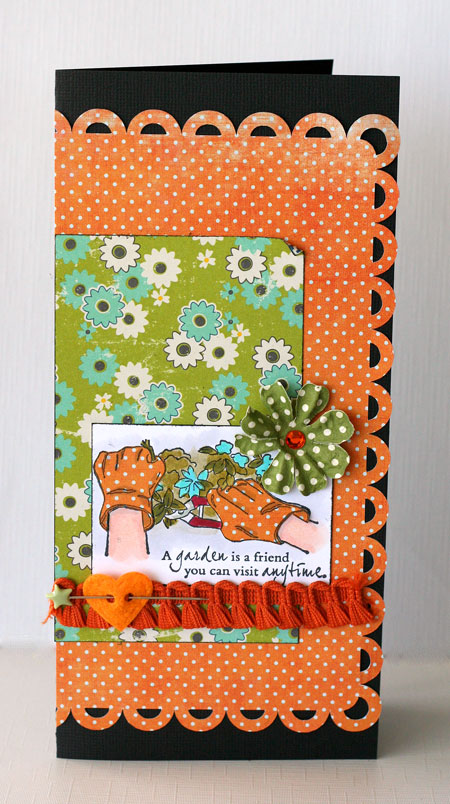
This design is a bit of a hodge podge of goodies. I just had fun with it. The die-cut paper in the background is some patterned paper, Pink Paislee I believe, that I cut out with my Silhouette digital craft cutter. I had originally wanted to use it for a design for my Craft Critique review but that didn’t happen so I used it here. The image is sort of a mixed media approach. I colored everything beside the gloves with my Copic markers and then paper pieced those with the orange patterned paper. I told you you’d be seeing the fun October Afternoon paper again! 🙂 I’m having a little fun counting each time I share it with you. This is card number three and there are lots more to come. It goes to show you just how far one 12×12 piece of paper will go! And oops! I’ve been rambling. What really started me thinking about how quickly May is going is that I’m finally getting around to uploading this design when it features May’s stamp of the month combo, Gardener’s Hands.

Supply List:

Stamps: Gardener’s Hands – May SOTM by Cornish Heritage Farms
Ink: Black Memento ink by Tsukineko
Paper: Simply Smooth white by Cornish Heritage Farms, patterned paper by October AFternoon, black cardstock by Bazzill
Other: ribbon by Making Memories, rhinestone, flower by Prima, copic markers

I also couldn’t resist creating a design using this week’s CPS sketch on Monday.I love pairing up white, ivory and Kaft together. This design uses my Ornamental Borders Scrapblock along with a sneak peek at Lisa’s new Encouragement Expressions…to be released tomorrow.

Nothing Ventured

jks-nothing-ventured.jpg
Stamps: Encouragement Expressions (MLM line) by CHF
Ornamental Borders Scrapblock by CHF
Ink: White craft ink by Clearsnap, Black Memento ink by Tsukineko
Paper: Kraft cardstock by Bazzill, Simply Smooth White cardstock by CHF
Other: ribbon, metal tag by Making Memories, twine, buttons by Autumn Leaves, flowers by Prima

 Have a great day and don’t forget to stop by tomorrow for the WT challenge,

jks-spring-signature.jpg

Heartfelt Thanks

I seriously don’t think that those serving in the armed forces get enough appreciation.Most of us, myself included, tend to go through each day taking our freedom and their sacrifice for granted. Today I just want to say a simple thank you.

Service Thank You

jks-thank-you-for-your-serv.jpg

This card is another design featuring the We Remember stamp set. It’s released today from CHF. I wanted to really make this image look like an old photograph so I stamped it onto glossy cardstock and then added in color using dye ink to look like a hand-tinted image. I used Ranger Cut n Dry nibs to pick up the ink (Oregano & Shell Pink Adirondack inks) and roughly color it in. I then sponged the edges with Distressed Corduroy & Vintage Photo Distress inks to get a vignette effect. I was going through my stash as I’m STILL working on purging so I’ll be organized once I get into my own craft room.  No…no work started again on that but hubby is really making a difference fixing up the outside of the house. Maybe June? Anyhow, I found this K & Co. charm that I picked up at Michael’s a few years ago and have been hoarding. I know it’s not current and I usually make an effect to use current product but I just couldn’t resist as it works perfectly with this design.

jks-service-thanks-close.jpg

I thought I’d share the rest of the images so you can take a look at the entire set.

ll-6019-we-remember-size.jpg

Supply List:

Stamps: We Remember (Rummage Bin line) by CHF
Paper: black cardstock by Bazzill, glossy cardstock by Ranger
ink; Black Memento ink & Versamark ink by Tsukineko, Brushed Corduory Distress ink and Oregano Adirondack ink by Ranger
Other: charm by K & Co. white embossing powder

Take care and have a beautiful day!

jks-spring-signature.jpg

We Remember

Two things to share with you today… a card and a recipe.  It’s rhubarb season here and yesterday I put together a rhubarb recipe. It’s a compilation of a few different recipes so I made one of my own. What does it have to do with today’s card? Well…honestly, not much except that I wanted to remember it. 🙂 I have a bad habit of losing recipes and sharing them with you is a win-win situation. You might enjoy them & I know exactly where they are!

We Remember

jks-we-remember.jpg

Today’s card uses a new stamp set to be released tomorrow from the Rummage Bin line. Lisa Silver is a long-time talented designer with CHF. If you follow the tutorial each week, Lisa always does a fabulous job with those. I’m so excited for Lisa as this is her first stamp set she’s designed and it is fabulous! We Remember is a classic military themed set that is perfect for so many families. For this design I thought I’d use some red Jenni Bowling paper with a few of the images from this set to create a Remembrance Day themed design.

Supply List:

Stamps: We Remember (the Rummage Bin) by CHF
Ink: Black Memento by Tsukineko, Brushed Corduroy Distress ink by Ranger
Paper: black cardstock by Bazzill, Natural Smooth cardstock by CHF, mini papers by Jenni Bowlin
Other: sewing machine, star brad by Creative Impressions, decorative tape by Prima

And here’s the recipe…

 Rhubarb Betty

6 cups of chopped rhubarb, fresh or frozen

1 ¼ cups sugar

Topping:

2 ½ cups flour

1 cup oatmeal

1 ½ cups packed brown sugar

1 cup butter or margarine, melted

1 tsp salt

1 tsp. cinnamon

Fill 9 x 13 with rhubarb and sprinkle with sugar. Mix flour, oatmeal, brown sugar, salt, cinnamon and butter together until crumbly. Scatter over rhubarb. Bake, uncovered in 375° oven for 40 minutes. Serve with ice cream. Makes 24 small servings or 16 large.

Thanks for stopping by!

jks-spring-signature.jpg