Monthly Archives: August 2007

Room by Room… a Cover Girl!

I hope you’ll put up with me! I’m so excited, I’m just bouncing! I NEVER thought I’d make the cover of a magazine! Papercrafts! How cool is that? Well, not me…but my design. A pic of me definitely would NOT sell it! LOL Check out the new PaperCrafts Magazine special interest publication Room to Room. It goes on sale in two weeks and you can order it on-line from PaperCrafts. 🙂 You can also check out some sneak peeks from that issue on the Papercrafts site as well. I can’t wait to see all the ideas in it. Below is my submission pic for my Blessed Frame project. Papercrafts now allows designers to share one project from each issue. For instructions and to see my other two projects, you’re just going to have to buy it. 😉 BTW the two gorgeous girls in the photo are my friend’s daughters. Are they not darling?!

Blessed Frame

jks-blessed-frame-submission-pic.jpg

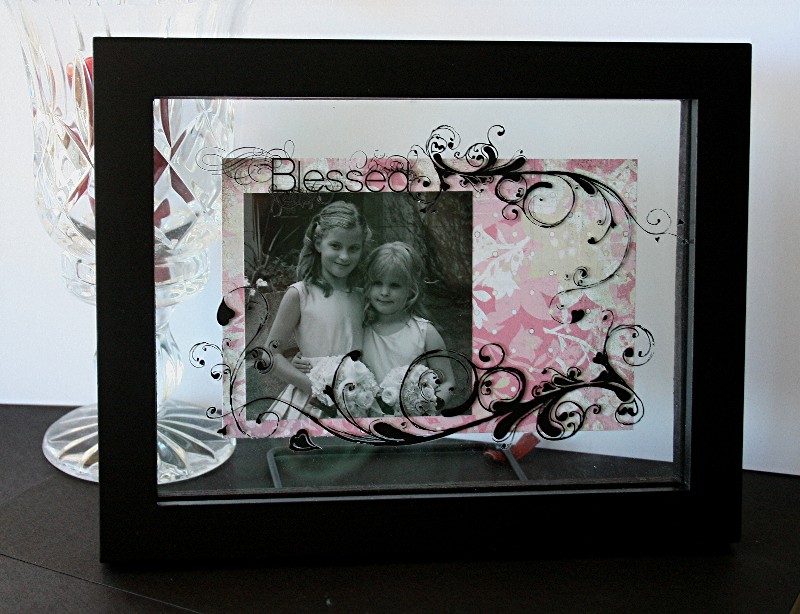
One of the papercraft projects I love the most is altering frames for use. I’ve altered all kinds and I always have fun doing it. The great thing about altered frames is that they are on display all the time. You can enjoy the results of your hard work every day. They also make fabulous gifts! If you’d like a tutorial on altering frames…I wrote one a while back for Craft Critique…here.

Believe in Your Dreams….a color challenge design

I’ve been wanting to make this card for a few days and today’s color challenge seemed to be the perfect time. This design is for my SIL Jane who is going back to school this Fall to follow her dreams. I’m so excited for her! I’ve been following my dreams and it is so exciting to see them coming true. Today’s color challenge… CC128 Groovy Skies…features Soft Sky paired up with Groovy Guava. I threw in two neutrals, whisper white and Kraft and had some fun!

Believe in Your Dreams

jks-believe-in-your-dreams.jpg

This design is pretty simple. I started off with my 5.25″ square card base and added a strip of Groovy Guava. I then stamped Tres Chic in Close to Cocoa over a piece of Kraft cardstock and sponged and distressed the edges. using my sewing machine, I freestyle stitched around the layer. I find that free-style stitchign goes really well with the distressed look.

For the main sentiment panel. I stamped the Journaling block onto a piece of white cardstock. Using the spiral punch, I punched the top edge to look like notebook paper and then sponged the edges. To add a little Soft Sky to balance out the colors, I stamped the large flower onto this layer as well. The sentiment…Dreams come a size too big so we can grow into them…comes from the Happy Harmony Sellebration set. I love this set but it is unfortunately no longer available.

The large flower from the Office Accoutrement set was stamped twice and then cut out before attaching to the design with a large pewter brad by Creative Impressions. I love this May ARts ribbon and couldn’t resist adding a little touch. I stitched it on with a zig zag stitch and then added a little blue button on top.

Hope you have a fabulous day! I hope all your dreams come true as well! If you feel like sharing…i’d love to hear about them…leave me a comment! 🙂

Rascal …a layout…

Do you like rascals?! I have a few but my youngest definitely qualifies! He is such a cutie but never has any trouble finding something to get into. Actually just before I started writing this, he decided to scrub the floor with the toilet brush….hmmmm…not a good idea. More work for me! The photo in the layout below was taken a few months ago when he decided to get creative. Why limit yourself to paper when you can try body art?! 😉 Lucky for me, it was washable markers and he came mostly clean after a nice bath. If you can’t read my journalling below…it is printed right on the photo and says…. creative genius, maybe…little rascal, definitely. 🙂

Rascal

jks-rascal.jpg

I’ve been doing a little scrapbooking lately and having fun with it. It was actually how I started paper crafting in the first place and it is fun to go back and use the skills I’ve learned and try it again. This layout was originally created for a review I did on Hambly Screen Prints for Craft Critique a few weeks ago. I love their product…it was fabulous to use! I’ll definitely be buying some in the future.

This design features Hambly’s gorgeous metallic silk screened patterned paper and two of their fabulous transparencies. I had a lot of fun layering them all together for this fun look. I was trying to get a funky fresh look to go with the “body art”. 🙂 Very little stamping on this design, just a little Rascal stamped onto the Cosmo Cricket chipboard button “R”. I used my Karen Foster Snap Stamps to spell it out. The star chipboard strip is from SU’s Ginormous Flowers Chipboard set. I took the stars and sprinkled them along the right side of the layout. The orange star strip along the left is a rub-on by Hambly Screen Prints and ties in with the star theme. The scraps of May Arts ribbon pull the teal/aqua color from the transparency. I just love this ribbon. It is fast becoming one of my faves. I can’t seem to put it down lately! 🙂

It’s a dreary Monday morning here. Very wet but we really need the rain. I’m going to be finishing up some designs, playing with my rascas and catching up on some housework. Not much fun (the housework that is) but it really needs to be done! 🙁 Wishing you a very happy Monday!

Supply List:

Cardstock: Bazzill Basics

Patterned paper: Hambly Screen Prints

Stamps: Mini Formal Snap Stamps – Karen Foster Design

Ink: Only Orange Craft- Stampin Up

Other: Transparencies – Hambly Screen Prints, star chipboard – Stampin Up, R chipboard button – Cosmo Cricket, ribbon – May Arts, paint – making Memories, sewing machine, orange star rub-ons – Hambly Screen Prints

A Simple Design… Peace & Comfort

I needed to take a little break today and so…no {C’est Bon} article today. Hope you don’t mind! I decided I’d share this simple design instead. This another design I created for Gina K and the Make a Wish Foundation stamps for a cause set. The set is called Make a Wish and you can help make wishes come true by purchasing the set here.

Peace & Comfort
jks-peace-comfort.jpg

I just love this dandelion stamp from the set paired up with this sentiment. I wanted to go for a soft, dreamy look…very soothing for someone who might by going through difficult days. This card design is very easy to make. The card base is a Fabriano card. I love the soft white/ivory color and the hand pressed look of the edges.

For the flowers, I stamped them three times onto the card with Versamark ink and then embossed them with clear embossing powder. To create the soft background, I lightly sponged it with Bashful Blue on the top half, Certainly Celery on the bottom and then Almost Amethyst around the top and middle edges. To blend them together, sponge lightly overlapping the colors a little where they change from one color to the next. If you use less ink, you can slowly build up to the desired look and it is much more subtle.

For the sentiment…I inked up the sentiment in two parts. I love splitting up sentiments to draw your eye through the design. This also works great when you have limited space in a design and are wondering how to fit the whole sentiment in there. Make sure you carefully clean your stamp before stamping the next section so as not to add more than you want! To finish it off and add a subtle embellishment, I tied a small scrap of dotted organdy May Arts ribbon in a knot and then adhered it to the card front with a glue dot.

Have a fabulous day!

Supply List:

Card – Fabriano Note card

Stamps: Make a Wish – Gina K Designs

Ink: Black Hybrid Palette Noir – Stewart Superior, Certainly Celery, Bashful Blue, Almost Amethyst – Stampin Up

Other: Clear embossing powder, sponges – Stampin Up, ribbon – May Arts

A Simply Saturday card…

This is a card I made a few weeks ago…simple and cute. Perfect for a quick card. I like keeping Saturday’s entries simple. Saturday is a great day to spend with your family. Make sure you find some time to do that today!

Ladybug Thanks

jks-ladybug-thanks.jpg

This is a super simple little 4×4″ square card design. The card base is made from Kraft cardstock adn then layered with Cool Caribbean and Rose red. Notice how I just wanted a hint of the red so I made that layer a lot smaller. The white main panel is randomly stamped with the flowers from the Little Lady stamp set from Papertrey Ink.

To add a fun element, I used an acetate overlay the same size as the card base. On the front of the acetate, I stamped my little ladybugs and sentiment in Red and Black Stazon ink. I love how it give the appearance of the ladybugs in flight. To hold it all together, I punched holes through the spine of both layers and tied an aqua dotted organdy ribbon through. Quick, fun and easy! Perfect for a summer Saturday. 🙂 Hope you enjoy yours!

Supply List:

Cardstock: Kraft, Cool Caribbean, Rose Red, Whisper White

Stamps: Little Lady – Papertrey Ink

Ink: Black & Red Stazon – Tsukineko, Rose Red, Lavender Lace, Cool Caribbean – Stampin Up

Other: ribbon – Michael’s, hole punch

Wish…

I originally designed this card for Gina K to promote her fabulous Make a Wish stamp set. This stamp set is designed to support the Children’s Make a Wish Foundation and $7 from each set sold will go directily to the foundation. I loved being part of something to raise money for this cause and you can help too, by purchasing this darling stamp set. It is such a flexible set and covers a great variety of occasions. I also used this card yesterday for the Way’s to Use it Challenge,,,the challenge was to use pins. If you’d like to play along with the challenge, you still can at WT126. There were also TWO challenges yesterday. If you missed it, make sure you check out Julie Buhler’s challenge here too.

Wish!

jks-wish.jpg

So finally…here are the details… This card has a side hinge. I scored the front about 1 inch from the folded edge, folded the front open and then glued it together to hold it in place. Through the hinge, I used my paper piercer to put two holes to insert my pin through. My pin is a beautiful long stick pin from Around the Block that I purchased from Jacksonbelle. After inserting the pin embellishment, I tied on the darling May Arts stitched ribbon.

For the main panel, I wanted to try out another acetate overlay. To create my overlay, I stamped the stars repeated over the aceate with white Stazon ink and allowed it to dry. To color the stars, I used my Sakura Gelly Roll Glaze pens. I love how they dry on acetate and give a great glazed look. While this was drying I adhere a layer of striped Tres Jolie paper to the card front after sponging the edges with Close to Cocoa Ink. Using my sewing machine, I stitched on the acetate layer.

To add some more dimension, add to the star theme and highlight my sentiment…I covered a Basic Grey Chipboard Elements star with the paper and then sanded my edges with my Basic Grey Precision File Kit. I omited part of the sentiment by only inking up the wish! part of my stamp and then stamped it onto the star. I love the fun boyish look!

Supply List:

Cardstock: Aqua – unknown

patterned Paper: Tres Jolie collection – My Mind’s Eye

stamps: Make a Wish – Gina K Designs

Ink: Black, Close to Cocoa – Stampin Up, White Stazon – Tsukineko

Other: Ribbon – May Arts, transparency – STaples Business Depot, Gelly Roll Glaze pens – Sakura, Chipboard Elements – Basic Grey, Pin – Around the Block, sewing machine

Thursday’s Ramblings…

Four hundred Twenty-eight! Huh? What? Four hundred twenty-eight pictures that we took yesterday! LOL We had a fabulous day at the African Lion Safari, but don’t worry…I won’t bore you with them all. Actually it was a long day and I’m still exhausted and I haven’t had much time for editing them so you are totally off the hook. 🙂 Scroll down to the bottom of the post if you are interested in taking a peek at the few I have edited.

Quick Tip: Ok…this is totally NOT papercraft related but I just found it out Monday and it saved me a LOT of money. 🙂 You can buy tickets for the above attraction as well as many others, at Costco. It will save you a pile! Have fun!

Way’s to Use it Challenge – I was supposed to be away on vacation today but you know how it is…the best laid plans of mice and men…. LOL Anyway…I set up a guest hostess for today’s challenge but maybe that got a little mixed up? Not sure…so I went ahead and posted. You can find the challenge HERE. I’ll be back later this afternoon to post my challenge card design here and all the instructions.

Craft Critique – I’ve been a very busy girl lately and written another article for Craft Critique. This week is book review week. I’ve been so interested in learning more about digital scrapbooking lately and when I found the Ultimate Guide to Digital Scrapbooking by Better Homes and Gardens, I just had to check it out. Fabulous publication! I learned so much and I love how learning something new, you can always apply it to different aspects of design. Below is my first hybrid design. It incorporates three digital techniques I learned from the level one section of this book. Click on the link, Craft Critique book review to check out more. 🙂

Sun, Sand, Surf – a digital design for Craft Critique.com

jks-sun-sand-surf.jpg

And lastly…a few of the photos…

This darling baby zebra with his mom, was born on Monday. I was so excited to get a pic of a day old zebra…absolutely amazing!
jks-baby-zebra.jpg

This 9000 pound elephant laid down right on top of his trainer…yikes!
jks-elephant-on-man.jpg
Fabulous Birds of Prey show – this is a landing young bald eagle…
jks-landing-young-bald-eagle.jpg
The Pride…
jks-the-pride.jpg
The waterpark and splash pad was fabulous for kids and great for cooling off…
jks-benjamin-splash-pad.jpg
jks-waterpark-slide.jpg