Category Archives: Papercraft projects

Playing House

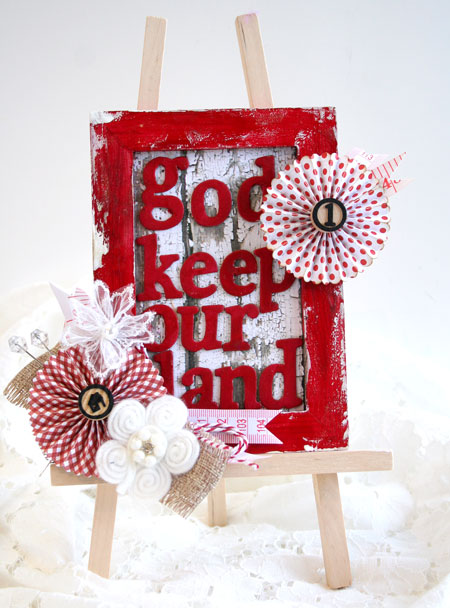
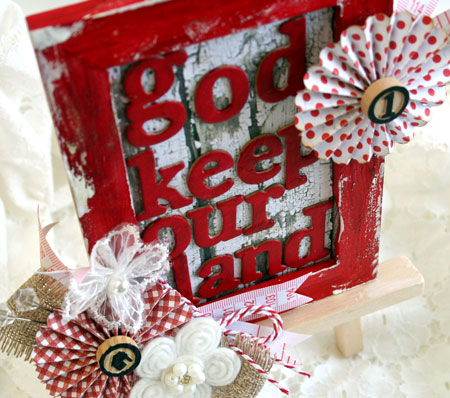
Now and then you make a project that brings you a lot of joy. Playing with this sweet little altered shadowbox house did that for me. It reminded me of the doll house my dad built for me as a child that brought many hours of enjoyment. Part of the fun of the doll house was decorating it with paint and wallpaper and bits of carpet. When my daughter was small I had my husband build her almost the exact replica of my doll house which was a huge hit for Christmas one year. Down the road I’m looking forward to having a granddaughter or two and hoping to make more  little houses for play.

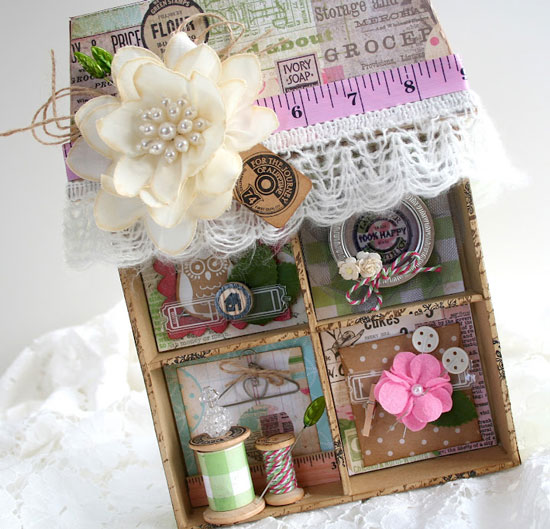
This shadowbox house is a new Maya Road release that can be quickly altered any way you like.

Today I’m blogging on the Maya Road Design Team Blog. I hope you’ll come and join me!

Have a beautiful day!

Trimmed Out Gift Bag

I love wrapping gifts. Making a gift look pretty and unique just adds that special touch. One way I like to do this is to have lots of kraft gift bags on hand. It makes it easy to whip  up just the right bag with paper crafting goodies I have on hand instead of running out to the store to find one that works.

Today’s project is a sweet little yellow gift bag that I’ve worked up to hold a gift for a new little someone. I love yellow for babies as it is soft and sweet and works with either gender. I have some very fond memories of my own little ones in lovely soft pale yellow sleepers. When I look back on my life so far, I think that rocking my little ones each night rank right up there with my very favorite moments.

To make this gift bag I’ve used lots of different yellow trims together to create a striped border along the top of the bag.  Continuous Lines Glue Dots® are a great way to adhere strips of trims. I’ve also used Craft Glue Dots® to hold on the buttons.  Here’s a fun tip... tear off a strip of the Glue Dots® roll and center it along your border. Apply the Glue Dots® directly from the backing for perfectly spaced buttons.

Supplies:

I wrote this blog post while participating on the Glue Dots® design team.

Thanks for stopping by!

glorious & free

It’s the Canada Day weekend and a glorious one at that! I’m excited to be spending most of the weekend with my loved ones at the lake. I’m so happy to celebrate this weekend and so thankful to be born a citizen of this land. I think most of us take for granted our freedoms and it’s a good thing to stop and think about how blessed we are. Each year we celebrate Canada Day on July 1st celebrating the anniversary of the July 1, 1867 when we became a country.

This year I wanted to create a Canadian themed project for the celebration. As I went through my stash, I found I didn’t have any maple leaf themed items. I really wanted to use what I had on hand so came up with a red and white themed frame. There are no leaves but I think it still has some Canadian flavour with the color scheme and part of our national anthem as the sentiment.

O Canada!
Our home and native land!
True patriot love in all thy sons command.
With glowing hearts we see thee rise,
The True North strong and free!
From far and wide,
O Canada, we stand on guard for thee.
God keep our land glorious and free!
O Canada, we stand on guard for thee.

To create this project I started off with a dollar store frame and stand and altered it. The wood frame is painted with layers of paint and distress crackle paint and inked with Distress Ink for a weathered look.

The embellishments are my favourite part of this project and I’ve used lots and lots of Glue Dots®. I started off embellishing this frame with the die cut rosettes. Putting them together is super easy with an XXL Glue Dot®. Craft Glue Dots® adhere the medium sized flowers and other trims and Mini Glue Dots® are perfect for adhering the chipboard letters.

Supplies: dollar store frame and… 

I wrote this blog post while participating on the Glue Dots® design team.
Happy Canada Day!


stars and stripes

I’m a Canadian girl, through and through.

OK. So you’re probably doing a double-take with today’s project then, right?

Well this project is inspired by the new beautiful Maya Road Star Bottlecaps and I thought I’d jump outside the box and create a set of vintage style canvases for my American friends.

I hope you like them and I hope I got the look right! 🙂

Today I’m in the CLASSroom with the tutorial and step outs on how to create this mini canvas set. I hope you’ll join me here.

Have a fabulous weekend!

classics for dad

June is always a wonderful month. It brings summer, school holidays, trips to the beach and Father’s Day. Today I have a gift project for dear old dad.

Is it just me or does anyone else find dads hard to create or buy for? I always find it so tricky. The other day I was going through my stash looking for some inspiration and came across this metal cd tin. Sorry…I’ve had it a while and I can’t remember where it came from but I’m sure a Google search would help you come up with a source. My guy is a music lover so I thought it would be fun to put all his favorites on a CD or two or three. His own personal music mix. My daughter actually made me up a CD while she was away at school this past year and I loved the gift.

Because this tin will hold classics, I went with a classic vintage style to alter the tin. The edges are wrapped with Tissue Tape and give it a fun feel.

The embellishments are made up of papers from the Boarding Pass line by October Afternoon and some chipboard accent pieces that I’ve covered or stained. Adhering them is easy with Craft Glue Dots®. Glue Dots® work great even on tough surfaces like metal and wood.

Supplies:

I wrote this blog post while participating on the Glue Dots® design team.
Happy creating!

off the cuff…

Canvas again. You know how I love it!

Ever seen the Maya Road Alterable Canvas Cuff? It’s a super cute cuff/bracelet that you can alter and wear. A very cool product idea.

Well, I wanted to create with one but I have to admit, I’m a pretty plain jane type of gal. It’s very rare that I wear anything around my wrists, even my watch. I really wanted to play with that cuff anyway so I went ahead and ordered it as an idea started spinning in my mind.

The lovely Alterable Canvas Cuff also makes a very lovely needle case. I’m quite tickled with how it turned out. My needles are pretty, safe and very easy to find.

A look at all the pretties decorating it…

…and a look at the back showing the masking and misting.

I’m sharing this project today on the Maya Road Design Team blog.You can see more photos, see the inside and read the project steps.

Oh…and if you love Maya Road as much as I do…they are releasing their Early Summer line. Gasp! It’s beautiful! Check it out!

PS There’s a giveaway! Seems to be a great week for those!

Supplies:

Have a fabulous weekend!

teacups and posies

Flowers are always a classic for Mother’s Day. We all have our favorites. I like bouquets that come from the garden. Things like lilacs, hydrangeas, daisies and daffodils. But how about a fun little floral arrangement that doesn’t fade?

I thought I’d put a little spin on the traditional Mother’s Day flowers with this little teacup arrangement filled with crafted flowers. To fill my teacup and provide something to adhere the flowers to, I wadded up a large piece of aluminum foil and adhered it with Craft Glue Dots® to the inside of the cup.

The beautiful big trim flowers were created with Maya Road trims and XXL Glue Dots®. I’ve gone with a sewing theme and you can see little glimpses of vintage sewing pattern tissue peeking out between them as a filler.

Little accents of tape measure trims and tulle trim are adhered just inside the rim of the teacup with Craft Glue Dots® to finish off the design.

There is no limit to what you can create with your crafting supplies. Don’t forget to think outside the box…or off the card or the page.

Supplies:

I wrote this blog post while participating on the Glue Dots® design team.
Happy creating!