Monthly Archives: June 2010

Embossing

It’s been quite a while since I’ve done much embossing. When I first started stamping and bought that heat gun, I was enthralled. Watching that embossing process was so cool. And there are so many heat embossing techniques. Why don’t I use them much any more? Aha! Does this make a good Ways to Use it Challenge? It was fun to challenge myself to create am embossed design and I hope you’ll join me today in the challenge here.

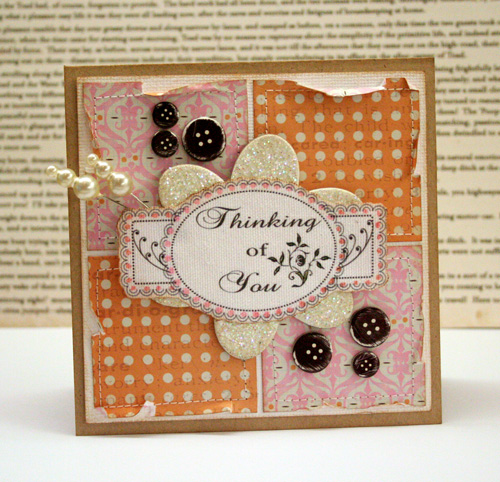
Embossed Journey Card

embossed-journey.jpg

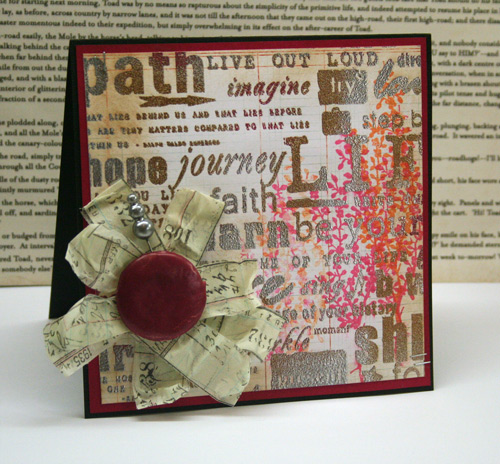
For this project, I used one of my favorite (and easy) embossing techniques.  A multi colored embossed surface using three different embossing powders. It probably has another name as well but I call it Triple Embossing.Here’s how you do it…

  1. Choose a  large stamp such as a background stamp or an image with a lot of inking surface. Ink with Versamark or embossing ink and stamp your paper.
  2. Sprinkle embossing powder A over approximately 1/3 of the surface. Remove excess.
  3. Sprinkle embossing powder B over another third of the surface. Remove excess.
  4. Sprinkle embossing powder C over the entire surface. Remove excess,
  5. Heat with heat gun until all the embossing powder is melted.

embossed-journey-detail.jpg

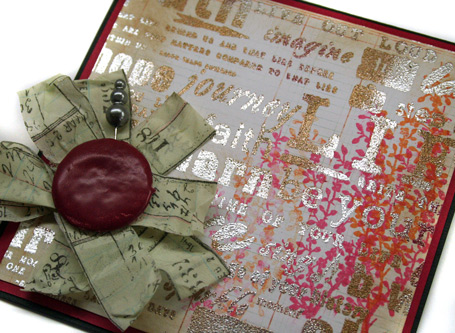
I love the way the embossed areas catch the light. You may also have noticed the huge brad in the project. It was  embossed with about 5 layers of Cranberry Adirondack Embossing powder to coordinate with my project. The stamping it done on some patterned paper, the Basic White 6×6 paper pad by Basic Grey.

Quick Tip: Use embossing powders from the same company so that they liquify at approximately the same time for good blending.

Supplies: Black cardstock by Bazzill, Cranberry Cardstock by Prism, Basic White 6×6 paper pad by Basic Grey,  Life ScrapblockSilhouette Blooms 1 by Cornish Heritage Farms, Cranberry Adirondack Embossing Powder, Tarnished Gold Embossing Powder, and Silver Embossing Powder by Ranger, Tim Holtz Tissue Tape by Advantus, Rosebud and Tangelo Memento Ink and Versamark Ink by Tsukineko

Happy creating!

This & That

I’ve been super busy creating things I can’t quite share yet. Funny how things go in waves. I had a ton of things to share at the beginning of the month and am now scrambling to create something for the blog. I did find this one card left in my “to share” folder.

Do you love on-line shopping? I did a little yesterday as the new Basic Grey Oliver and Olivia lines are in at Ellen Hutson LLC.  I just couldn’t resist as they are so cute! Can’t wait for my mail to arrive!

thanks-so-much.jpg

This card uses some fun October Afternoon paper with rub-ons, stitching and some inked canvas. I sponged the outside and die cut edges of the canvas with ink to add color and highlight them.

Quick Tip: when die-cutting, use the positive and negative shapes on your project for a fun look.

Supplies: patterned paper by October Afternoon, Printed Canvas by Prima Marketing, rub-on transfer, sewing machine, butterfly by Jenni Bowlin, Circle Nestability Die and  Nested Dahlia Die by Spellbinders, Dried Marigold Distress Ink and Shabby Shutters Distress Ink by Ranger

I spent yesterday relaxing and then cleaning my space. The top photo was taken June 11th and the bottom one after a whirlwind creative marathon. I really hadn’t planned to share but Susan Opel posted this on Facebook yesterday on the Paper Crafts page so I thought I might as well. lol There’s nothing quite like having that photo shared to get it done. After a day of procrastination, it DID spur me into action. 26 minutes and 57 seconds later ( I used a timer), everything was put away, the counters dusted and the floor swept. It now looks like the first photo again. When I designed the room, I really took into consideration how I create and how I would store everything. Everything has a place and is easy access so it makes clean up a lot easier.  Yay! I’m ready to get right to work in my space this morning.

craft-room-whirlwind.jpg

So. Which does your space look like. Number 1, number 2 or somewhere in between? 🙂

Have a creative day!


Monday Happiness

It’s a fresh new week and a beautiful day and I’m happy here. One of the things that makes me happy is wonderful friends. I created this gift bag for a friend of mine just to let her know that.

This gift bag uses all kinds of Lily Bee Design goodies. Paper, chipboard, rub-ons…love them all. I had a little fun experimenting with this bag and mixed two different lines together. The Lovely line and Hello Sunshine mixed so well.

Lily Bee Design also has a fun giveaway going on that you won’t want to miss. Do you like Lily Bee on facebook? Invite your friends for a chance to win. Check it out here.

you-make-me-happy-bag.jpg

You’ll notice I used lots of stitching on this project. To stitch on a gift bag you have to make the design on a front panel first. Just cut a piece of scrap paper the size of the front of the gift bag and create your design on it. When finished gluing and stitching, adhere the whole thing to the gift bag front.

happy-gift-bag.jpg

Quick Tip: YES! You can stitch on chipboard!

Supplies: sewing machine, Hello  Sunshine & Lovely papers, rub-ons and chipboard by Lily Bee DesignEdger Punches by EK Success

Another thing that makes me very happy is  my sweet blog readers. Many thanks to each of you for stopping by each day!

Wishing you happiness…

Sweet Saturday Thoughts

I LOVE today’s Card Pattern’s Sketch #69. Blocks of color are such a great look and an easy way to break up the design.

I’m also loving this Lily Bee Design Lovely paper. This pink and orange double sided paper is called Splendid and I think Kristen has very aptly named it. I had to laugh at myself though. You may have noticed that I used this exact same paper combo for last week’s sketch. Often I work ahead and for this sketch, not so much so I had totally forgotten that I had used it already.

This week at Card Patterns the sketch is sponsored by The Stamping Boutique and as always, there’s a great prize for a random participant.  There’s also a chance to be one of the Super Six and a guest designer for Card Patterns.

Thinking of You

sketch-69-thinking-of-you.jpg

sketch-69.jpg

I’ve used the Thinking of  You 2  digital image from the Stamping Boutique for this card. I love printing onto Claudine Hellmuth Sticky Back Canvas. It runs through the printer so easily and the texture is just fabulous.

thinking-of-you-detail1.jpg

After printing, I inked the edges and then highlighted the scallops with little dots by using a Sakura Pink Glaze Pen.

The gorgeous glitter chipboard is from Melissa Frances and the sweet chipboard buttons are Lily Bee and from the same Lovely line. A little stitching and some pearl Trinket Pins and it’s done.

Happy creating!

Hi. That’s it. Hi.

Ever had one of those days you wake in a fog. That’s me today. Yawn. Just another week or so of school here and I’m looking forward to a little summer vacation with my kids. This is one of my last “no-kid” days for the next couple months so I’m hoping to get myself moving and get lots accomplished.

And so…since I can’t think of anything witty or interesting to say… here’s today’s card that I’ve created for the CLASSroom. Project information and instructions can be found here.

canvas-hi-card.jpg

Have a fun (and productive) day!

silk and roses

ribbon.

It’s gorgeous isn’t it? I love all kinds as it can really change up the look just by changing the ribbon.

I love plain ribbon. Dotted ribbon. Gingham ribbon always makes me happy. Sheer ribbon. Lacey ribbon. And oh that gorgeous silk ribbon! I think it just may be my favorite of them all.

Today for the Ways to Use it Challenge, I’m challenging you to pull out your ribbon and show us some great ways to …well, use it. I hope you’ll join us here.

silk-ribbon-roses-card.jpg

I’ve had this silk flower idea on my brain for a while. Do you ever have ideas that you just don’t seem to get around to? Today seemed like a great day for a ribbon challenge and also to have fun with this idea.

silk-ribbon-rose-detail.jpg

The silk ribbon flower is created by twisting silk ribbon and adhering it with a glue gun. It looks harder than it really is. Seriously easy. The green “leaves” are just some celery silk ribbon tied in a bow and placed under the rose. I used Mauve Silk Ribbon for this project.

Supplies: silk ribbon by May Arts,  cardstock by Bazzill, Seaside Retreat 6×6 paper pad by Webster’s Pages, Basic Manilla 6×6 paper pad by Basic Grey, Wood Grain Backgrounder stamp by CHF, Earth Flowers, & Just Find Me stamps by Hero Arts, Brushed Corduroy and Tumbled Glass Distress Ink and Jet Black Archival Ink by Ranger, Tiny Attacher by Advantus, hot glue gun, Pearl Trinket pins by Maya Road, twine

Happy creating!

what’s up

I’ve decided that I love teaching scrapbooking. Two classes down, I’ve had a lot of fun, met some great people, learned lots and had a wonderful time. I’ve looked at the paper crafting industry in a lot of different ways. As a newbie, a customer, an addict, a designer, a design team member, a staff member, a product designer and now as an instructor as well. It’s really interesting to see the many different sides of things and each experience is one that helps me learn and grow.

love-our-day-blog-size.jpg

Also, I’m so excited (and I hope you don’t mind my sharing) that one of my layouts is in the Basic Grey June newsletter. Gasp! I {heart} Basic Grey!

And here’s the details about my next class…

scrapbook-memories.jpg

Scrapbook Memories
1890 Hyde Park Rd.
London, Ontario

519-474-2665 

Here’s a peek at my next class…

sun shine

layout-clip.jpg

Monday, June 28th
6:30 – 8:30

We’ll be having fun with circles, ric rak and the Delovely line by Cosmo Cricket to create a summer themed 12×12 layout. We’ll be continuing the techniques onto an accompanying card as well.

I’d love to have you join me. 🙂

Take care,