
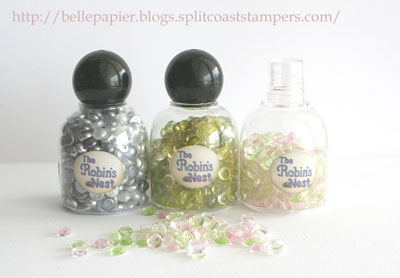
I’ve been sucked in by these tiny little Dew Drops! So sweet, now that I’ve started to use them I just can’t stop! These tiny acrylic embellishments are from The Robin’s Nest and come in clear or semi-opaque varieties. They are so easy to use and apply and I just keep finding new places to add them in! Each embellishment is approximately 1/4″ in diameter. Each bottle resembles a little nail polish bottle and I’m amazed at how many little pieces come in each package.
What I love about The Robin’s Nest Dew Drops
- 21 varieties
- lovely shine and subtle look
- flat side for easy application
- each bottle comes with a variety of colors
- I’m amazed that there are approximately 560 dew drops per package!
- great price – $4.99 …that is less than a penny each!
How to adhere…
The Robin’s Nest Dew Drops are super easy to adhere. You can adhere them using a couple easy methods…
- mini glue dots…if you have the large size like I do…I actually pull my glue dot in half so that I can adhere two dew drops and reduce bulk
- Dimensional Glaze….I use Ranger Glossy Accents but other dimensional glazes also work well such as Crystal Effects
Where to Use…
- The dew drops are fabulous as flower centers
- use as accents for water or ice
- Use to “frame” a design element
- Adhere to the center of scallops
- Adhere them in a line as you would brads as an embellishment
Quick Tip: If you don’t have the right color of Dew Drop in your collection…you can easily color them with Copic markers for a quick fix.
Where to Buy:
- I purchased my Dew Drops from Ellen Hutson. Ellen put these beauties on the map by introducing them to the online stamping world through her store.
- Due to the popularity of these dew drops…they are starting to become available in local scrapbooking stores as well as other on-line sources.
Little Sheep
This fun little design was inspired by this week’s CPS challenge. Loved the scalloped edges to the design and I knew right away exactly how I wanted to do this. I’ve been wanting to try die-cutting a little card with my Spellbinders Nestabilities dies for a couple months now. I love how challenges always give you that little kick to take the idea in your head and get it out on paper. To cut out this little card (approximately 4.5″ across) I simply folded a piece of double-sided patterned paper in half, lined up my die so that it wouldn’t cut off the hinge and ran it through my Cuttlebug. The pink paper is actually the same paper I used to layer the design…the pretty dots one…just the reverse side. When you open up the design…you get a card with a darling dotted inside.
I wasn’t sure exactly what I wanted to do with this card design but my eyes fell on my Cornish Heritage Farms Primitive Beginnings stamp set. I hadn’t had a chance to use it yet and this darling little sheep caught my eye. I admit…I’m not using it in the primitive folk art style in which it was designed…but I love taking stamps and using them for a broad variety of ideas. I short…I love stamps that are flexible and I think this little sheep works for a shabby style baby design too. I paper pieced my little sheep on top of the dotted paper and then added the sentiment. A little Creative Impressions mini paper clip “holds” it there and again…for embellishment, my brown dotted Creative Impression’s ribbon. Lastly…to add in all my little dew drops…I adhered them with Ranger Glossy Accents to each scallop of the card. It was so super quick to do and I was really impressed with how fast it dried.
Hope you enjoyed this product review and tutorial. ![]() For other {C’est Bon} products just click on the C’est Bon tab in my category section of the sidebar. All {C’est Bon} products are ones I love to use and are my own opinion based on my experience with that product. I love hearing from you. If you have any questions or comments on this product I’ll do my best to answer by editing this post.
For other {C’est Bon} products just click on the C’est Bon tab in my category section of the sidebar. All {C’est Bon} products are ones I love to use and are my own opinion based on my experience with that product. I love hearing from you. If you have any questions or comments on this product I’ll do my best to answer by editing this post.
22 responses to “Robin’s Nest Dew Drops {C’est Bon}”