Monthly Archives: November 2007

Simply Saturday…Christmas Designs

Thanksgiving weekend is a great time to get started on those Christmas designs if haven’t already done so! If you are short on crafting time, like many this holiday season, a great way to put together a pile of cards quickly is in a clean, simple style (this is Simply Saturday after all 😉 ) using coordinating papers and embellishments.

Today I have a couple quick cards to share with you in a very simple, scrappy style. Yes it is OK to switch up your styles once in a while. I always find I learn something new by looking at things in a different way. Only one of these cards has any ink…and it is a small amount at that but I had a lot of fun putting these designs together.
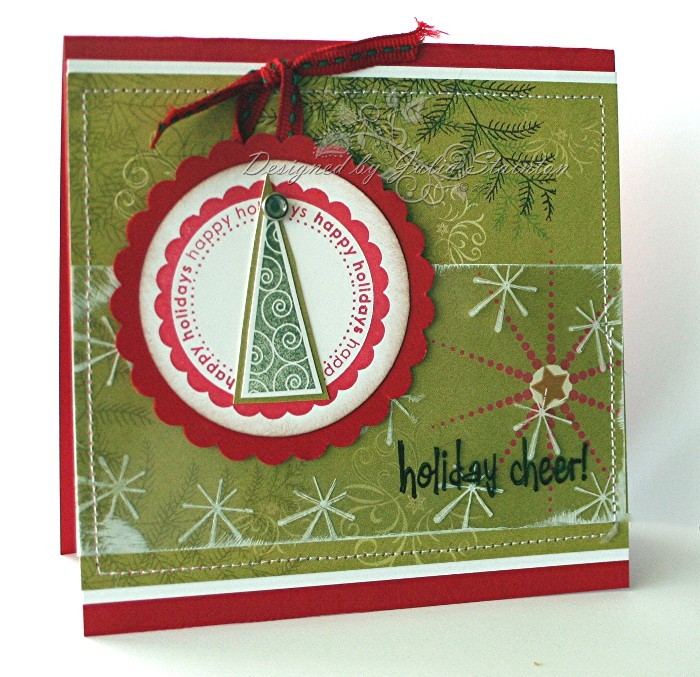
Christmas Joy

jks-oh-joy.jpg

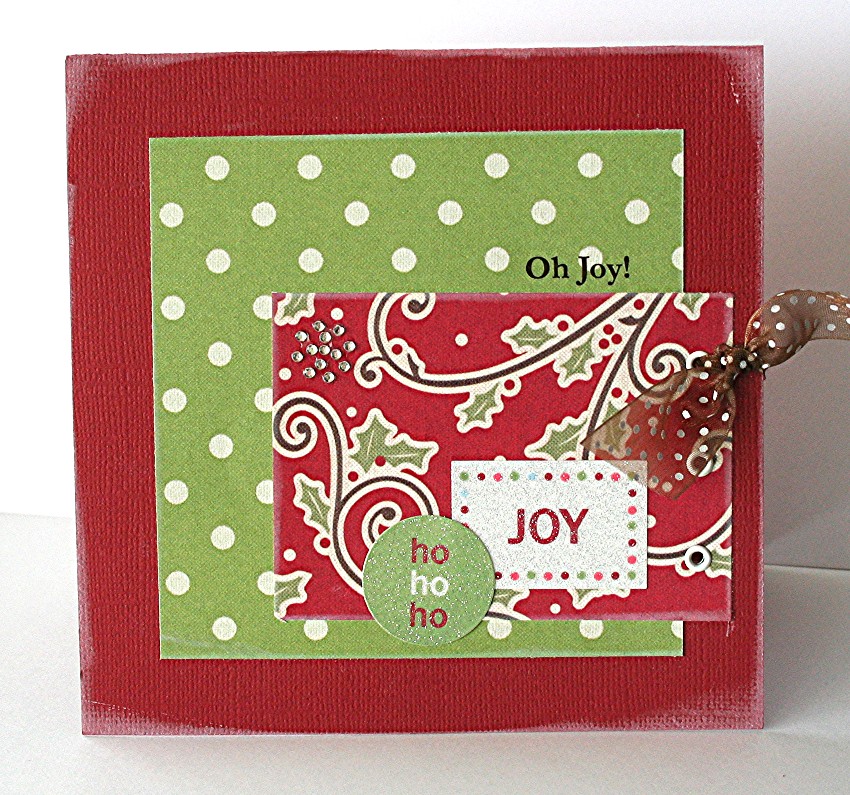
This quick simple design uses some textured cardstock and some fun glitter stickers to create a layered scrappy style card design. So quick and easy to put together with some coordinating papers and stickers…you could make a large variety of different designs for a quick set.

Supply List:

Cardstock: Bazzil Basics

Patterned Paper: Making Memories

Ink: White Craft – Stampin Up

Other: Glitter Stickers – making Memories, white eyelet, Crop-a-dile – We R Memory Keepers, Ribbon – Michael’s, snowflake rhinestone stickers – Me and My Big Ideas

jks-ho-ho-ho.jpg

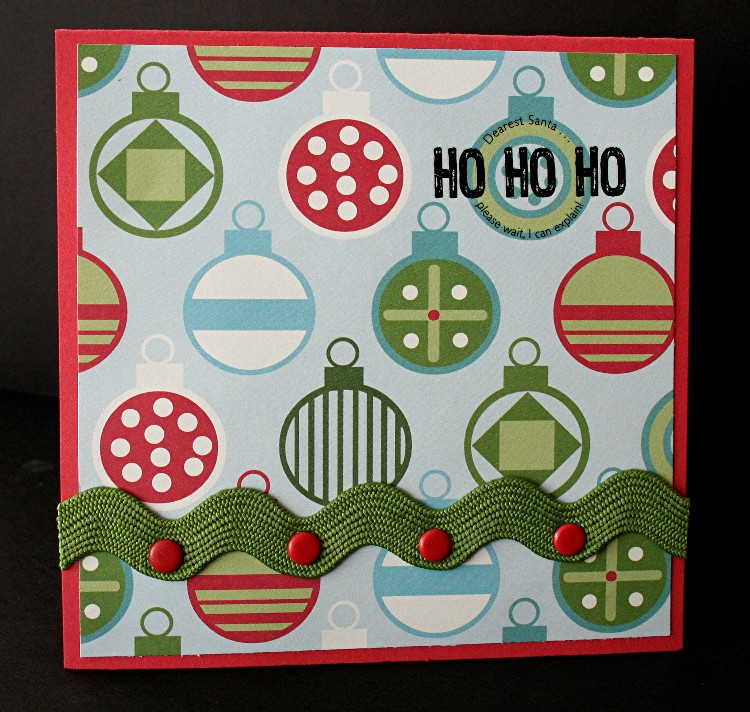
I just love this patterned paper for this card design. This card actually was designed to coordinate with my Making a List covered notebook that was published in the Paper Crafts Holiday Cards and More issue. This is a super quick card to put together. The May Arts super thick Olive Ric Rak was one of my favorite additions. I set red Making Memories snaps in it to look like berries. The Basic Grey rub-on transfer is actually my favorite part of this design. I just love how it fits perfectly onto one of the ornaments…different products, different companies but it is almost as if they were made to go together. If you can’t see it in the pic…just click on it for a larger image. It says…Please Santa…I can explain. 🙂

Have a great weekend getting ready for the holidays. Hope you take time to enjoy some simple things and perhaps even put together some fun and simple designs.

I’m having MORE computer problems this morning. Today I’m grateful I had half of this already written, and that my son just bought a laptop this week! 🙂 Unfortunately all my files and photos aren’t accessable on the other computer. Soooo….if I don’t appear much for the next few days….that is where I am. Stuck with more computer problems. LOL I’m really having a love/hate relationship with these babies!

Simply Snowflakes

I decided I was going to find some time to stamp today, even if it was just a few minutes. The Limited Supply Challenge sounded like fun. I love snowflakes…I guess the part I do have the trouble with is limiting my supplies. You know how I love my goodies! 😉 This challenge has you using snowflakes, a sentiment, neutral colors, limited layers, one embellishment, one tool…yikes! But I did it! Yes it is simple but there are time when I really like simple. What do you think?

Vanilla Peace

jks-vanilla-peace.jpg

For this design, I used my Simply Singles Lizzie Anne Designs Snowflake stamp and stamped the image panel with Sahara Sand. I then overstamped the panel with Versamark ink and embossed with Irridescent Ice embossing powder to add some sparkle. I’m hoping that the embossing powder doesn’t count as an embellishment or I’ve totally bombed the challenge! LOL

To limit my layers, I decided to punch down for the sentiment instead of layer up. After punching out an oval for my sentiment, I adhered my vanilla panel adn then stamped the Peace sentiemnt from the LAD Glad Tidings set in the space…a perfect fit. Yay…something was going right for me today! The tool I chose (could only pick one!) was a no 
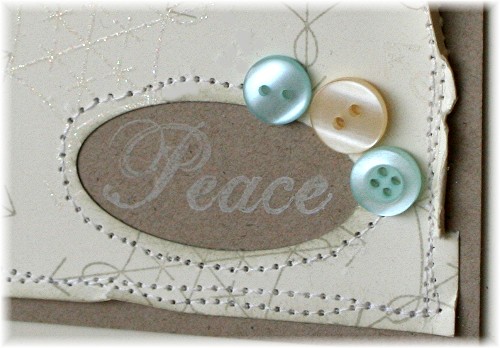
brainer…my sewing machine. I did a little free-style stitching around the edges and then crumpled up the edges with my fingers. See no tool 😉 .

For my embellishment…you could only use one type. I bought these darling little My Mind’s Eye buttons at my local scrapbook store last week and the colors are perfect. The little subtle shot of color that Jen requested…Jen…are you reading this? You can be quite demanding you know that?! LOL

And so…there it is. Honestly…I don’t think the photo does it justice but it will have to do! 🙂 Have a great weekend and have fun with that holiday shopping!

The Stamping Room Update

I thought I’d share a little stamp room update for you. I’m sure you are all not as excited as I but…please forgive me…I just had to share! 🙂 Since the last time when all you saw was a hole in the ground, I now have a gravel floor, concrete block walls, a window, it is actually framed over top with the floor joists of my new back entrance and the insulation and siding is on the new addition so we are 90% closed in. My hubby has been working day and night to get it moving along. Winter has arrived in Ontario so there is a bit of a push. Because we have a boiler/hot water heating system, I’m getting in-floor heating so it should be nice and toasty on my tootsies and won’t feel so much like a basement. Below is a pic I took yesterday afternoon. Stamping Room to the left, bedroom to the right. And my beautiful dog peeking in through the window opening. I know it doesn’t look like much yet but it has come a long way, baby! The floor is getting ready to be poured today. Can’t wait!

jks-basement-reno-floor.jpg

Thanks for putting up with me! 😉 I’m being thankful today too…with how far it has come along. That is the trick to big projects…celebrate each accomplishment along the way!

Happy Thanksgiving & a Little Stitching…

Happy Thanksgiving to my American friends this morning! I’m wishing you all a fabulous day. We have so much to be thankful for. In Canada we celebrated early in October. I always love Thanksgiving…taking the time to get together with family and friends and most of all, to remember my many blessings…health, love, family, friends, home, forgiveness. Being thankful is something I try to make part of every day. O give thanks unto the LORD; for he is good: for his mercy endureth for ever. Psalm 136:1

I decided to make a Thanksgiving card today to wish those who are celebrating a happy Thanksgiving. Also, today is Thursday so it is time for another Ways to Use It Challenge. I’ve decided to do a rerun challenge today…one of my favorite things. Probably shouldn’t be too hard to guess this one…STITCHING! 🙂 Pull out those sewing machines, do a little hand-stitching, or some faux stitching…if your design has stitching on it, it will be perfect for today’s challenge. Now I know that many of you are busy today. I know the work involved with getting a large dinner together so….if you can’t play along today…feel free to design something anytime this week. Hey…if you’re really into it, make a card or project every day! I’d love to see your ideas! Check out the challenge at WT141 If you’d like a stitching tutorial…check out my All Stitched Up.

Thanksgiving Cornucopia

jks-thanksgiving-cornucopia.jpg


This design uses some of my new Cornish Heritage Farms stamps that I got in the mail on Tuesday. I was so excited to get stamping with them! The Cornucopia is from Kim Hughes darling set, Let’s Get Stuffed. Is that appropriate for today or what?! LOL The image was colored in with my Copic Markers and then overstamped with the Weave backgrounder stamp, also by CHF. I am totally loving these backgrounders!They are so fabulous for adding texture.

My main card base is Chocolate Chip cardstock layered with this stunning Webster’s Pages patterned paper. Love the vintage look of it. I added a row of machine stitching around the panel after adhering. My sentiment panel is Kraft cardstock and is stamped with another CHF backgrounder, Weathered Wood in Real Rust ink. I decided to try stitching the May Arts ribbon down in stripes across this layer with a zig zag stitch. I think I see more ribbon stitching in my future. 😉

For my final touches, I added a little corner definition with a little free-style stitching on the bottom left corner of my image panel before adhering to my design. The little corner treatment uses a corner punch embellished with a Fancy Pants Harvest Pin tied with a scrap of that ribbon.

I hope you find some time to take me up on the challenge! Wishing you a safe and happy and thankful day!

Holiday Cheer

A little more holiday cheer….a Christmas card design to share with you today. Sorry I totally missed yesterday. There are only so many hours in the day and I tell you…I’ve been burning the candle at both ends trying to keep up. There was just so much housework to catch up on, sometimes you just have to do that and forget about stamping. 🙁 I’m sure many of you are busy cooking and cleaning as well with American Thanksgiving coming up tomorrow. I wish you all a fabulous day with lots of food, friends and family. It will be same old, same old for us as we celebrated Canadian Thanksgiving weeks ago in October. Truth be told…although I wouldn’t turn down a turkey dinner, I like celebrating in October…gives me a little more time to get ready for Christmas. I’ve been busy shopping and sorting and making lists. I like to get my shopping done before now to avoid the crowds but I’m just going to have to brave them this year I’m afraid. I AM doing really well with the Christmas cards this year as you can see. I have lots stocked up…I just have to decided which ones go where. 🙂

Holiday Cheer

jks-holiday-cheer.jpg

This is a little design I created with the Lizzie Anne Designs Holiday Cheer stamp set. So darling…love the fun look. I decided to have a little fun with some acetate and stamped the stylized snowflake onto it with white Stazon ink. I love this opaque ink and if you haven’t tried it…the white is one of the most flexible ones to get. To add to the frosty look, I also swiped the edges of the layer with the ink pad and allowed to try.

My background design is very simple and uses a 5.25″ square card base in Real Red cardstock. The patterned paper layer is a gorgeous Olive color. It is more of that awesome Webster’s Pages designer paper by Terri Conrad. After adhering my layers, I stitched around the design with my sewing machine to frame it and attach my transparency layer.

To create a fun hanging ornament, I stamped my Happy Holidays circle onto whisper whit cardstock and punched it out with a Marvy Maga circle punch. After sponging the edges, I adhered it to a scalloped circle punched with my Giga Circle punch, also by Marvy. The hip tree is stamped with Always Artichoke and cut out, matted and adhere to the center of the ornament. A little Making Memories gemstone brad adds some glitz and a little scrap of May Arts ribbon adhered with a glue dot add the tie for the ornament.

Quick Tip: When using Marvy Punches, they make it easy to layer …the Giga punch will perfectly mat a Mega size punch and so on.

Webster’s Pages, May Arts ribbon and stamps available from Jacksonbelle Embellishments.

Wishing you a fabulous day! Enjoy Thanksgiving and find a little holiday cheer in getting ready for Christmas. 🙂

Grow with Love

I thought I’d take a little break from Christmas designs and share a floral design I created not too long ago. I love the warmth of the coral flowers paired up with the vanilla and black color scheme. Just what my blog needed…a shot of color. It’s simple to create gorgeous flowers with this Three Step Daisy set by Kitchen Sink Stamps. Love all the various color combos and looks you can come up with. This card is really flexible…just by changing up the sentiment, you can use it for many occasions.

Grow with Love

jks-grow-with-love.jpg

If this design looks familiar, you may have seen it before. I originally created it for an article/review I wrote for Craft Critique on Kitchen Sink Stamps….I gave them a huge thumbs up. I was really impressed as they have some of the easiest to use polymer stamps I’ve tried.

It’s been a very busy day here. Lots of work to do that I can’t share right now. You’ll have to forgive me…I’m so exhausted tonight…I can’t even remember the patterned paper line! If someone can help a tired girl out…:) Take care my friends! 🙂

Supply List:

Cardstock: Black, Very Vanilla – Stampin Up

Patterned Paper:

Stamps: Three Step Daisy – Kitchen Sink Stamps

Ink: Groovy Guava, Rose Red, Cameo Coral, Certainly Celery, Old Olive – STampin Up

Other: Crop-a-dile – We R Memory Keepers, heart snap, velvet brad – Making Memories, ribbon (Velvet and green) – May Arts, Flower – Prima

Christmas is Coming… {C’est Bon}

Christmas is coming and I’m starting to get ready for it. Over the past week, I’ve started Christmas shopping…with large families…a huge job! I’ve also taken some time to pull out my favorite holiday baking recipes and think ahead to what I need. I love holiday baking. It just doesn’t seem to be Christmas without it. As I’ve been super busy over the past week, today I thought I’d share some of my favorite cookie and bar recipes. You know how is it always great to try out something that comes recommended by a friend? 🙂 Also, if you want a bunch of great recipes and ideas…make sure you scroll through the comments on this post….Spreading a little Christmas Cheer. So many of you were so kind to share some awesome ideas, traditions and recipes and they are really fun to look through!

Shortbread

3 cups flour

1/2 cup sugar

1 dash salt

1 1/2 cups butter, softened

Mix ingredients together in a food processor…should form a thick stiff dough. Pat into 2 8″ round pans. Mark each into 12 wedges and prink with fork. Bake at 350°F for 30 minutes. Sprinkle with sugar and cut into wedges. Remove when cool. Store in tightly sealed container.

Peanut Butter Cookies

2 cups all-purpose flour

3/4 teaspoon baking soda

1/2 teaspoon of baking powder

1/4 teaspoon salt

1/2 cup butter

1 cup peanut butter

1/2 cups brown sugar

1/2 cup sugar

1 egg

Sift flour, baking soda, baking powder and salt together. Cream butter and peanut butter together. Gradually beat in sugars. Add egg and beat until fluffy. Stir in drey ingredients. Toll dough, a teaspoonful at a time, into balls; place 3 inches apart on greased cookie sheets.. Flatten with fork and top with cut up candied cherry if desired. Bake at 375°F for 12 minutes or until golden brown.

Eggnog Cookies – Mrs. Fields recipe

2 1/4 cups flour

1 teaspoon baking powder

1/2 teaspoon cinnamon

1/2 teaspoon nutmeg

1 1/4 cups sugar

3/4 cup margerine

1/2 cup egg nog

1 teaspoon vanilla

2 large egg yolks

1 tablespoon nutmeg

Preheat oven to 300°F. In medium bowl, combine flour, baking powder, cinnamon and nutmeg. Mis well. In large bowl, cream sugar and butter with an electric mixer to form a grainy paste. Add eggnog, vanilla and egg yolks and beat at medium speed until smooth. Drop by rounded teaspoons onto ungreased cookie sheet one inch apart. Sprinkle with nutmeg if desired. Bake for 23-25 minutes. Immediately transfer to cool.

Quick Tip: Use the leftover egg whites from the above recipe to make the meringues below…

Holiday Meringues – so pretty and festive with colored sugar on top

3 large egg whites

1/4 teaspoon cream of tartar

3/4 cup sugar

1 teaspoon vanilla

Preheat over to 200°F. Line 2 cookies sheets with foil or waxed paper, wetting corners of cookie sheets to hold linings in place. Beat egg whites with mixer on medium speed until frothy. Add cream of tartar and beat until soft peaks form when beaters are lifted. On high speed, gradually add sugar one tablespoon at a time. Beat until stiff, very white and glossy. Beat in vanilla. Spoon into pastry bag fitted with large star shape tip. Pipe small mounds one inch apart on cookie sheets. Sprinkle with decors if desired. Bake 3-4 hours until meringues are dry and crisp all the way through. Cool on sheet on a wire rack. Peel off liner. Store in an airtight container at room temperature for up to 2 months.

Gingersnaps –  these melt in your mouth…one of my faves

2 cups sugar

3/4 cups margerine

3/4 cup lard

1/2 cup molasses

2 large eggs

4 cups flour

2 teaspoons ginger

2 teaspoons cinnamon

1/4 teaspoon salt

4 teaspoons baking soda

Cream and beat first four ingredients. Stir in remaining ingredients. Roll into balls. Coat with sugar and place on an ungreased cookie sheet. Bake at 350°F for 10-12 minutes. Remove from cookie sheet and cool on rack.

Happy baking! Wishing you a fabulous holiday season with lots of treats to enjoy!